
Today I’m sharing the upstairs hallway and backstairs makeover. I’ve been slowly making my way through our home room by room and after living here for 1 1/2 years I’m finally giving some attention to some of those in-between spaces.

Most recently I tackled the back stairs leading to the upstairs hallway because, as you can tell from the before pictures above, they needed a little love. Worn, grungy and dark, these stairs are the preferred route up to the kids bedrooms and weren’t very enticing (we have a front stairs too but it’s out of the way).

Some fresh paint, some stripped paint and a new railing and it’s magical once again. (Funny what a $5 new return vent cover can do for appearances.)

The super narrow doorway at 24″ wide and crusty wood handrail that was protruding almost 3″ out from the wall lead to some serious furniture moving debacles which in the end had me removing the handrail altogether about a year ago. The solution now is this fun rope handrail.

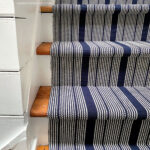
The steps themselves are one of those details to be treasured. The grooves are so worn that nearly half of the board thickness is gone from years and years of use. These steps also had multiple layers of paint and I wanted to get back down to the raw wood. Unfortunately once I started stripping it became evident that the first coat of paint was black and nearly impossible to remove it all from the grain so I ended up staining the treads dark walnut in hopes to blend the black a bit.

You can still see the wood grain and years of character but I really wanted lighter wood treads so I’m still adjusting to the darker color.

Looking up to the hallway and it’s super steep with a 10″ rise on each step which is even more reason for a handrail.

The rope is unobstrusive and adds tons of texture.


I used pipe ceiling hanger plates and split ring pipe hangers to hold the rope in place. The plates are anchored to studs with 3″ screws then the hangers are screwed in place again using 3″ screws. Insert the rope and screw the hanger shut. Knot the rope at the ends so it doesn’t slide through the hanger.
Clearly this handrail is really only for guidance and precaution.

And now my kids think we live in a pirate ship.

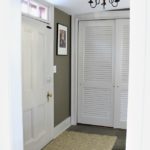
Coming up the stairs and looking to the right you can see the open hallway and barely the attic stairs.

Above is a view looking back down the steps.

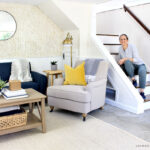
And standing further back into my son’s bedroom (yes the doors are missing and currently being painted) you can see how bright the space is now. All the walls are Benjamin Moore simply white flat and the trim is London Fog.

Keeping it real because my kids are still young and have lots of toys that need homes we have the cubby storage bins I made 4 years ago tucked under the eave. Eventually that piece will go away but for now it’s super user friendly.

All the upstairs floors are original circa 1740. I believe the entire second floor must have been one big open space because of the way the floor boards run under the walls and closets. That big wood box in the corner was used to store firewood for the wood stove that provided heat on the second floor.

And looking back towards the back stairs and into my son’s bedroom. The other door leads to a large walk in closet.

I replaced the existing boxy ceiling fixtures with these weathered copper nautical feeling flushmounts and I couldn’t be happier.

I was nervous about replacing the old two-light fixtures with single lights but the new shape and seeded glass casts so much light even with a 60 watt bulb it’s a huge improvement and keeps the hallway bright especially in the evening.

Build.com sent me the lights so fast I was still painting walls when they arrived but the installation was straight forward and easy. They have tons of lights to choose from if you’re considering new light fixtures or any other home remodeling supplies.
The open doorway on the right above leads to the kids bathroom, you can read about that makeover here where I installed cedar planks on the walls.

Turning down the hallway where I hung the replica of the historical chore chart leads to the girls bedroom on the right, the loft area and front stairs. The centrally located chimney is clearly visible here on the left side.

The chore chart is really a replica of a historical document from Orchard House where the Alcott girls were raised. It’s called the Order of Indoor Duties for Children and it’s a fun little play on history which I thought was totally appropriate to hang upstairs near the kids bedrooms.

It’s a narrow hallway here to the girls bedroom and further on to the loft area which is my kids most favorite hide out space to play.
With each roll of paint that goes on I feel more and more this house is our home and I hope I’m doing it the justice it deserves by enhancing the historical charm and keeping all the rustic details in play.
Disclaimer: I was provided product for review from Build.com but all thoughts and opinions are my own.
Wow Jaime! The stairs look so much better and I love the pirate ship rope too! 🙂 Your home has so much charm it is beautiful!
Love everything about this!
your home is such a dream!
What an amazing job! Our old house (built 1852)steps look like yours and I agree that it does give them character.
Jamie – I just spent some time review this post and your Houzz tour. You are so incredibly talented and your taste and style are impeccable. Seriously, you taste blows me away – and then your builds on top of it – you are incredibly talented my friend!
Keep warm!
Laura
Those stairs are the most beautiful thing ever! I love the light you chose and your floor boards just make me drool! The character of the space is definitely something to treasure.
I think you're living in my dream home!
LOVE your rope railing ( and will pin it because I've wanted to do one in our fixer upper and wasn't sure how )
Those floors – OMG – those floors !!!
xoxo