• Home
  • Blog
  • About
  • Contact
    • Disclosure
    • Privacy Policy
  • SHOP
  • Widget area for main menu

    • Email
    • Facebook
    • Instagram
    • Pinterest
    • Twitter
    • YouTube
  • Skip to primary navigation
  • Skip to main content
  • Skip to primary sidebar

Jaime Costiglio

build - paint - sew

  • BUILD
    • BEDS
    • BENCHES
    • DESKS
    • DRESSERS
    • GAMES & TOYS
    • SCRAP WOOD
    • SHELVES
    • STORAGE
    • TABLES
  • TOOLS
  • PAINT
    • CRAFTS
    • FURNITURE
    • HOME DECOR
  • SEW
    • GIFTS
    • HOME DECOR
    • POUCHES
  • HANDBUILT HOLIDAY
    • 2021
    • 2019
    • 2018
    • 2017
    • 2016
    • 2015
    • 2014
    • 2013
  • GIFTS
    • BABIES
    • KIDS
    • FOR HER
    • FOR HIM
    • TEACHERS
    • WEDDINGS
  • SEASONAL
    • 4TH OF JULY
    • FALL
    • HALLOWEEN
    • CHRISTMAS
    • SUMMER
    • SPRING
    • ST. PATRICK’S DAY
    • THANKSGIVING
    • VALENTINE’S DAY
    • WINTER
  • SALTBOX PROJECT
    • BATHROOMS
    • DINING ROOM
    • EXTERIOR
    • FAMILY ROOM
    • FOYER / MUDROOM
    • KIDS BEDROOMS
    • KITCHEN
    • LIVING ROOM
    • MASTER BEDROOM
    • PLAYROOM
  • SCROLL SAW

DIY X Brace Entry Bench

March 12, 2011

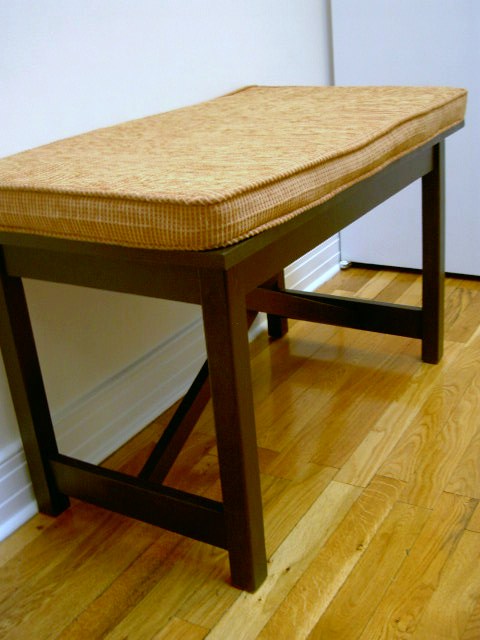
I built an entryway bench for our friends.

Using Ana White’s x bench as a guide I modified the size to fit the space.
(This bench measures 34″w x 19″h x 18″d.)
Now they have a landing spot for visitors.
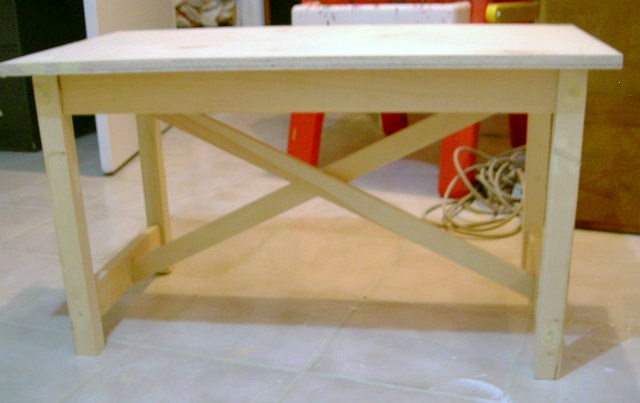
Progress pictures:

All assembled and ready to finish.

To finish I did the following:
1. one coat paint with primer (Behr French Roast, semi gloss finish)
2. sanded 120 grit, then 220 grit for ultra smooth finish
** absolutely necessary if you want a smooth, smooth surface **
3. two coats paint with primer (one could have done it but I wanted it perfect)
For the cushion:
1. Cut 2″ high density foam to fit bench:
2. Cut fabric to fit, top and bottom pieces, gutter piece and make piping:

3. Finished cushion cover:

Fits perfect in it’s new home and fun to build.

You may also like...

  • Wood & Leather Bed Free PlansWood & Leather Bed Free Plans
  • “R” is for Rolling Storage Seat“R” is for Rolling Storage Seat
  • DIY Doll Size Camp Bunk BedsDIY Doll Size Camp Bunk Beds
  • DIY Camp Bunk Bed for DollsDIY Camp Bunk Bed for Dolls
Share this post:

Filed Under: BENCHES, BUILD, DIY, FURNITURE, FURNITURE, HOME DECOR, HOME DECOR, PAINT, SEW, SEWING16 Comments

Reader Interactions

Comments

  1. Love Being A Nonny says

    March 12, 2011 at 3:27 PM

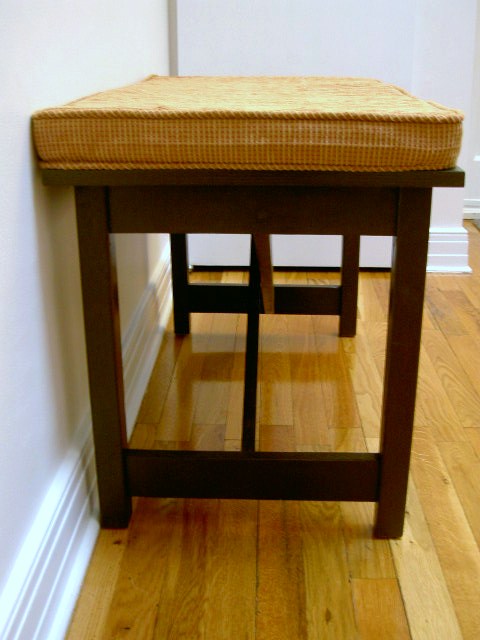
    Love it…the bench AND the cushion!

    Reply
  2. Angie says

    March 12, 2011 at 4:07 PM

    Ok, I feel like such an underachiever now…LOL. All that aside, I love the bench. Very inviting in an entryway.

    Angie
    Linen & Verbena

    Reply
  3. BeingBrook says

    March 12, 2011 at 5:36 PM

    Love the bench! I am super obsessed with benches lately and want one for every room. Love the cushion-great job!

    Reply
  4. Katy says

    March 13, 2011 at 1:05 AM

    good job! Your paint finish is impeccable! I am so lazy that i never sand my pieces very well 🙁 Details, details… so hard

    Reply
  5. Allison Shops says

    March 14, 2011 at 1:09 AM

    Your bench looks great. I'm partial to dark stain, so great call. Dropping by from Met Monday. When you have time, come see the chairs I had recovered.

    Allison
    Atticmag

    Reply
  6. pinktoesandpowertools says

    March 14, 2011 at 2:29 AM

    Love this bench and cushion–fantastic job!

    Reply
  7. Kristy Carberry says

    March 14, 2011 at 4:00 AM

    Great job! I'm a little scared of constructing things, but have no problem reconstructing. maybe one day I will be brave!

    Reply
  8. aggieam01 says

    March 14, 2011 at 1:14 PM

    Beautiful!! I have been dying to get a bench like this for our front hallway. This is great!

    Reply
  9. MMB Creations says

    March 14, 2011 at 10:54 PM

    Very nice job.

    Reply
  10. Jena @ Involving Color says

    March 14, 2011 at 11:19 PM

    Wow, I'm so impressed you made this! Looks great! Just came across your blog today and I'm a new follower.

    Reply
  11. Elizabeth (Blue Clear Sky) says

    March 15, 2011 at 2:01 AM

    Hi, I'm stopping by from Handmade Tuesday at Ladybug Blessings. Your bench turned out so well and looks very professional. Great job! Ana has the best patterns.

    Reply
  12. Janet says

    March 15, 2011 at 9:20 PM

    LOVE.IT! GREAT JOB!!!!

    http://www.craigslistqueen.blogspot.com

    Reply
  13. Grace @ Sense and Simplicity says

    March 25, 2011 at 2:59 AM

    I can't believe you are building all these pieces – I'm just so impressed. Well and a little jealous too. I would love to be able to do something like that.

    Reply
  14. Korrie@RedHenHome says

    March 25, 2011 at 3:09 AM

    Incredible. I *so* want to build a piece of furniture someday!

    Reply
  15. Delightful Order says

    March 25, 2011 at 5:19 AM

    Love it! I'm inviting you to link this to my Inspiring Thursday Party. http://delightfulorder.blogspot.com/2011/03/delightfully-inspiring-thursday-linky_23.html
    DaNita

    Reply
  16. Megan says

    March 25, 2011 at 11:40 PM

    wow. I can't believe you built that. so cool!

    Reply

Leave a Reply Cancel reply

Your email address will not be published. Required fields are marked *

Primary Sidebar

Hi! I’m Jaime

Jaime Costiglio

Hello!

Thank you for stopping by.
Join me for lots of DIY.

Read more

Get new posts via email

Handbuilt Holiday: Gift Project Plans

handbuilt holiday gift project plans

Collection of DIY gift project plans to build.

The Home Depot Tool Prospective

THD Prospective

Tools to consider for the DIYer.

Archives

The Home Depot Logo
Copyright © 2026 Jaime Costiglio · Custom site by Moonsteam Design

Privacy Policy