• Home
  • Blog
  • About
  • Contact
    • Disclosure
    • Privacy Policy
  • SHOP
  • Widget area for main menu

    • Email
    • Facebook
    • Instagram
    • Pinterest
    • Twitter
    • YouTube
  • Skip to primary navigation
  • Skip to main content
  • Skip to primary sidebar

Jaime Costiglio

build - paint - sew

  • BUILD
    • BEDS
    • BENCHES
    • DESKS
    • DRESSERS
    • GAMES & TOYS
    • SCRAP WOOD
    • SHELVES
    • STORAGE
    • TABLES
  • TOOLS
  • PAINT
    • CRAFTS
    • FURNITURE
    • HOME DECOR
  • SEW
    • GIFTS
    • HOME DECOR
    • POUCHES
  • HANDBUILT HOLIDAY
    • 2021
    • 2019
    • 2018
    • 2017
    • 2016
    • 2015
    • 2014
    • 2013
  • GIFTS
    • BABIES
    • KIDS
    • FOR HER
    • FOR HIM
    • TEACHERS
    • WEDDINGS
  • SEASONAL
    • 4TH OF JULY
    • FALL
    • HALLOWEEN
    • CHRISTMAS
    • SUMMER
    • SPRING
    • ST. PATRICK’S DAY
    • THANKSGIVING
    • VALENTINE’S DAY
    • WINTER
  • SALTBOX PROJECT
    • BATHROOMS
    • DINING ROOM
    • EXTERIOR
    • FAMILY ROOM
    • FOYER / MUDROOM
    • KIDS BEDROOMS
    • KITCHEN
    • LIVING ROOM
    • MASTER BEDROOM
    • PLAYROOM
  • SCROLL SAW

Art Cart & Caddy Free Plans

January 20, 2016

Everyone is still in organization mode so I teamed up with Ana White to bring you this art cart.  It’s perfect for storing and organizing kids art supplies.
diy art cart and portable caddy free plans

A DIY tutorial to build an art cart and portable caddy. Make this easy storage cart for all your art supplies including the removable caddy.

We think this would be a very appropriate build for any kids space.  Maybe you have the perfect spot somewhere in your home or even to build as a gift for that creative child in your life?
diy portable art caddy

Cart Details

As a bonus I have included plans down below for the removable art caddy.  The caddy allows kids to bring the supplies directly to their work table.
diy supply cart with removable caddies
Ana made this build so simple and easy you won’t believe how fast it comes together.  I choose to go natural with the finish using two coats of clear poly and I didn’t even fill in my nail holes!  Sometimes nail holes don’t bother me especially on a utilitarian build like this one.
wood art cart

Storage Supply Shelves

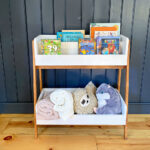
The art cart alone is beautifully simple and has plenty of space for paper, markers, crayons and supplies.  You could even add casters under the bottom shelf if you wanted to make it easy to move around!
art supplies storage cart
Our art cart was inspired by Pottery Barn Kids art cart here (no longer available):
Pottery Barn Kids art cart
image source
Their cart sells for $200 plus shipping.  I built our DIY cart for $45 and I even used select lumber so you could probably build it for more like $35 using #2 stock.
art caddy with handle free plans

Portable Art Caddy

And our removable caddy has a handle!  While the inspiration version does have a removable top tray with compartments they don’t have a handle.  Every kid wants a handle on their portable caddy I guarantee it.
kid holding art caddy
Ana has the plans for the art cart here and I have the caddy plans down below.
diy art cart and portable caddy free plans

Caddy Plans

Be sure to read through plans entirely and always follow all safety precautions when operating power tools.

art caddy plans
 

Supplies:

  • 1 – 1x3x6 pine board
  • 1 – 1×6 @ 11″ pine board
  • ¼” plywood scrap @ 11” x 12 ½”

Cut List:

  • 4 – 1×3 @ 11″ pine board (sides)
  • 1 – 1×6 @ 11″ pine board
    (handle)
  • ¼” plywood @ 11” x 12 ½” (base)
Click here for a printable PDF version of the art caddy plans.


make box shape

Step 1: Attach the sides using wood glue and 1 1/4″ finish nails.
attach base to box frame

Step 2: Attach the base using wood glue and 1 1/4″ finish nails.  Your caddy box is ready for the handle.
caddy cut out handle 

Step 3: Use a jigsaw to cut out handle piece as per sketch.  I suggest a 1” forstner bit to make the handle corners then jig saw in between.


art caddy attach handle
Step 4: Insert the handle and attach using wood glue and 1 ¼” finish nails through sides and base.  Sand well and finish as desired.
diy art cart and caddy free plans

You may also like...

  • DIY Lego Minifigures Shelf with Free PlansDIY Lego Minifigures Shelf with Free Plans
  • DIY Wall Mirror with StorageDIY Wall Mirror with Storage
  • DIY Book Rack and Toy Storage UnitDIY Book Rack and Toy Storage Unit
  • DIY Kids Play BarnDIY Kids Play Barn
Share this post:

Filed Under: BUILD, CRAFTS, DIY, FURNITURE, GAMES & TOYS, SHELVES, STORAGE4 Comments

Reader Interactions

Comments

  1. Anika Kumar says

    January 21, 2016 at 5:39 AM

    You are such an inspiration! Very cool cart and idea. I think I will be making that caddy very soon for my kids!
    Anika | http://www.littlefreemonkeys.com

    Reply
    • Monique says

      April 22, 2018 at 2:28 PM

      Where is the link to the link. I have clicked on everything and the cart does not show up. Help.

      Reply
      • Jaime says

        April 22, 2018 at 3:45 PM

        Hi Monique, The link is in the post above. Cart: http://www.ana-white.com/2016/01/free_plans/art-storage-shelf-caddies Art caddy: https://drive.google.com/file/d/0B85dRd-BoH0weVhwdUJkVDNpbnc/view
        Hope that helps.

        Reply

Leave a Reply Cancel reply

Your email address will not be published. Required fields are marked *

Primary Sidebar

Hi! I’m Jaime

Jaime Costiglio

Hello!

Thank you for stopping by.
Join me for lots of DIY.

Read more

Get new posts via email

Handbuilt Holiday: Gift Project Plans

handbuilt holiday gift project plans

Collection of DIY gift project plans to build.

The Home Depot Tool Prospective

THD Prospective

Tools to consider for the DIYer.

Archives

The Home Depot Logo
Copyright © 2023 Jaime Costiglio · Custom site by Moonsteam Design

Privacy Policy