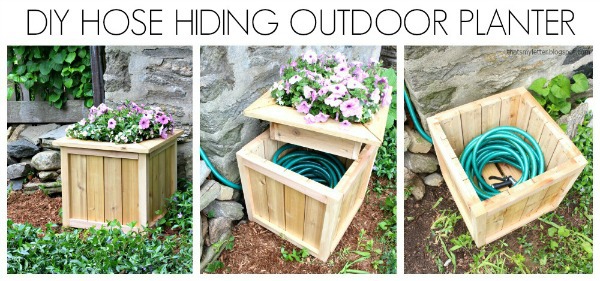
The outdoor hose, it’s a necessity for a lot of reasons. We need it for watering the flowers, running the slip’n’slide, filling the pool, when the kids want to run through the sprinkler, filling water balloons, washing the car, the list goes on and on. But we don’t always want to see that outdoor hose when it’s not in use so let’s hide it with a DIY hose hiding planter!
A DIY tutorial to build a hose hiding planter. A place to store the garden hose out of sight and a flower planter all in one complete with free plans.
Ready to get building for outdoors? Together with Kreg Tool a group of us buildy bloggers have come up with some awesome outdoor diy build projects. Today we are all sharing different projects with details on how to build your own! And my project is this very user friendly hose hiding planter.
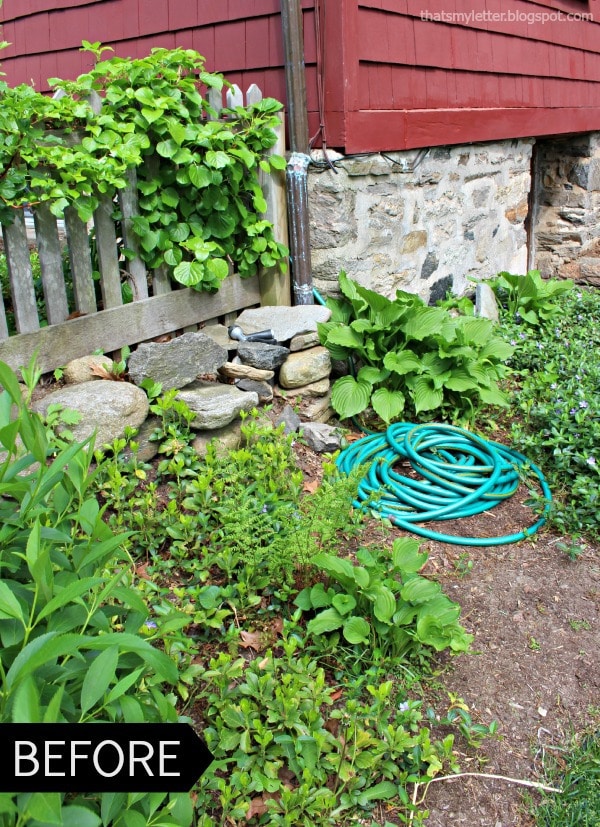
BEFORE:
This is my hot mess of a hose area in our backyard. Granted we are only entering our third summer at this home so tackling this eyesore was pretty far down on the to-do list.
The hose spigot is actually behind the fence (in the front yard) but we need the hose accessible to the backyard. It usually rests in an unsightly pile amidst hosta and ferns. At least it was wound up and neat but still not looking so pretty.
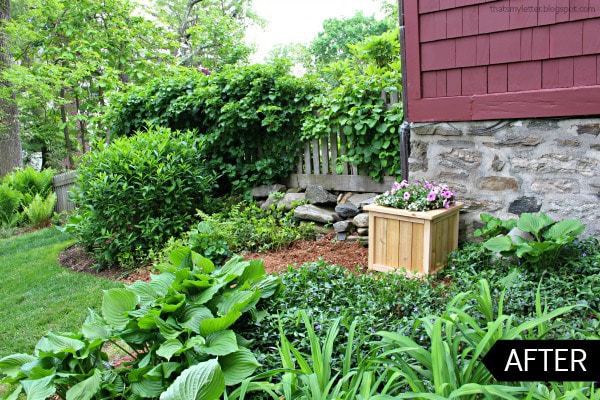
AFTER:
I decided to clean up the area and create not only a pretty spot for flowers but a place to hide the hose when not in use. It looks a bazillion times better! I’m sharing the plans on how to build your own hose hiding planter down below.
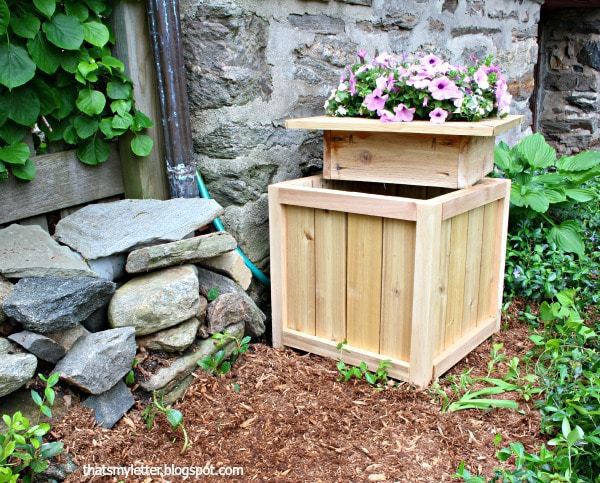
First I removed the giant hosta plant and relocated it. Then I added some fresh mulch and put the new planter in place. To access the hose you simply lift up the flower planter box and move it to the side.
The hose I used is 75 feet long and fits just right with the planter in place. We definitely don’t use the hose every day but fairly often and I don’t mind winding it back into the planter to keep things neat.
Planter Plans:
Below are the plans and step by step instructions to build this hose hiding planter.
Materials:
- 4 – 1x4x8 cedar board
- 2 – 1x2x8 cedar board
- 1 – 1x6x8 cedar board
- 1 – 2x2x8 pine board
- wood glue
- kreg jig
- 1 ¼” exterior screws
- 1 ¼” pocket hole screws (recommend Kreg Blue-Kote)
Cut List:
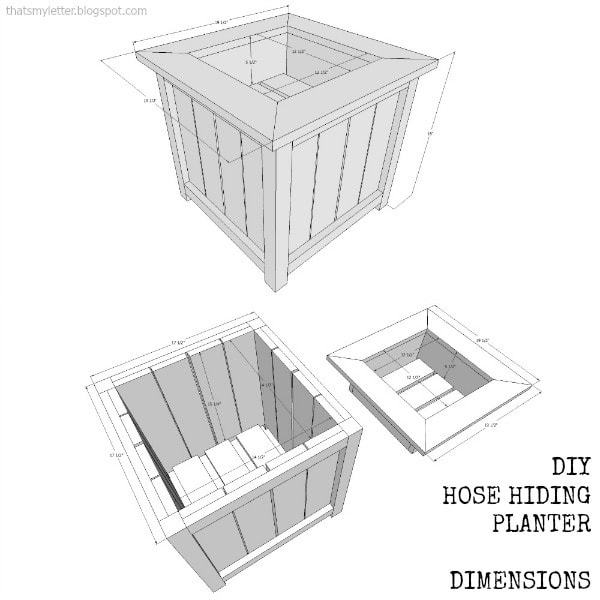
- 16 – 1×4 @ 16” (side slats)
- 8 – 1×2 @ 14 1/2” (side cross supports)
- 4 – 2×2 @ 17 1/4” (legs)
- 3 – 1×4 @ 14 1/2” (base slats)
- 2 – 1×6 @ 14” (planter box long sides)
- 2 – 1×6 @ 12 1/2” (planter box short sides)
- 4 – 1×4 @ 19 ½” ends cut at 45 miter not parallel (box trim)
- 3 – 1×4 @ 12 ½” (planter box base slats)
Click here for a PDF version of the plans.
Always use safety and caution when operating power tools!
Steps:
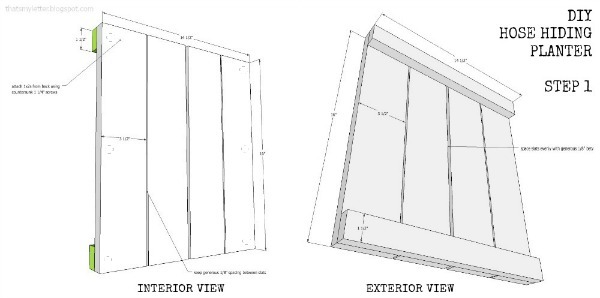
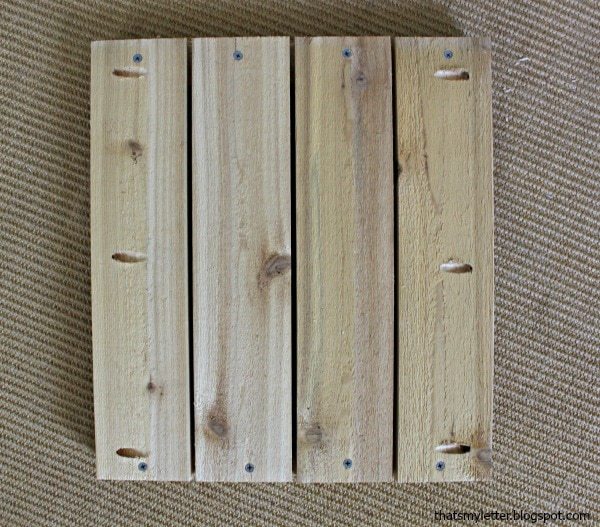
Step 1: Make sides. Predrill pocket holes into two slats at edges. Attach slats to cross supports using glue and 1 ¼” countersunk screws from the interior.
Make 4 pieces.
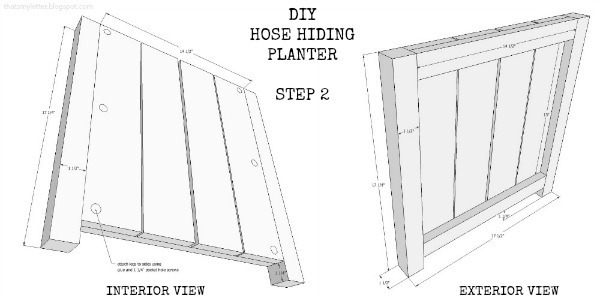
Step 2: Legs. Attach short side panels to legs using glue and 1 ¼” pocket hole screws. Make 2.
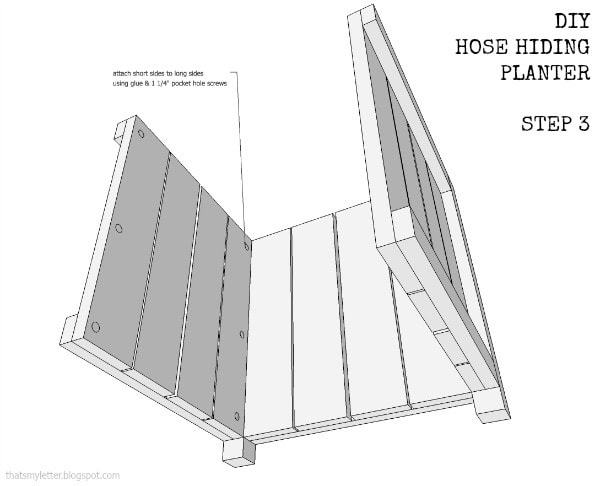
Step 3: Make box. Attach two remaining short side pieces to legs using glue and 1 ¼” pocket hole screws. Repeat for other side panel to complete the box.
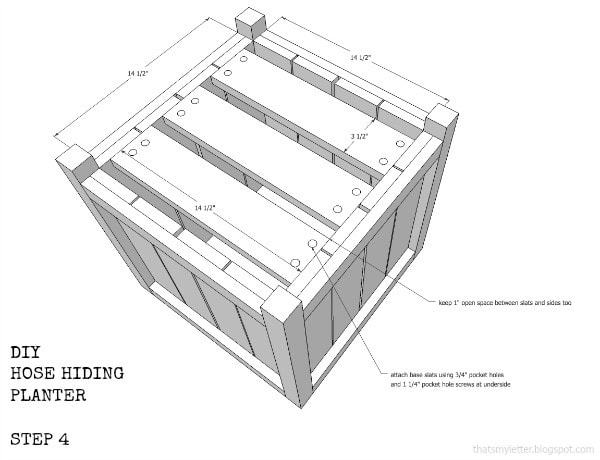
Step 4: Base slats. Attach base slats to box from underside using 1 ¼” pocket hole screws. This completes the planter base portion.
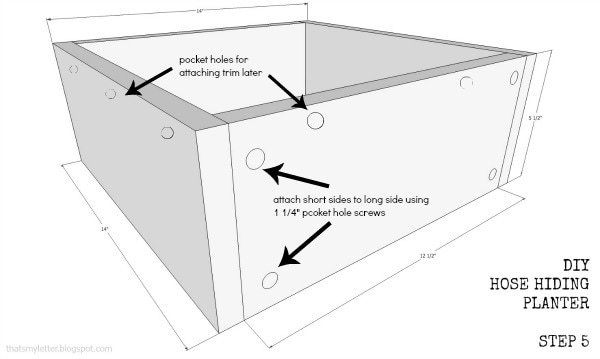
Step 5: Planter box. Predrill pocket holes for attaching trim to box side pieces prior to construction. Attach short sides of box to long sides using glue and 1 ¼” pocket hole screws.
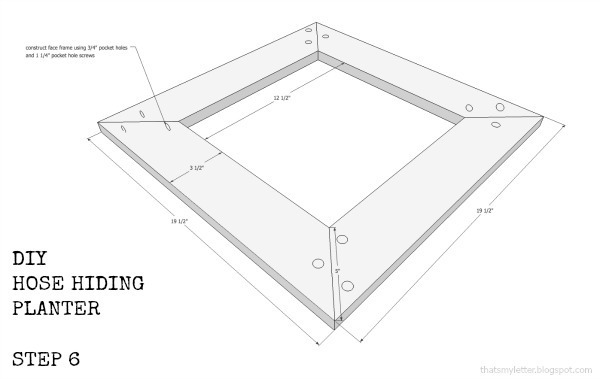
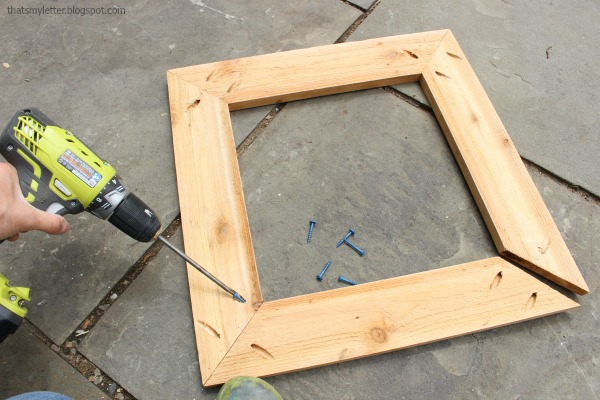
Step 6: Planter box trim. Attach trim pieces together to make a ‘frame’ using glue and 1 ¼” pocket hole screws.
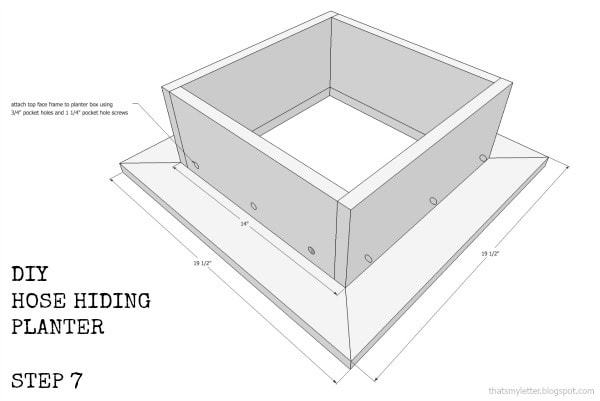
Step 7: Trim. Attach planter box to underside of trim using 1 ¼” pocket hole screws.
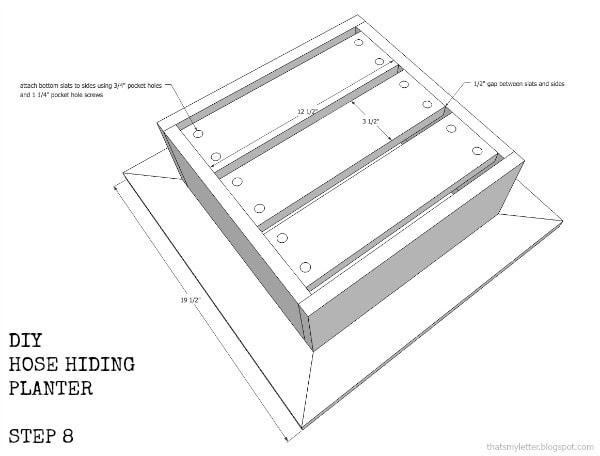
Step 8: Base slats. Attach planter box base slats from underside using glue and 1 ¼” pocket hole screws.
Filling the Hose Hiding Planter:
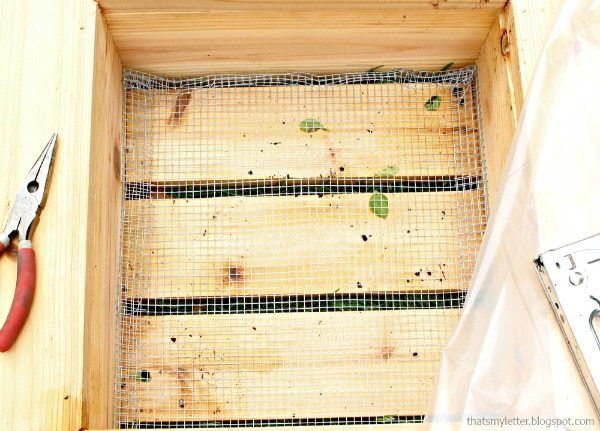
I lined the top planter portion with hardware cloth. Then I stapled plastic sheeting over the hardware cloth. This will keep the soil and plants moist and prevent anything from falling through the slats.
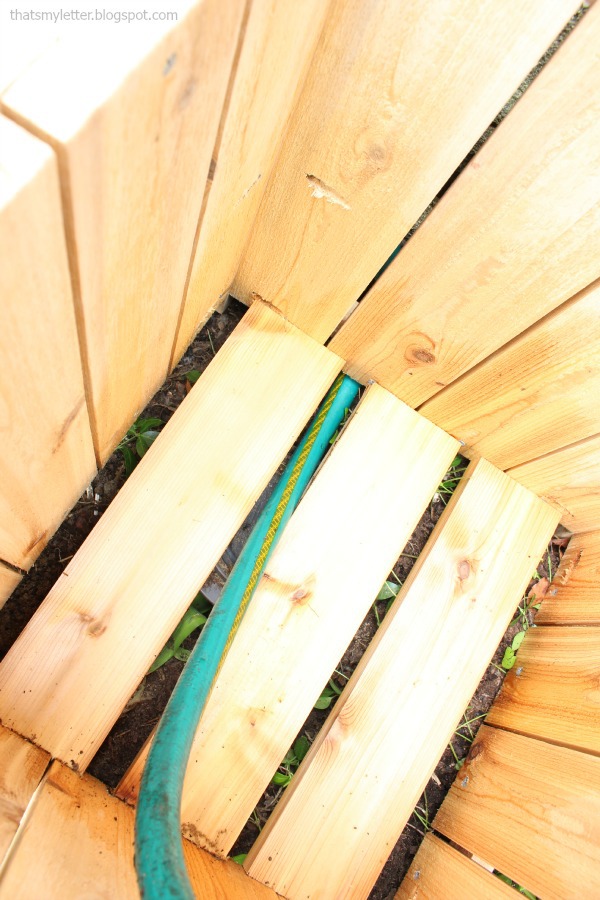
Feed the hose through the open slats in the large base and wind it up inside the box. Plop the planter down in place and your hose is now hidden but still accessible.
For more outdoor projects using Kreg tools check out these posts:
- Outdoor Storage Bench: Amber @ Averie Lane
- Outdoor Buffet: Amanda @ The Tale of an Ugly House
- Planter: Ashley @ Cherished Bliss
- Outdoor Storage Box: Jenn @ Build-Basic
- Hanging Bed Porch Swing: April @ Wilker Do’s
Disclaimer: I have partnered with Kreg Tool to bring you this hose hiding planter. I have received compensation and/or materials for this project however all thoughts and opinions are my own.
Thanks for joining me for this hose hiding planter project. Please leave any questions in the comments below and be sure to follow me on social media for sneak peeks, tools and project inspiration:


Brilliant!
Love it! A solution to a problem I have! Thank you.
What a great idea, Jaime! So much prettier than any hose hider I've seen.
This is such a great idea. I need to make one of these. I hate seeing the hose out in the yard.
What if you cut a hole in the side and made it large enough to fit one of the crank hose reels inside??? No more rewinding the hose by hand. I might have to get hubby and son in on the design of that!!
Yes great idea. I think the flower pot would be cumbersome to move every time you need the hose.
Hi,
Can you fix the link for the .pdf file? I'd apprecaite it. It says "
Google Drive – The app is currently unreachable."
Thank you!
Jim
@Jim I just checked the link and it seems to be working fine. Try copy and paste the direct url: https://drive.google.com/file/d/0B85dRd-BoH0wQ3lLWElVSWxDUmM/view?usp=sharing Hope that helps.
Is this still available in PDF? When I click on your link, it says No Preview Available and above that File is in Owners Trash.
Hi Anthony, Yes the plans are still in PDF format. I checked all the links and they work for me. Try here: https://drive.google.com/file/d/0B85dRd-BoH0wblF4QWZGVGxNUVk/view?usp=sharing
Couple of observations: Your cut list says 12 – 1×4 @ 16" side slats, but you use 4 per side. Since the box has 4 sides, you need 16 of these. This also means the materials list needs to be adjusted to add another 1×4 (could add 1 – 1x4x6). You could also get by with a 1x6x6 instead of 1x6x8 to reduce excess materials.
Thank you @mz for catching the error. I have updated both the cut & materials lists. Hope you're enjoying your planter!
This is such a cool idea! The tutorial looks great, thanks for sharing! Featured on Ana-White.com today!
"Ana White and Team"
This is a brilliant idea. this is a really stupid question but I'm new to all DIY, how to read the numbers in material list, and cut list?
Made this planter over the weekend and it is very nice. Total cost for all material was under $20.00, but you've got to be careful which cedar you choose. Also, my cedar boards did not come in 1×4, 1×6, etc and I had to cut to size. Kreg pocket kit can run $20.00, so I did the pocket screw holes by hand. One final thought The planter is smaller than I expected and I will have a difficult time putting my hose in it each time. I am going to investigate one of those hoses that "shrink" when not being used.
Excellent project! Think I'll have a go at this soon. Is that 1/4" hardware cloth you're using to line the planter?
Thanks for the plans…
Did you make it so the wasps and hornets don’t make nests inside?
Hi Glenn, I’ve been using this hose storage planter for 3 summers now and I’ve had zero wasp or hornet nests inside.
Planning to make a slightly larger version and put a lock on it so that I can keep my miter saw, jig saw, and sander outside, but also keep them safe.
Great idea, make sure it’s weatherproof to keep your tools safe from the elements.
Would like DIY instructions for this! Awesome design!
Hi Charlene, the instructions are above within the post or if you would like a printable PDF version it’s here: https://drive.google.com/file/d/0B85dRd-BoH0wblF4QWZGVGxNUVk/view
I love this planter box and was wondering how a bench could be added between 2 of these. We go to horse shows and have to decorate our stall area and need 2 portable planter boxes similar to this with storage in the bottom and then the plants on top that can be removed and a bench in between the boxes.
Hi Heather, Thank you for your nice comments on my planter box. I think if you wanted to add a bench I would make it a separate piece and just place it between the two boxes. There’s lots of outdoor bench plans online that will work great. Good luck!
This is lovely. I will be making this within the next two weeks. My plastic one died and they are so expensive to buy and they have no personality. I’m thinking about putting a hinge on the top and removing the planter and just making it so I can sit on it. Another idea was to leave the planter and put another top with a hinge to use that space as a storage area for the different nozzles I have. I will paint it white to match the exterior of the house. I’m so excited about this project! Thank you so much for sharing!
Hi Jaimie,
Thank you ever so much for publishing plans for this awesome planter. Materials are all cut and almost ready to go but I’ve encountered a minor issue which I’d really appreciate some help with.
The text (measurements and notes on the interior and exterior view on the Step 1 image is a tad illegible.
Specifically, I’m looking to confirm the dimensions and to understand the spacing required between the slats.
Appreciate if you or anyone else can clarify.
Thanks !