 How I built a wall hutch above my kids built in desks in the playroom.
Ana White has come through again! Plans for a lovely 3 drawer wall hutch that fits perfectly above the schoolhouse desks or any desk for that matter.

Inspired by Ballard Designs 3-drawer hutch:

Ana drew up the plans and I built two units for about $80 each.

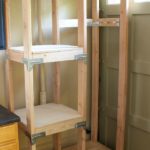
Each unit has 3 generous sized drawers that don’t require drawer slides! (or hardware if you choose):


I trimmed out the top in basic crown molding for a finished look.

And added corkboard in between the hutches for hanging artwork:
(See the schoolhouse desk plans here.)

The drawer pull hole was made using a 1 1/2″ spade bit and the backing is wide beadboard (or wainscot paneling).

There is a bit of a funky spot on the far left side that I should explain. I choose to keep the built in media component cabinet, which we are not using currently, because it’s a nice little feature of our home and I think in the future it might be useful. In addition there’s a return vent which I had to work around so keeping the hutch flush with the media cabinet allowed for enough vent space.

This is how the wall started when we moved in:

And now:
Thank you to Ana for making the schoolhouse desk and hutch plans which transformed a completely unused space into something totally functional and organized.
A true haven for my kids who now have their own workspace.

Here’s how to build the wall hutch:
1. Follow Ana’s plans for cuts and construction.

2. Prime and paint one coat high gloss white enamel.
3. I choose to install a 1×2 cleat at the base in addition to screwing through the top 1×2 on the hutch.
Use 3″ screws directly into the studs:

4. Hang the shelves:

5. Install crown molding and paint the final coat.


you are so crazy talented. that's all. 🙂
Jaime just when I thought this space couldn't possibly be any better …you did! This is incredible. Your talents are endless.
This is SO cool, Jaime! Love the bulletin boards you squeezed into the space as well.
WOW, this is such a clever idea.
I want to move in to your house! That work space is beautiful and you did a gorgeous job. Wow!
I love it!! great job! 🙂
simply put, this just rocks!
Love it! Amazing job!
Love it! Amazing job!
What a super DIY! Love it!
Jamie, they look great! You did a fabulous job on these! I need a couple of these for my house!
I’d love it if you linked this up over at Living Well Spending Less for Thrifty Thursday this week! http://www.livingwellspendingless.com/category/thrifty-thursday/
I LOVE this!!! When I build my new house I am going to make sure that this is included! I love everything about it!!
I found you at Nifty Thrify Sundays and I am so glad I did!! Now following you via Bloglovin and Google!!
Kate @ Uniquely Undone
uniquelyundone.blogspot.com
Love your blog. I just followed you and hoping you'll follow back 🙂
http://thecraftiestallie.blogspot.com/
Those look great!
this is exactly what i'm looking for…. now if only i can find someone to build it.
This space is wonderful! So clean, bright and organized! Could you share the color of the yellow chairs, please? 🙂
It's beautiful AND functional! I'd love to know – where did you purchased the chairs from? Thanks!