• Home
  • Blog
  • About
  • Contact
    • Disclosure
    • Privacy Policy
  • SHOP
  • Widget area for main menu

    • Email
    • Facebook
    • Instagram
    • Pinterest
    • Twitter
    • YouTube
  • Skip to primary navigation
  • Skip to main content
  • Skip to primary sidebar

Jaime Costiglio

build - paint - sew

  • BUILD
    • BEDS
    • BENCHES
    • DESKS
    • DRESSERS
    • GAMES & TOYS
    • SCRAP WOOD
    • SHELVES
    • STORAGE
    • TABLES
  • TOOLS
  • PAINT
    • CRAFTS
    • FURNITURE
    • HOME DECOR
  • SEW
    • GIFTS
    • HOME DECOR
    • POUCHES
  • HANDBUILT HOLIDAY
    • 2021
    • 2019
    • 2018
    • 2017
    • 2016
    • 2015
    • 2014
    • 2013
  • GIFTS
    • BABIES
    • KIDS
    • FOR HER
    • FOR HIM
    • TEACHERS
    • WEDDINGS
  • SEASONAL
    • 4TH OF JULY
    • FALL
    • HALLOWEEN
    • CHRISTMAS
    • SUMMER
    • SPRING
    • ST. PATRICK’S DAY
    • THANKSGIVING
    • VALENTINE’S DAY
    • WINTER
  • SALTBOX PROJECT
    • BATHROOMS
    • DINING ROOM
    • EXTERIOR
    • FAMILY ROOM
    • FOYER / MUDROOM
    • KIDS BEDROOMS
    • KITCHEN
    • LIVING ROOM
    • MASTER BEDROOM
    • PLAYROOM
  • SCROLL SAW

DIY Trug

July 11, 2011

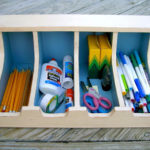
Let’s make a kids trug for toys, books, games, and more.  I have free plans down below for you to make this DIY trug.

wood trug tutorial

A DIY tutorial to build a wood trug. Make this storage trug perfect for all kinds of clutter with an easy to carry handle using my plans.

kids toy trug

Awhile back I made these wood caddies here to use as Easter baskets.

wood Easter caddies

Easy Access Caddies

But I wanted something with easier access for kids so I modified the curve of the sides for a more open look.  The concave curve on the ends actually makes the trug much more user friendly than the caddy.

empty storage bin
kids toy storage
Below are step by step instructions to make a wood trug.  Always follow all safety precautions when using power tools.
wood trug dimensions

Supplies:

  • 1 – 1x8x6 pine board
  • 1 – ¼” plywood scrap @ 13 ½” x 7 ¼”
  • ¾” dowel @ 13”l
  • 1 ¼” finish nails
  • ¾” finish nails
  • wood glue

Cut List:

  • 4 – 1×8 @ 12” pine board (sides & ends)
  • 1 – ¼” plywood 13 ½” x 7 ¼” (base)
  • 1 – ¾” dowel @ 13” (handle)
Click here for printable PDF version of the trug plans.

curved end dimensions

Step 1: Make curved ends as per sketch.  Predrill both ends for the handle using a ¾” spade bit going only ½” deep.
Make 2.

drilling holes for handle
attaching end to sides

Step 2: Attach sides to end using wood glue and 1 ¼” finish nails.

placing handle in position

Step 3: Insert handle into predrilled hole in end and secure using wood glue and 1 1/4″ finish nails.  Shot the nail in from the end directly into the handle.

attaching second side

Step 4: Attach other end piece using wood glue and 1 ¼” finish nails.  Then secure the handle with a finish nail.

attaching base to sides

Step 5: Attach the base using wood glue and 3/4″ finish nails.

wood trug painted

Wood Trug Finish Details

To finish the wood trug paint as desired.  Then to add the monogram print out the lettering (I used American typewriter font).  Position the print out on the side of the trug.  Then trace the letters with a ballpoint pen leaving a slight indent in wood.
how to add personalization without vinyl stencil
Paint inside the indent and seal with Minwax clear satin poly.
how to add personalization without vinyl stencil
four year old carrying trug full of toys
diy kids trug
wood trug for kids side view

Inspired by this wood caddy from Pottery Barn Kids:

pottery barn inspiration
(Not available anymore.)

wood trug for kids with free plans

This is a gift for our neighbor, hope he enjoys it!  You can see it all wrapped up here.
wood trug for kids with free plans

You may also like...

  • DIY Kids Play BarnDIY Kids Play Barn
  • DIY Flatware Storage BoxDIY Flatware Storage Box
  • DIY 18″ Doll Trundle BedDIY 18″ Doll Trundle Bed
  • DIY Treehouse Dollhouse & Furniture PlansDIY Treehouse Dollhouse & Furniture Plans
Share this post:

Filed Under: BUILD, DIY, GAMES & TOYS, GIFTS, HOME DECOR, KIDS, PAINT, SCRAP WOOD13 Comments

Reader Interactions

Comments

  1. Cassie @ Primitive & Proper says

    July 11, 2011 at 1:56 AM

    that looks great, jaime! so nice that you can just build that stuff… i wish i had that patience!

    Reply
  2. Crystal @ Ordinary Days says

    July 11, 2011 at 3:11 AM

    That is just adorable! You are very talented. 🙂

    Reply
  3. Erin says

    July 11, 2011 at 4:05 AM

    That turned out super cute!

    Reply
  4. joetterer says

    July 11, 2011 at 5:11 PM

    scolling down from the first trug pic to that ADORABLE shot of the boy with captain america stuff=priceless!

    http://www.minnesotajunker.blogspot.com

    Reply
  5. [email protected] Road says

    July 11, 2011 at 5:24 PM

    He'll love it! It's so cute, and kids love to tote their stuff around.

    Reply
  6. Jamie says

    July 12, 2011 at 12:07 PM

    whoa! I never would have imagined I could make something like this! I'm pinning it right now 🙂

    Reply
  7. Amanda says

    July 12, 2011 at 7:27 PM

    It looks fantastic, I want to knock a whole bunch up! So many uses around the house for these.

    Reply
  8. adventuresindinner says

    July 13, 2011 at 2:09 AM

    Clever! I need another idea for the endless toy storage in the basement.

    Reply
  9. Deanne says

    July 13, 2011 at 3:37 AM

    these are great, I might have to make some for my little boys and girl!

    Reply
  10. silly eagle books says

    July 14, 2011 at 2:15 PM

    I love this as a next-to-the-bed book trug. 🙂 thanks for sharing!

    vanessa

    Reply
  11. Rachel says

    August 1, 2011 at 4:18 AM

    Wow I love that you made this from scratch. It really is so cute! I would love it if you would stop by and link up this post with the crafty link party I recently started at Lines Across My face.
    🙂 Rachel
    http://linesacrossmyface.blogspot.com/2011/07/craft-link-party-2-cure-for-common.html

    Reply
  12. Jen Woodhouse says

    January 30, 2013 at 6:42 PM

    This is adorable. Does the dowel slide in and out? I know you put stoppers on the ends, but I noticed they're on the inside of the trug, not the outside. Just wondering why you chose to put them on the inside instead of the outside…?

    Reply

Leave a Reply Cancel reply

Your email address will not be published. Required fields are marked *

Primary Sidebar

Hi! I’m Jaime

Jaime Costiglio

Hello!

Thank you for stopping by.
Join me for lots of DIY.

Read more

Get new posts via email

Handbuilt Holiday: Gift Project Plans

handbuilt holiday gift project plans

Collection of DIY gift project plans to build.

The Home Depot Tool Prospective

THD Prospective

Tools to consider for the DIYer.

Archives

The Home Depot Logo
Copyright © 2023 Jaime Costiglio · Custom site by Moonsteam Design

Privacy Policy