• Home
  • Blog
  • About
  • Contact
    • Disclosure
    • Privacy Policy
  • SHOP
  • Widget area for main menu

    • Email
    • Facebook
    • Instagram
    • Pinterest
    • Twitter
    • YouTube
  • Skip to primary navigation
  • Skip to main content
  • Skip to primary sidebar

Jaime Costiglio

build - paint - sew

  • BUILD
    • BEDS
    • BENCHES
    • DESKS
    • DRESSERS
    • GAMES & TOYS
    • SCRAP WOOD
    • SHELVES
    • STORAGE
    • TABLES
  • TOOLS
  • PAINT
    • CRAFTS
    • FURNITURE
    • HOME DECOR
  • SEW
    • GIFTS
    • HOME DECOR
    • POUCHES
  • HANDBUILT HOLIDAY
    • 2021
    • 2019
    • 2018
    • 2017
    • 2016
    • 2015
    • 2014
    • 2013
  • GIFTS
    • BABIES
    • KIDS
    • FOR HER
    • FOR HIM
    • TEACHERS
    • WEDDINGS
  • SEASONAL
    • 4TH OF JULY
    • FALL
    • HALLOWEEN
    • CHRISTMAS
    • SUMMER
    • SPRING
    • ST. PATRICK’S DAY
    • THANKSGIVING
    • VALENTINE’S DAY
    • WINTER
  • SALTBOX PROJECT
    • BATHROOMS
    • DINING ROOM
    • EXTERIOR
    • FAMILY ROOM
    • FOYER / MUDROOM
    • KIDS BEDROOMS
    • KITCHEN
    • LIVING ROOM
    • MASTER BEDROOM
    • PLAYROOM
  • SCROLL SAW

“S” is for Styrofoam

November 19, 2011

Glittered snowflake ornaments made from STYROFOAM™ Brand Foam.

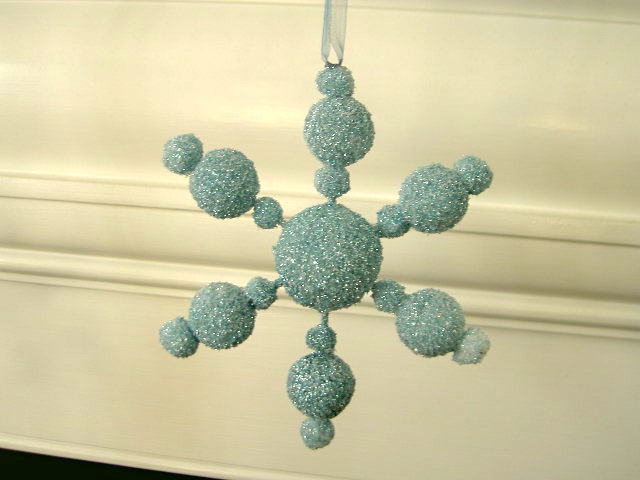
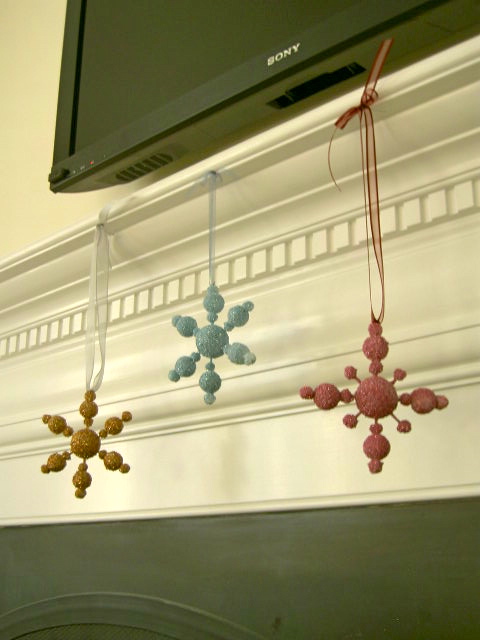
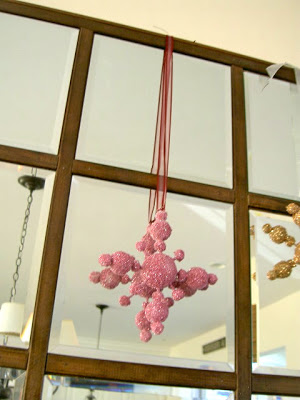
Simple, easy ornaments you can make to add sparkle anywhere for the holidays.

Inspired by the large bead snowflake from Pottery Barn:
You could glitter these any color to match your decor.

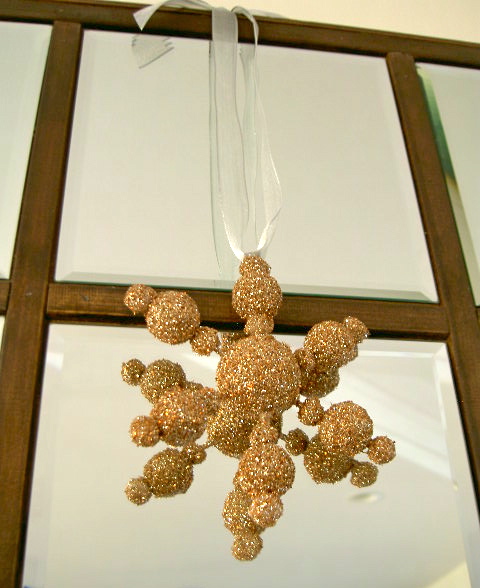
Here’s how I made the ornaments:


Supplies needed:

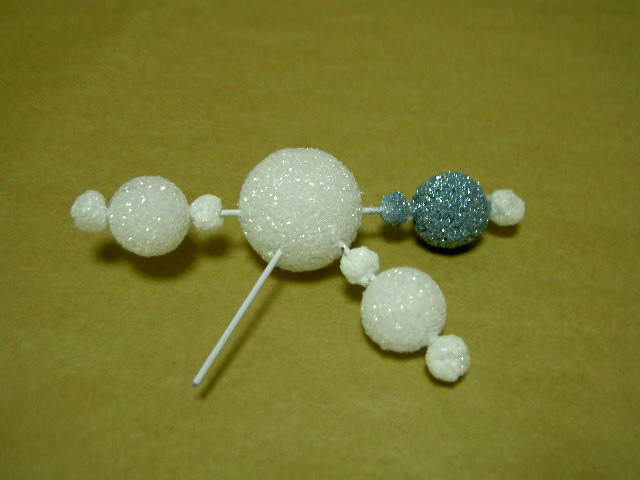
STYROFOAM™ Brand Foam:
– 1″ balls
– 1 1/2″ balls
– flat sheet goods (any size)

– Krylon spray glitter

– loose glitter

– wire hangers (& wire cutters)

– hot glue gun

– tiny measuring spoons or melon baller

1. Begin by cutting the wire hanger into pieces, one 5″ piece and 4 – 2 1/2″ pieces:

2. Prepare the smaller balls.
Using a metal measuring spoon scoop out a small ball shape from the flat sheet:

Dig down deep and then twist in a circular motion:

This is what comes out:

3. Take the ball and roll it between your hands like a meatball to smooth the edges and achieve a nice rounded shape:
4. Make at least 6 1/2″ balls and 6 3/4″ balls:
5. Begin assembly.
Use the 5″ wire piece and slide the balls on in this order:
(Use a drop of hot glue on the wire then slide the ball over the glue.)
6. Take the 2 1/2″ wire and poke into side of large center ball.
Add same balls into place.
7. Repeat on other side for equality:
8. Spray the glitter spray paint onto the balls, then sprinkle loose glitter onto the paint:
(Do this in sections over a scrap paper to collect glitter for re-use.)
9. Make a resting cradle for the center ball with straight pins to let paint/glitter dry:
10. Hang using ribbon and a straight pin glued into the outer most ball:
Ready for Christmas.

This project was recently part of the Handmade Holiday series at Under the Table and Dreaming:

UndertheTableandDreaming

Check out all the STYROFOAM™ Brand Foam projects from the series, there are a lot of great ideas, especially using the cone shape for trees.

I was one of the few who made ornaments.

A little STYROFOAM™ Brand Foam can go a long way.

Disclaimer: The STYROFOAM™ Brand Foam materials used in this project were provided by The Dow Chemical Company.  The opinions in the post are entirely my own and I have not been paid to publish this project.

You may also like...

  • Cross Stitch Monogram Ornament PlacecardCross Stitch Monogram Ornament Placecard
  • DIY Wedding Cake Ornament FavorsDIY Wedding Cake Ornament Favors
  • DIY Modern Tree with OrnamentsDIY Modern Tree with Ornaments
  • “P” is for Paper Bag Ornaments“P” is for Paper Bag Ornaments
Share this post:

Filed Under: CHRISTMAS, CRAFTS, DIY, SEASONAL10 Comments

Reader Interactions

Comments

  1. melanzana says

    November 19, 2011 at 8:40 PM

    Prekrasno!!!!hvala za tutorial….

    Reply
  2. [email protected] Road says

    November 20, 2011 at 4:14 AM

    Those are really cute! Who knew you could make your own Styrofoam balls?

    Reply
  3. sabrymagic says

    November 20, 2011 at 1:20 PM

    Sono bellissime queste tue decorazioni…..
    sei veramente molto brava:)
    Un bacio
    Sabry!!

    Reply
  4. Jenny @ Simcoe Street says

    November 21, 2011 at 10:21 PM

    Wow, this looks sooo great! Love how little ornaments turned out.

    Jenny
    http://www.simcoestreet.blogspot.com

    Reply
  5. cheapcraftymama says

    November 22, 2011 at 12:35 PM

    Those are very cute and look fun to make!

    Reply
  6. shopannies says

    November 22, 2011 at 11:30 PM

    love these I think I will make some to hang from my picture window thanks

    Reply
  7. Shannon says

    November 23, 2011 at 3:21 AM

    That's the best use of styrofoam balls I've ever seen!!
    Shannon
    http://www.akadesign.ca

    Reply
  8. Sherika Lovett Alston says

    November 25, 2011 at 12:09 AM

    What a beautiful idea!! I love them! You have to come link up over at passionatelyperfect.com! We also have a giveaway going on!!

    Reply
  9. Kerryanne English says

    November 25, 2011 at 3:45 AM

    They look fantastic and probably an easy enough project for the kids to tackle.

    I'd love it if you could link this project up at my Simply Christmas event at: http://shabbyartboutique.blogspot.com/2011/11/inspiration-friday.html

    Reply
  10. cheapcraftymama says

    December 6, 2011 at 3:44 PM

    Love these! I featured them on "Top 10 Ornaments to Make" @ http://www.cheapcraftymama.com! Feel free to stop by and grab a button to show that you are featured!

    Reply

Leave a Reply Cancel reply

Your email address will not be published. Required fields are marked *

Primary Sidebar

Hi! I’m Jaime

Jaime Costiglio

Hello!

Thank you for stopping by.
Join me for lots of DIY.

Read more

Get new posts via email

Handbuilt Holiday: Gift Project Plans

handbuilt holiday gift project plans

Collection of DIY gift project plans to build.

The Home Depot Tool Prospective

THD Prospective

Tools to consider for the DIYer.

Archives

The Home Depot Logo
Copyright © 2023 Jaime Costiglio · Custom site by Moonsteam Design

Privacy Policy