How to make a sliding barn door using inexpensive hardware

It seems everyone wants the sliding barn door look, what’s not to love? Do a little research on sliding barn doors and you’ll soon find out – the hardware is very expensive AND not sold in your hardware store either.
Thankfully there are clever folks out there who’ve figured out an inexpensive solution using readily available hardware!

Kristi at Addicted 2 Decorating posted these sliding doors above from Crisp Interiors (along with lots of other similar ideas!) and I knew right away I needed to do this in my girls bedroom.

Using the existing door I simply took it off the hinges, stripped the paint, sealed it up and rehung the door as a sliding barn door with some plumbing parts and wheels.

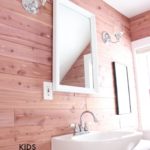
Stationary 2″ wheels keep the door on track at the bottom.

Here the door is closed and obviously not perfect because we live in a 1740 saltbox farmhouse where none of the walls or floors are square and level (I don’t even think the door is actually square) hence the imperfections.

Ready for a before and after?

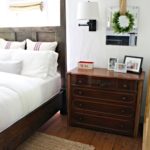
The girls bedroom hadn’t been touched since we moved in over a year ago.

I removed the wallpaper, painted the walls a very pale pink, stripped the trim and doors, added box springs to their beds, new rug and a laundry list of other updates I’ll be sharing in the coming weeks.

Here’s a peek into their room from the hallway, the door does slide all the way open (and I still need to paint the hallway door trim!).

On the interior I choose to mount the handle pull horizontally.

And here you can see the gap between the trim, door and hardware.
How to make an inexpensive sliding barn door:
1. Remove door from hinges and finish as desired.

2. Purchase pipe parts. Kristi at Addicted 2 Decorating has a great list of her parts (she used a different piece at the door top).
Supplies:
All 1/2″ galvanized steel:
– 1 – 72″ pipe
– 2 – floor flange
– 2- nipple
– 2 – 90 elbow
– 2 – screw eyes
– 2 – 2″ stationary wheels

3. Insert screw eyes into top of door about 3″ from edge.

4. Attach wheels to bottom of door about 4″ in from edge and flush to interior. You can see my door is only 3/4″ thick and the wheel housing is almost 2″ wide and therefore visible from the exterior. You could add a 1×2 board across the base of the door to conceal and attach the wheel.

5. Slide the pipe through the eye hooks then screw on the fittings. Now attach the flanges to the wall.
I wiped my pipe with WD40 to reduce the noise.
Another sliding barn door piece I built with inexpensive hardware is this console:


That is so awesome. I rally need to find a way to use this in my house.
I cannot wait to do this. I have a entrance to a enclosed staircase and laundry room side by side. Gonna use one door to share between the two. Can slide it right to close off laundry room and leave staircase open and left to close off staircase!!
It's so beautiful! I actually found the tutorial I used for my very similar (as in, identical hardware, different door style) sliding door for my office / guest room. I built it very closely to Mandi of Vintage Revival's tutorial, and I love the look! I had a huge doorway to cover, and just framed it up with some salvaged 2×6's and covered it in a drop cloth then framed it with 1×2's. It's beautiful! And slides so easily. I'm so excited to see this hardware option in this many different places, because it's simple, easy and affordable! http://www.vintagerevivals.com/2014/06/how-to-build-a-lightweight-sliding-barn-door.html
Ohhh I love this so much!! It looks so great in your daughters room! These would make super cute sliding closet doors in my daughters room. I
really like the distressed look of them, too! Visiting from Best DIY Projects and Recipes 🙂
This is so awesome! Thanks for including all the great details of how you did it! And can I just say that the room looks a million times better! And I LOVE the floors. Such wide planks.
It looks great! It obviously was a BIG job but it looks like it was well worth it!
This is awesome!!! I would like to do this for my Boy's closet. However, we have plaster walls, it looks like you do too, so I wanted to know how size and type of screws did you use to nail the flanges to the wall?
Thank you!