
My kid’s bathroom finally got a well deserved makeover and we are loving every inch of it! Come see for yourself how I kept myself busy during the holiday break – it was totally worth it.

You can see from the before picture I wanted to get rid of the wallpaper, paint the trim and moulding, bulk up the mirror and replace the sconces.

Success! And I didn’t even remove one speck of wallpaper! It’s actually hiding underneath all that beautiful cedar planking – don’t tell anyone.

Installing the cedar planks was a breeze and so much easier than removing wallpaper. I simply marked the studs, cut the boards to fit and used finish nails to secure in place.


Fresh out of the packaging the cedar is very pink (almost purple) and I will admit I was a teeny bit scared of the color but the sunlight has already begun to work its magic and the wood has had a chance to fade a bit. I’m actually looking forward to it fading even more but the contrast with the white trim and dark hardware is beautiful.


I used 1/2″ pipe parts to make this towel bar.


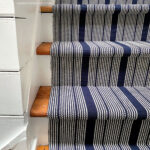
The wood floors were stripped and resealed with clear satin polyureathane. They had a heavy glossy coat of poly that was really yellow and grungy. Now they look so natural and fresh against the white trim and cedar planks.


I was able to keep the same sconces only adding new clear glass globes with edison bulbs to completely change the look. And the mirror got a new bulkier frame and some white paint.


I took the mirror off the hinges and added some poplar trim then painted everything white to match.

I can’t believe it’s the same bathroom!


A view from the hallway shows just how the cedar planking doesn’t overpower the space but adds great texture (and scent!).


The toilet paper holder is also made from 1/2″ pipe. No more flying springs or excuses for my kids not to change the roll.

I sealed the cedar at the sink edge with chaulk. I’m sure over time the cedar will get water marks right behind the faucet but that’s the beauty of age.

Installing the cedar planks truly is a beginner project. Normally I would recommend starting at the baseboard but I intentionally started at the back of the sink. I wanted one board running across the sink and worked my way down from there. The boards are easy to cut with a jigsaw and snap into place with tongue and groove fittings.

Hope you’ve enjoyed seeing my kids bathroom makeover.
Disclaimer: I was provided product for review from Cedar Safe Closets for this post. All opinions, thoughts and photos are my own. And cedar doesn’t have to be just for the closet!


it's gorgeous!!!! beautiful job, jaime!
Whoa, what a big difference! I love, love, love the cedar plank against the white–so pretty!
So amazing! What a great fresh look.
I love it!! SO original and clean and lovely! I'm DYING to do a plank wall and this cedar is such an interesting take! Did you use any adhesive, or just nails with the planks? Isn't it amazing how new and clean the tub and sink and toilet look now!! Well done!
Awesome! I love that you went right over the wallpaper, how fun is that. It looks so clean and airy with the white against the cedar. I'm wondering what the floor is? It's so light colored (for now), is it an east coast wood (asks the west coast girl)? Really nice job and a very good point about using cedar outside of closets – why hide it?!
Gorgeous!!! I pinned this for future reference!!! I want to this to our bathroom! Thank you for sharing!!!
It's beautiful! The sconce shade swap was genius.
Oh Wow that cedar is so gorgeous. Awesome job, as always 🙂
The cedar walls are stunning. Wow. Such a great contrast with the white trim.
And since I still don't have a toilet paper roll holder, that is happening. I love your pipe version.
nice look! I'm starting to collect ideas to re-do our kid bathroom…good stuff here. and I HATE that no one can put toilet paper on the holder but me! That is one of my FAVORITE features!!
Wow! So nice and clean looking! Would love for you to join the Trash 2 Treasure link party on Kammy's Korner.
http://www.kammyskorner.com/2015/02/trash-2-treasure-tuesday-link-party.html
This turned out SO gorgeous!! I LOVE the cedar, it looks so pretty against all the white and the sunlight. And I bet it smells so yummy. 🙂 Pinned!