• Home
  • Blog
  • About
  • Contact
    • Disclosure
    • Privacy Policy
  • SHOP
  • Widget area for main menu

    • Email
    • Facebook
    • Instagram
    • Pinterest
    • Twitter
    • YouTube
  • Skip to primary navigation
  • Skip to main content
  • Skip to primary sidebar

Jaime Costiglio

build - paint - sew

  • BUILD
    • BEDS
    • BENCHES
    • DESKS
    • DRESSERS
    • GAMES & TOYS
    • SCRAP WOOD
    • SHELVES
    • STORAGE
    • TABLES
  • TOOLS
  • PAINT
    • CRAFTS
    • FURNITURE
    • HOME DECOR
  • SEW
    • GIFTS
    • HOME DECOR
    • POUCHES
  • HANDBUILT HOLIDAY
    • 2021
    • 2019
    • 2018
    • 2017
    • 2016
    • 2015
    • 2014
    • 2013
  • GIFTS
    • BABIES
    • KIDS
    • FOR HER
    • FOR HIM
    • TEACHERS
    • WEDDINGS
  • SEASONAL
    • 4TH OF JULY
    • FALL
    • HALLOWEEN
    • CHRISTMAS
    • SUMMER
    • SPRING
    • ST. PATRICK’S DAY
    • THANKSGIVING
    • VALENTINE’S DAY
    • WINTER
  • SALTBOX PROJECT
    • BATHROOMS
    • DINING ROOM
    • EXTERIOR
    • FAMILY ROOM
    • FOYER / MUDROOM
    • KIDS BEDROOMS
    • KITCHEN
    • LIVING ROOM
    • MASTER BEDROOM
    • PLAYROOM
  • SCROLL SAW

DIY Bookshelves with fabric storage bins

May 22, 2011

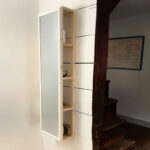
I built storage shelves for books, toys and games.
diy bookshelves with fabric storage bins

These shelves are for Lily, she has been my ‘test build’ customer and she’s not even 1 yet.
diy bookshelves with fabric storage bins
The plans are from Ana White’s 6 cube bookshelf, I modified the top shelf by eliminating the dividers to accommodate board games, puzzles and larger odd sized toys.
diy bookshelves with fabric storage bins

Lucky for Lily so far I’ve made her tower shelves,
diy tower shelves with doors
a toy box,
diy open toy box
and now these storage shelves.
diy open bookshelves with storage
I’d say she’s all set, for now.
diy open bookshelves with storage
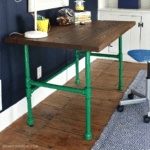
I only have one progress picture but the build was fast and easy.
I used cabinet grade plywood and 1×2 boards with beadboard for the backing.
how to build free standing bookshelves
The pink fabric bins are from Target.

painted free standing bookshelves with storage bins

painted free standing bookshelves with storage bins

painted free standing bookshelves with storage bins

You may also like...

  • DIY Painted Pipe Base Wood DeskDIY Painted Pipe Base Wood Desk
  • DIY Wall Mirror with StorageDIY Wall Mirror with Storage
  • DIY Letters to Santa MailboxDIY Letters to Santa Mailbox
  • Wood & Leather Bed Free PlansWood & Leather Bed Free Plans
Share this post:

Filed Under: BUILD, DIY, FURNITURE, FURNITURE, ORGANIZATION, PAINT, SHELVES, STORAGE33 Comments

Reader Interactions

Comments

  1. Love Being A Nonny says

    May 22, 2011 at 12:08 PM

    F is for Fabulous! I is for I love!!!

    Reply
  2. Cassie @ Primitive & Proper says

    May 23, 2011 at 12:41 AM

    those are awesome!!! you are so talented with building. 🙂

    Reply
  3. Rachelle @ Adventures in Creating says

    May 23, 2011 at 3:18 AM

    Wow I am impressed! You go girl- these are awesome!

    Reply
  4. Lisa says

    May 23, 2011 at 12:36 PM

    These are gorgeous! And so are the other pieces you made! Wonderful job!

    Reply
  5. KooKooCraft says

    May 23, 2011 at 6:09 PM

    beautiful! i want this too 🙂

    Reply
  6. Kara says

    May 24, 2011 at 2:04 PM

    You definitely inspire me to want to build my own furniture. Perhaps someday I'll take the plunge. These look great.

    Reply
  7. Jenn says

    May 24, 2011 at 4:58 PM

    These are awesome! I love how you left the dividers out of the top shelf! How long would one of the shelves take you to do? I might just try it! Following you now! 🙂

    Reply
  8. Christine - Tutorial Addict lol says

    May 24, 2011 at 11:17 PM

    That is just AWESOME!! I LOVE how you changed it up, I like it without the dividers on the top part! GREAT JOB on ALL of those projects!

    Reply
  9. pinktoesandpowertools says

    May 25, 2011 at 2:15 AM

    I agree with the others–I really like it without the dividers in the top shelf. Really nice!

    I aspire to one day be as productive as you. I, like Jenn, am curious how long it takes you to put one of these together? Need to know how far I've got to go on the productivity goals 🙂

    Reply
  10. Deanne says

    May 25, 2011 at 2:51 AM

    wow fantastic job, love all the stuff you've built!

    Reply
  11. Nikki says

    May 25, 2011 at 9:23 AM

    This is awesome… well done. Did you make them or your husband?

    Reply
  12. jcprime1 says

    May 25, 2011 at 10:41 AM

    Yes Nikki I built the shelves. My husband doesn't know where to find the drill and screws, I build everything I post, he watches the kids!

    Reply
  13. Jennifer says

    May 26, 2011 at 1:21 AM

    Jaime those are adorable! I didn't realize you built all your projects! I love that you build things while your husband watches the kids! I wish I could say that!
    Jen
    Scissors & Spatulas

    Reply
  14. Janet says

    May 26, 2011 at 2:37 AM

    Wow, this is awesome! I love the idea of having bins at the bottom and a shelf at the top. Great job!

    Reply
  15. Amy Gilman and Emily Lee (Sisters of the Wild West) says

    May 26, 2011 at 3:37 AM

    Your shelf is AWESOME!! They look straight out of pottery barn! I would love to have you link them up at our link party this week
    Amy
    http://www.Sistersofthewildwest.blogspot.com

    Reply
  16. Indulging says

    May 26, 2011 at 1:03 PM

    It's gorgeous! You have a lovely blog here 🙂

    Love and luck!

    Reply
  17. danemi1 says

    May 26, 2011 at 3:50 PM

    what a lucky young lady having all these beautiful things designed especially for her – wow – sooo lucky!

    Reply
  18. Nan says

    May 26, 2011 at 8:53 PM

    Just found you from Shabby Chic – your blog is so cute! Those shelves look great! Very impressed you did it! I'd love to see the rest of the room. Do you have a post of the whole room re-do? If so, I'd love to include it in my gallery at Playful Decor!

    Reply
  19. shopannies says

    May 27, 2011 at 2:38 AM

    how very cute love all the great shelves plenty of room something I never seem to have enough of please stop by my blog for a visit if you find time
    [email protected]

    Reply
  20. Jacqueline says

    May 27, 2011 at 1:45 PM

    These are just perfect for what I need in the kids room! They also look easy to build! Thank you for sharing and if you have the time I'd love for you to stop by my party and share these!

    Simply Creations Link Party #9

    Reply
  21. Sara says

    May 27, 2011 at 2:27 PM

    Those are FABULOUS!!! Is there ANY way at all I could get the pattern from you? I want so badly to build shelve for MY girls' room but I am not sure how without a pattern…THANKS!! (a pattern as in measurements of the boards…)

    Reply
  22. Lesley Paige says

    May 28, 2011 at 12:17 AM

    What a lucky Lily you have! I am in awe of your building skills! Your work is absolutely gorgeous!

    Thanks for sharing
    Lesley
    craftingismytherapy.blogspot.com

    Reply
  23. Shannon Brennan says

    May 28, 2011 at 3:02 PM

    Awesome!

    Reply
  24. Candace says

    May 28, 2011 at 6:16 PM

    These are so great! I'd love some for our nursery!

    Reply
  25. Jen says

    May 28, 2011 at 8:29 PM

    I love how girlie these shelves look with the hot pink baskets all lined up. What great storage you made! Jen @ http://www.icantstopcrafting.blogspot.com

    Reply
  26. Amy K says

    May 29, 2011 at 11:51 AM

    Love, love, love these. Pinning…

    Reply
  27. Rachel at Sun Scholars says

    May 30, 2011 at 3:58 AM

    Those shelves are amazing! If we weren't moving, I'd have them on the list of things to do this weekend… ha ha. Awesome!!

    I would LOVE for you to share these at my For the Kids link party! Come join the fun!!

    http://sunscholars.blogspot.com/2011/05/for-kids-friday-12.html

    Reply
  28. Handy Man, Crafty Woman says

    May 31, 2011 at 3:10 AM

    I love these! so pretty! I'd love it if you would come over and link up a project to our Wicked Awesome Wednesday link party if you get a chance.

    Reply
  29. Delightful Order says

    June 2, 2011 at 4:38 AM

    I featured this today at my Delightfully Inspiring Thursday Party.

    Grab a button, if you'd like:

    http://delightfulorder.blogspot.com/2011/06/delightfully-inspiring-link-party-14.html

    DaNita

    Reply
  30. Heidi says

    June 3, 2011 at 4:51 AM

    I have had shelves on my mind lately. love these. They turned out so dang cute…

    heidi
    chickhardware.blogspot.com

    Reply
  31. Lulu Lane Designs says

    June 4, 2011 at 5:23 PM

    I love these! And really I think I could manage to make these! 🙂 Found you through the linky party on Miss Mustard! New follower too! 🙂

    Reply
  32. D+B says

    June 5, 2011 at 5:28 AM

    Love your blog!! I am definitely going to be your new follower 🙂 I would love it if you followed me to @ for-the-luv-of.blogspot.com that would be great 🙂 I am just starting out, but I am excited to share new recipes, crafts, and makeup.. And Giving away giveaways on mineral make-up!!

    Reply
  33. Ally says

    June 6, 2011 at 6:29 PM

    That's awesome! I am looking for some toy storage, and this might be just the ticket. I love the modification you made.

    Reply

Leave a Reply Cancel reply

Your email address will not be published. Required fields are marked *

Primary Sidebar

Hi! I’m Jaime

Jaime Costiglio

Hello!

Thank you for stopping by.
Join me for lots of DIY.

Read more

Get new posts via email

Handbuilt Holiday: Gift Project Plans

handbuilt holiday gift project plans

Collection of DIY gift project plans to build.

The Home Depot Tool Prospective

THD Prospective

Tools to consider for the DIYer.

Archives

The Home Depot Logo
Copyright © 2023 Jaime Costiglio · Custom site by Moonsteam Design

Privacy Policy