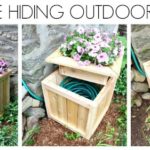
Using crates for storage isn’t a new concept but I’m taking them poolside with this storage unit. A great family solution for towels and toys. The kids know exactly where to find googles and small toys. And towels are at the ready when they emerge from the pool. Plus mom doesn’t have to run around searching for all the things.

A DIY tutorial to make a poolside storage unit using crates. Includes open shelving for pool towels and a drawer for all the small toys and googles.

The folks at Crates & Pallet have put together some very creative and amazing diy bloggers to bring you lots of Summer Storage ideas using these large crates. Be sure to stop by a visit these lovely ladies and check out their projects.
More crate project ideas:
- House of Wood
- Jaime Costiglio (you’re here)
- Sawdust 2 Stitches
- One Arsty Mama
- Damask Love
- At Home with Natalie
My poolside storage unit is pretty straight forward with three large crates stacked on top of each other plus a DIY base and top. I also added a pull-out drawer by resizing one of the large crates to fit inside another large crate. Pretty genius I thought 😉

Although I used all large crates for this project did you know Crates & Pallet makes crates and pallets in various sizes and shapes and they are available at major big box retailers like The Home Depot, Walmart, Jo-Anns and online at houzz.com and wayfair.com. To see their entire assortment of products click here.
Below I will share the tutorial on how to make this poolside storage unit. Be sure to read through the entire plans first before beginning.

How to make a poolside storage unit:
Supplies:
- 4 large crates
- 1 – 2x2x6 board
- 2 1/2″ exterior pocket hole screws
- wood glue
- 1 1/4″ exterior grade wood screws
- 1″ exterior grade wood screws
- 3/4″ finish nails
- 1 – 1x4x6 cedar board
- clear exterior grade polyurethane (spray is easiest)

Step 1: Build the base. Using the printable PDF plans here build the base using 2×2 boards and 2 1/2″ exterior grade pocket hole screws.

TIP: Keep the pocket holes facing upwards (they will be covered by the crate), it’s easier to attach the short sides this way versus using a right angle drill.

Step 2: Attach the bottom crate to the base using wood glue and 1 1/4″ exterior grade wood screws.

Step 3: Attach the next crate to the previous crate using 1″ exterior grade wood screws, angle the screws up in from the underside of the lower crate into the thick side portion of the upper crate (marked in bright blue on the picture above). Do this for all four corners.
Stack one last crate on top of the previous for a total of three crates. Attach using wood screws.

Step 4: To make the pull-out drawer disassemble the last large crate, it will be rebuilt to fit inside the bottom large crate. Gently pry off the side and bottom slats using a putty knife or pry bar.

Once completely disassembled you will have 2 end pieces and 13 slats.

Step 5: Trim down the end pieces to 8 1/2″ wide as shown above.

Step 6: Trim down the slat pieces to 16″ long. Begin re-assembly starting with the bottom slats (run four across the long sides with equal spacing). Then move to the sides, use wood glue and 3/4″ finish nails or staples. You will have one leftover extra slat.
Attach a handle at center front if desired.
Step 7: To make a smooth top add 3 cedar boards cut to 19 1/2″l. Secure the boards to the top crate from the underside using wood glue and 1″ wood screws.
Seal everything with exterior grade clear satin polyurethane spray to protect the wood from the elements.

SHOP THIS PROJECT:

Disclaimer: This post is sponsored by Crates & Pallet. I have received compensation and / or product for review in order to complete this project. All thoughts, opinions and creative ideas are my own.

Leave a Reply