
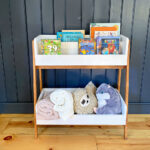
Truth be told I previously shared this open media shelf way back when. This was before I figured out how to make proper plans so today I’m reposting this build with step by step instructions including detailed plans and cut lists.

This open media shelf has two pull out bins perfect for gaming and DVD storage.

And it still has a low profile at 13″ deep so completely unobtrusive in your room.

We filled the bins with Skylanders and DVDs and the notched out pull handle is a fun detail.
Below are the step by step instructions with materials and cut lists.

Materials:
- 2 – 2x2x8 select pine boards
- 4
– 1x2x8 pine boards - 1 – 2x (butcher block or the like)
@ 36” x 13” - 2 – 1x10x6 pine boards
- ¾” plywood – ½ sheet (4’ x 4’)
- ¼” plywood – handy panel (2’ x 4’)
- 1 ¼” & 2 ½” pocket hole screws
- 2” wood screws
- 1 ¼” finish nails
- wood glue
Cut List:
Shelf
- 4 – 2×2 @ 34 1/2″ (legs)
- 7 – 1×2 @ 31″ (cross supports
/trim) - 8 – 1×2 @ 9″ (end trim)
- 1 – butcher block 2x @ 36” x 13”
(top) - 3 – ¾” plywood @ 32 ½” x 10 ½”,
corners notched out ¾” square (shelves) - 1 – ¾” plywood @ 10 ½” x 10 1/2 “
(divider) - 1 – 1×2 @ 9 ¾” (divider trim)
Bins
- 4 – 1×10 @ 14 ½” (front &
back) - 4 – 1×10 @ 10 ¼” (sides)
- 2 – ¼” plywood @ 14 ½” x 11 ¾”
(base)

Step 1: Create
frame. Attach legs to cross supports using glue and 1 ¼” pocket hole
screws. Be sure to predrill pockets
holes in legs for next step prior to attaching.
frame. Attach legs to cross supports using glue and 1 ¼” pocket hole
screws. Be sure to predrill pockets
holes in legs for next step prior to attaching.

Step 2: Attach
frame to top using glue and 2 ½” pocket hole screws.
frame to top using glue and 2 ½” pocket hole screws.

Step 3: Attach top shelf. I recommend attaching the plywood shelf
portion first to the legs and then cutting the trim to fit but you can assemble
the shelf with trim prior to placing it in position on the frame.
portion first to the legs and then cutting the trim to fit but you can assemble
the shelf with trim prior to placing it in position on the frame.

Step
4: Repeat Step 3 for middle shelf.

Step 5: Attach bin
divider using 1 ¼” pocket hole screws at underside center of middle shelf.
divider using 1 ¼” pocket hole screws at underside center of middle shelf.

Step 6: Attach bottom
shelf same as others. Here also attach
bin divider to underside of shelf using 2” countersunk wood screws.
shelf same as others. Here also attach
bin divider to underside of shelf using 2” countersunk wood screws.

Step 7: Attach divider trim using glue and 1 ¼” finish
nails.
nails.

** Be sure to measure the space for your bins before making any cuts. Keep 1/8″ on both sides in order to allow the bins to slide easily.

Step 1: Use a
jigsaw to notch out the pull handle portion of 2 front pieces.
jigsaw to notch out the pull handle portion of 2 front pieces.

Step 2: Attach
the sides to the front using glue and 1 ¼” pocket hole screws.
the sides to the front using glue and 1 ¼” pocket hole screws.

Step 3: Attach
back to sides using glue and 1 ¼” countersunk screws from back.
back to sides using glue and 1 ¼” countersunk screws from back.

Step 4: Attach base
using glue and 1 ¼” countersunk screws.
You could use finish nails but these bins could see a lot of weight so
screws are a better option.
using glue and 1 ¼” countersunk screws.
You could use finish nails but these bins could see a lot of weight so
screws are a better option.
For more details and in progress build pictures see my previous post on this open media shelf here.


Cool! One of these days I'll sit down and learn to use SketchUp so I can post proper plans too.
Looks great!! I"m amazed what you gals can do on SketchUp!! I also LOVE your new blog design!!! So clean and fresh!