• Home
  • Blog
  • About
  • Contact
    • Disclosure
    • Privacy Policy
  • SHOP
  • Widget area for main menu

    • Email
    • Facebook
    • Instagram
    • Pinterest
    • Twitter
    • YouTube
  • Skip to primary navigation
  • Skip to main content
  • Skip to primary sidebar

Jaime Costiglio

build - paint - sew

  • BUILD
    • BEDS
    • BENCHES
    • DESKS
    • DRESSERS
    • GAMES & TOYS
    • SCRAP WOOD
    • SHELVES
    • STORAGE
    • TABLES
  • TOOLS
  • PAINT
    • CRAFTS
    • FURNITURE
    • HOME DECOR
  • SEW
    • GIFTS
    • HOME DECOR
    • POUCHES
  • HANDBUILT HOLIDAY
    • 2021
    • 2019
    • 2018
    • 2017
    • 2016
    • 2015
    • 2014
    • 2013
  • GIFTS
    • BABIES
    • KIDS
    • FOR HER
    • FOR HIM
    • TEACHERS
    • WEDDINGS
  • SEASONAL
    • 4TH OF JULY
    • FALL
    • HALLOWEEN
    • CHRISTMAS
    • SUMMER
    • SPRING
    • ST. PATRICK’S DAY
    • THANKSGIVING
    • VALENTINE’S DAY
    • WINTER
  • SALTBOX PROJECT
    • BATHROOMS
    • DINING ROOM
    • EXTERIOR
    • FAMILY ROOM
    • FOYER / MUDROOM
    • KIDS BEDROOMS
    • KITCHEN
    • LIVING ROOM
    • MASTER BEDROOM
    • PLAYROOM
  • SCROLL SAW

DIY Tapered Mudroom Bins with Curved Handle

June 21, 2011

I built custom storage bins for MB’s mudroom:

Bins with handles and monograms.

MB is a school friend who recently moved into a beautiful new home and was looking to make the best use of her mudroom cubby system.

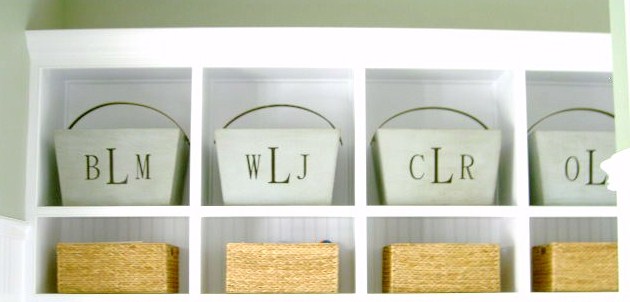
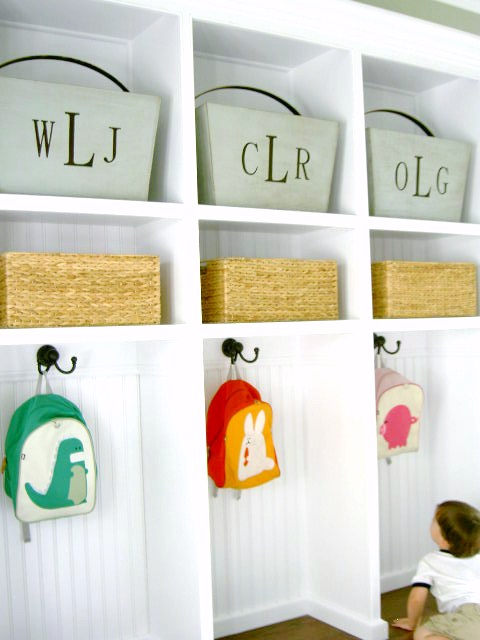
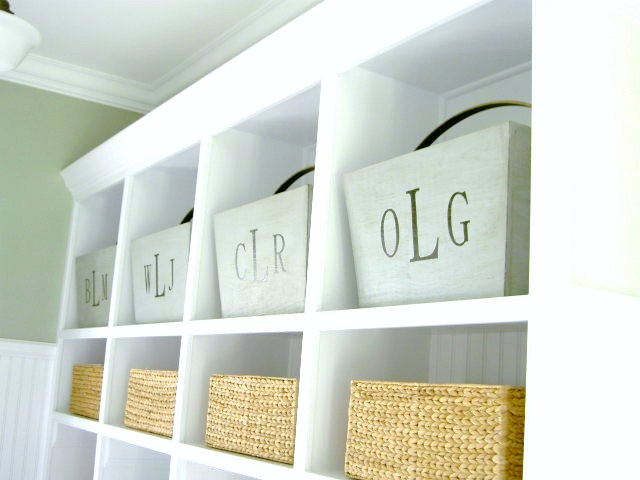
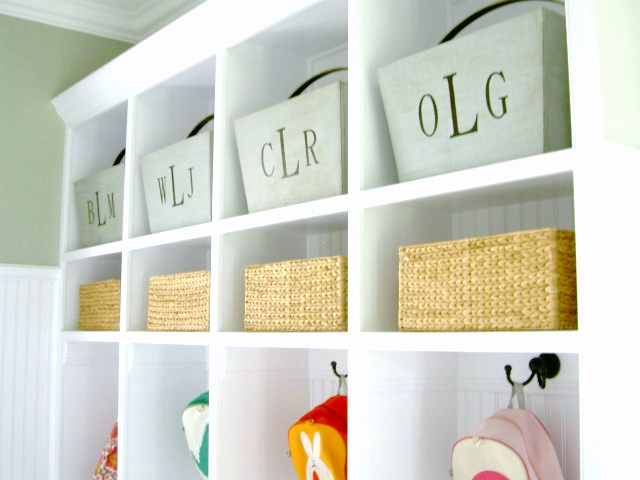
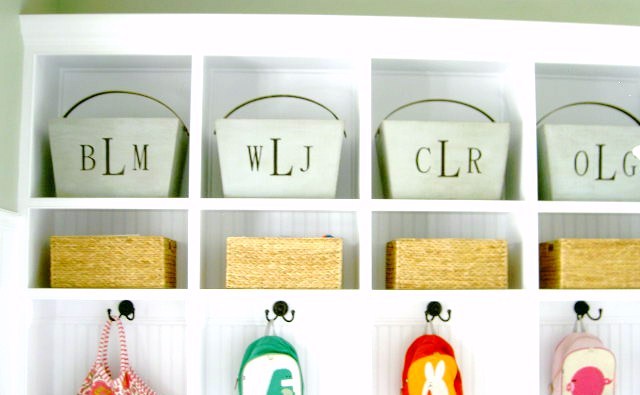
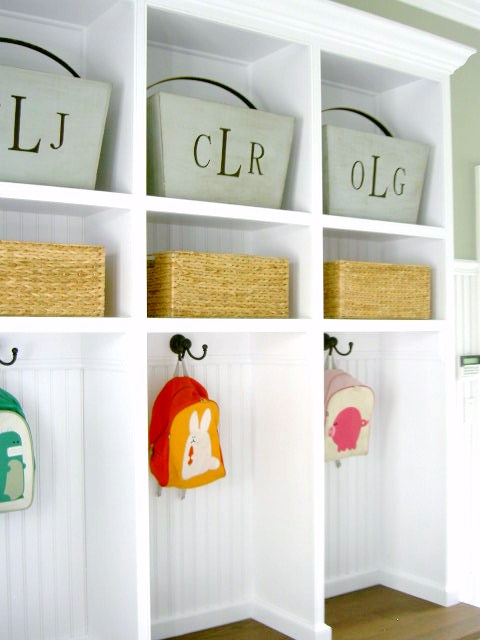
She already had two places with baskets and was looking for another different, more decorative storage solution for off-season items.

I must give MB all the credit for coming up with the design: a tapered wooden bin with a handle.
I simply executed her design; building the bins to size (20″w x 12″h x 13″deep, 17″high at handle) painting, adding a handle and handpainted monogram.

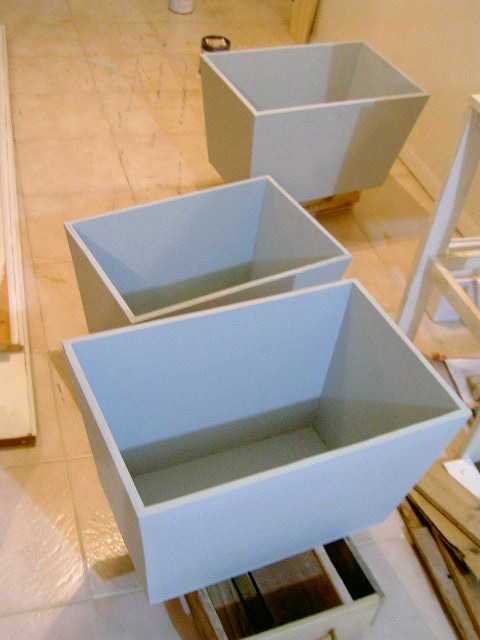
I used about one sheet of 1/2″ plywood ripped at 12″.
I cut the four sides on an angle to get the tapered bottom:

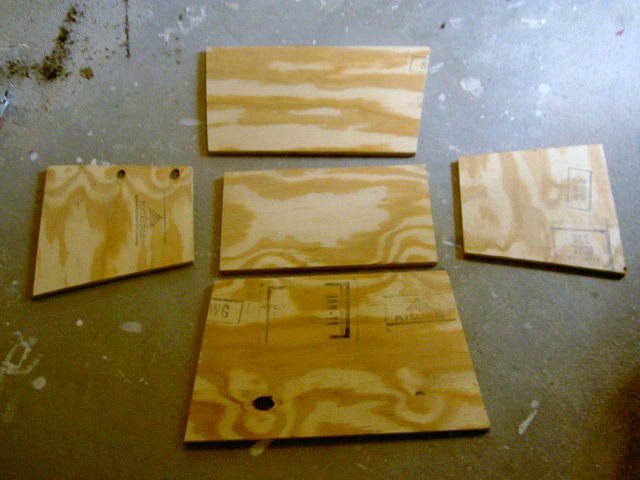
Originally I had planned for an inset bottom using the 1/2″ ply but that wasn’t working out so great.
In the end the bottoms are 1/4″ ply nailed from the bottom and it gives a much better finished look.

I painted the bins with two coats Benjamin Moore wedgewood gray matte.

Sanded to distress lightly.

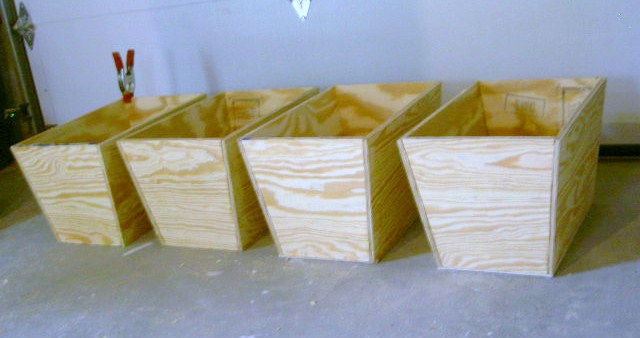
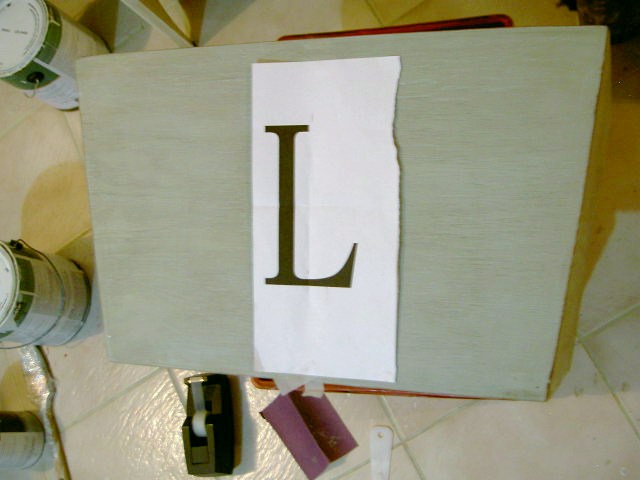
Applied Minwax dark walnut stain.

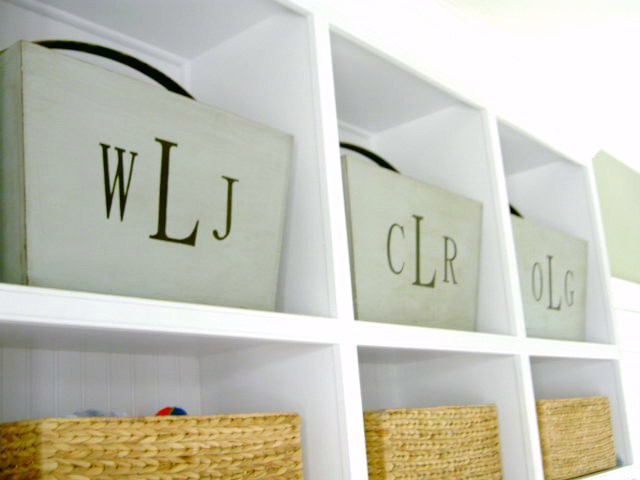
For the monogram I used DFKai-SB font, printed the middle letter 6″ tall, find the center of the box and line up the letter.  Simply trace letter with a ballpoint pen to get a light indent in the paint.

Paint in the indent using Behr french roast.
Add the remaining two letters on either side which are 4″ tall.

Sealed with wipe-on Minwax poly satin finish.

One down, three to go:
For the handle I used an 18″ embroidery hoop (1″wide x 1/4″thick), pried off the hardware and cut each circle in half.
Applied one coat of Minwax dark walnut stain and sealed with wipe-on Minwax poly satin finish.

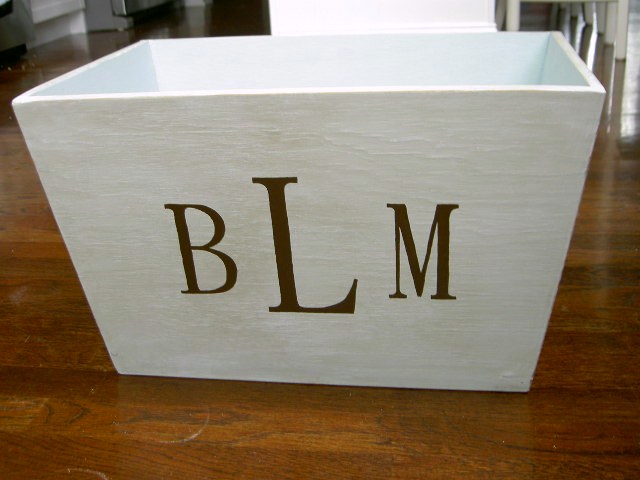
Measured the handle height at 17″ and screwed into the sides.  The handles are purely for decorative purposes, they will hold the bin but I wouldn’t recommend carrying the bins around by the handle.

A fun challenge and a nice way to incorporate the family’s personal touch while still serving a very useful purpose.

Thanks MB, I hope you enjoy them as much as I enjoyed making them.

You may also like...

  • DIY Mudroom Bins on WheelsDIY Mudroom Bins on Wheels
  • DIY Personalized Trug (the naked version)DIY Personalized Trug (the naked version)
  • DIY Square Mudroom BinsDIY Square Mudroom Bins
  • Magazine Rack MakeoverMagazine Rack Makeover
Share this post:

Filed Under: BUILD, DIY, HOME DECOR, ORGANIZATION, STORAGE44 Comments

Reader Interactions

Comments

  1. Lisa @ Fern Creek Cottage says

    June 21, 2011 at 8:26 PM

    What a great idea! They are so cute! Love when something is useful and good looking. 🙂

    Reply
  2. Inspire Me Heather says

    June 21, 2011 at 9:17 PM

    Aw, the bins look terrific – and the whole space looks great too!

    Reply
  3. Lulu Lane Designs says

    June 21, 2011 at 9:25 PM

    Love this space! Gonna pin this one!!

    Reply
  4. Comeca Jones says

    June 21, 2011 at 9:25 PM

    This is great I'm thinking of having my sweeties brother build me a two person cubby to sort of define my entryway. This is a cute idea mine has to be a moveable piece but still I'm saving your post to show him thanks for inspiring.

    Reply
  5. Cassie @ Primitive & Proper says

    June 21, 2011 at 9:51 PM

    we need to be neighbors. NOW. i am sure we could use each other in a wonderful way!

    Reply
  6. Twice Nice says

    June 21, 2011 at 11:11 PM

    These are so cool!! Thanks for sharing how you made them. They are very creative, and a pretty solution to those cubbies.
    Deb

    Reply
  7. Twice Nice says

    June 21, 2011 at 11:11 PM

    These are so cool!! Thanks for sharing how you made them. They are very creative, and a pretty solution to those cubbies.
    Deb

    Reply
  8. Tiff says

    June 22, 2011 at 12:42 AM

    I would love a storage area like that! So practical! You have made it look amazing!!! x

    Reply
  9. Haven Conner says

    June 22, 2011 at 2:12 AM

    Wow, are you ever talented. Those bins look fantastic!!!

    Reply
  10. Allison@FabRehab says

    June 22, 2011 at 3:33 AM

    If you could be any more amazing, I'd hate you. This is swoon-worthy!

    Reply
  11. Donna Hollingsworth says

    June 22, 2011 at 4:35 AM

    I am loving the bins in the mudroom. Wheres my miter saw? I am ready to get to work! Great job!!!!!

    Reply
  12. Paige says

    June 22, 2011 at 11:31 AM

    I love the whole thing!

    Reply
  13. The Vintage Farmhouse says

    June 22, 2011 at 1:10 PM

    Excellent idea. It looks great!

    Reply
  14. jenclair says

    June 22, 2011 at 4:45 PM

    Love the bins! Well, I love the whole room–clean, neat, cheerful, useful.

    Reply
  15. Deanne says

    June 22, 2011 at 10:00 PM

    I have mud room envy, I would love to have room for a mud room, your looks great!

    Reply
  16. Stephanie says

    June 23, 2011 at 6:05 AM

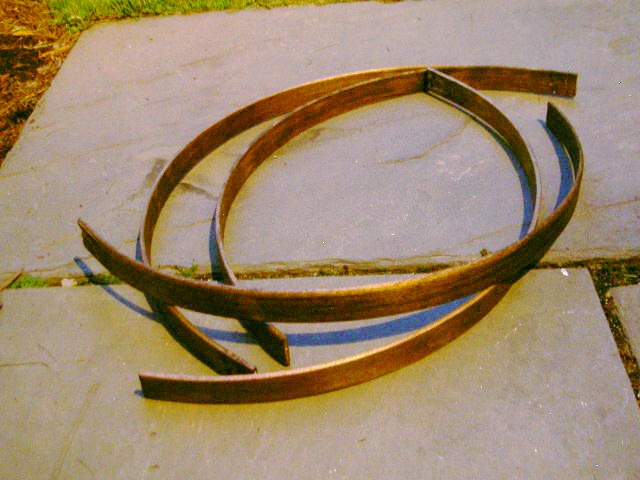
    This is an amazing space! I love how you used the embroidery hoops as handles, so creative.

    Reply
  17. Ava says

    June 23, 2011 at 11:13 AM

    You make this look so easy. It really is fresh and lovely. So clever ! xx Ava

    Reply
  18. Delaney says

    June 23, 2011 at 1:29 PM

    These look fabulous! I'm jealous!
    http://sweetteaserendipity.blogspot.com

    Reply
  19. Katy says

    June 23, 2011 at 3:53 PM

    love what you used for the handles. awesome!

    Reply
  20. Mrs. 2010sHousewife says

    June 23, 2011 at 5:53 PM

    Those are awesome! Great job!

    Reply
  21. Chari at Happy To Design says

    June 23, 2011 at 11:59 PM

    Hi Jaime…

    Ohh my…what a creative and talented lady you are! I really do love the tapered wooden bins that you built and decorated…they're awesome! They look so sweet in the cubbies of your friend's mudroom bench! Which by the way…is also awesome! I love how it's designed! Thank you so much for sharing this sweet project and tutorial with us!

    Warmest summery wishes,
    Chari @Happy To Design

    Reply
  22. Katy says

    June 24, 2011 at 12:19 AM

    this looks fantastic!

    Reply
  23. Jen @ Domesticated Nomad says

    June 24, 2011 at 12:20 AM

    It looks lovely and so functional too. I wish I had that much space. But a bin for each person, I might be able to find space for that. 🙂

    Reply
  24. Carrie @ Hazardous Design says

    June 24, 2011 at 12:04 PM

    These are great. I found you via Remodelaholic where I just posted a mudroom makeover. Bins like these would be perfect in my new space!

    Reply
  25. Heather says

    June 24, 2011 at 3:51 PM

    Absolutely love these bins–wish I had a mudroom!!

    Reply
  26. BluBabesCreate says

    June 24, 2011 at 11:49 PM

    What the dang! I need me a mud room!

    Reply
  27. Jo says

    June 25, 2011 at 11:43 AM

    I've just stumbled upon your blog and I'm in love! Great ideas that I can't wait to try in our home. Thank you for sharing.

    Have a great weekend~
    Jo

    Reply
  28. kelly says

    June 26, 2011 at 12:06 AM

    awesome!!!

    Reply
  29. Korrie@RedHenHome says

    June 26, 2011 at 3:46 PM

    These are soooo fabulous! And using an embroidery hoop for a handle?? Genius!

    Reply
  30. Stacey says

    June 28, 2011 at 1:49 AM

    WOWSAS! That is an awesome project! The bins are so cool and the cubby is AMAZING! I need this!
    Stacey of Embracing Change

    Reply
  31. Shaunna says

    June 29, 2011 at 2:22 AM

    How absolutely beautiful and perfect!!! Wonderful! Thanks so much for linking up to All Things Furniture!
    🙂
    shaunna

    Reply
  32. Jamie says

    June 29, 2011 at 3:04 AM

    Super cute! – I also love seeing someone else do lettering the old school way, like I do! 😉

    Reply
  33. Suzanne@Meridian Road says

    June 29, 2011 at 3:34 AM

    Wow, Jaime! Those are great! I wondered what you used for a handle. I never would have thought to cut a hoop in half!

    The lettering looks great! I thought it was vinyl when I first saw the bins.

    Reply
  34. Delightful Order says

    June 30, 2011 at 4:22 AM

    I'm not sure there is one post of yours that I don't LOVE!! I have featured you, yet again, because YOU do amazing work. Pop over and take a peek, if you'd like:

    http://delightfulorder.blogspot.com/2011/06/delightfully-inspiring-thursday-party_29.html

    DaNita

    Reply
  35. Jess@Balancing The Dream says

    June 30, 2011 at 4:55 PM

    Great tutorial!! The design is perfect, the colors are perfect….i'm pinning this!! thanks for sharing!!

    Reply
  36. Jess@Balancing The Dream says

    June 30, 2011 at 4:56 PM

    p.s….i'm your newest follower!! 🙂

    Reply
  37. Naomi says

    July 1, 2011 at 2:47 AM

    Those look so great!

    Reply
  38. Kelli @ RTSM says

    July 6, 2011 at 12:57 AM

    These are awesome! I totally need these in my mudroom now! I love the monograms, but I think I would have to use vinyl since I have a hard time painting inside the lines:)

    Reply
  39. Jennifer says

    July 6, 2011 at 2:16 AM

    Girl, your projects ROCK! I'm always impressed! Would you have time to put something together to do a guest post for me the first week of August? We will be at the beach and I'm trying to get my days filled. I'd love to have one of your tutorials!
    jen

    Reply
  40. Sawdust and Paperscraps says

    July 14, 2011 at 3:37 AM

    These are awesome! I love the handles. You're so smart!!!

    Reply
  41. Pawleys Island Posh says

    September 12, 2011 at 1:13 PM

    LOVE LOVE LOVE!!! Thanks for sharing! Found you through the link up today at Abode Love!

    Reply
  42. Coley says

    September 12, 2011 at 10:05 PM

    Honestly, one of my goals in life is to have a cubby bin/shelves like this. Yours is dreamworthy- gorgeous and functional!

    Reply
  43. Kim says

    March 3, 2012 at 7:08 AM

    This awesome mudroom has been saved in my pinterest board for some time now and I'm finally able to use it for our own mudroom re-do. Would you mind telling me what dimensions you used – cubby width and height? divider depth? bench seat depth and height?

    Thanks so much!

    Reply
  44. Lily says

    July 26, 2012 at 8:10 AM

    I would love a storage area like that! So practical! You have made it look amazing!!! x

    http://mudroomstorageideas.com

    Reply

Leave a Reply Cancel reply

Your email address will not be published. Required fields are marked *

Primary Sidebar

Hi! I’m Jaime

Jaime Costiglio

Hello!

Thank you for stopping by.
Join me for lots of DIY.

Read more

Get new posts via email

Handbuilt Holiday: Gift Project Plans

handbuilt holiday gift project plans

Collection of DIY gift project plans to build.

The Home Depot Tool Prospective

THD Prospective

Tools to consider for the DIYer.

Archives

The Home Depot Logo
Copyright © 2026 Jaime Costiglio · Custom site by Moonsteam Design

Privacy Policy