• Home
  • Blog
  • About
  • Contact
    • Disclosure
    • Privacy Policy
  • SHOP
  • Widget area for main menu

    • Email
    • Facebook
    • Instagram
    • Pinterest
    • Twitter
    • YouTube
  • Skip to primary navigation
  • Skip to main content
  • Skip to primary sidebar

Jaime Costiglio

build - paint - sew

  • BUILD
    • BEDS
    • BENCHES
    • DESKS
    • DRESSERS
    • GAMES & TOYS
    • SCRAP WOOD
    • SHELVES
    • STORAGE
    • TABLES
  • TOOLS
  • PAINT
    • CRAFTS
    • FURNITURE
    • HOME DECOR
  • SEW
    • GIFTS
    • HOME DECOR
    • POUCHES
  • HANDBUILT HOLIDAY
    • 2021
    • 2019
    • 2018
    • 2017
    • 2016
    • 2015
    • 2014
    • 2013
  • GIFTS
    • BABIES
    • KIDS
    • FOR HER
    • FOR HIM
    • TEACHERS
    • WEDDINGS
  • SEASONAL
    • 4TH OF JULY
    • FALL
    • HALLOWEEN
    • CHRISTMAS
    • SUMMER
    • SPRING
    • ST. PATRICK’S DAY
    • THANKSGIVING
    • VALENTINE’S DAY
    • WINTER
  • SALTBOX PROJECT
    • BATHROOMS
    • DINING ROOM
    • EXTERIOR
    • FAMILY ROOM
    • FOYER / MUDROOM
    • KIDS BEDROOMS
    • KITCHEN
    • LIVING ROOM
    • MASTER BEDROOM
    • PLAYROOM
  • SCROLL SAW

DIY Scrap Wood Advent Candy Tree

October 29, 2010

Christmas is coming need I remind you and one can never have too many Christmas decorations, especially when you spy something you don’t already have.  Meet my Christmas Lollipop Advent Tree:
scrap wood candy advent tree

I saw this too cute advent tree in the Garnet Hill catalog for a mere $68 buckaroos and thought with my new basic woodworking skills I could definitely recreate it.  Here goes nothing.

I took all 1×2 scraps, a 5/16 dowel and a 1×4 scrap cut to 3.5″ for the base.  Below are the cut pieces and I made a center hole in each piece (using a 3/8″ drill bit so it could slide on the 5/16 dowel and swivel) and 2 holes on each end – only about 1/2″ into the wood – for the lollipop sticks.

scrap wood piece cut gradually smaller

Then I found colored stain from Minwax – never knew but they have it and it works awesome!

scrap wood stained green

Now for some light sanding.

scrap wood stained green and sanded

Next I glued the dowel into the base (I did predrill a 5/16″ hole but not all the way through the base).  Then I made spacers from this 7/16″ plastic tubing.  You can barely see them in photo way above and even less so in real life but the spacers keep the wood pieces from touching so they can swivel nicely.  Each spacer is about 1/2″ long except the one piece I put on top to hold everything on which was only about 1/4″ long.

clear tubing

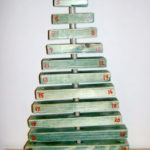
So it goes piece of tubing, wood, piece of tubing, wood, and on and on until you have 12 gradating pieces of wood.

scrap wood candy advent tree

I just arranged the wood pieces like a spiral so each lollipop has its own space without knocking into something above.  (This also helps with the balance so the tree doesn’t tip over.)  Here she is with Dum Dums – and I can only imagine how great it would be with Blow Pops.

scrap wood candy advent tree
 Not bad for scrap wood, $6 of stain (which I only used a tiny bit) and about 3″ of plastic tubing.  Merry Christmas kiddos and happy licking all those lollies!
scrap wood candy advent tree

You may also like...

  • Scrap Wood Advent Calendar UpdatedScrap Wood Advent Calendar Updated
  • DIY Cupcake StandDIY Cupcake Stand
  • “L” is for Ledges“L” is for Ledges
  • Cross Stitch Monogram Ornament PlacecardCross Stitch Monogram Ornament Placecard
Share this post:

Filed Under: CHRISTMAS, CRAFTS, DIY, GIFTS, KIDS, SEASONAL4 Comments

Reader Interactions

Comments

  1. Tracie says

    December 10, 2010 at 12:20 PM

    Just wondering where you found the plastic tubing. Does blue or orange carry it? I've wanted an Advent tree for forever and LOVE this one. Thanks!

    Reply
  2. jcprime1 says

    December 10, 2010 at 7:23 PM

    Tracie – I found the tubing at Orange in the plumbing dept. Good luck with your tree, it really was a quick build.

    Reply
  3. Katie Adams says

    November 28, 2012 at 2:03 PM

    Thank you for sharing, I love this idea. I have created a round-up of all my favorite Advent calendars and I have added yours! You can check it out here http://www.thecraftyblogstalker.com/2012/11/25-diy-christmas-advent-calendar.html If you would like me to remove your feature please let me know and I will take it down right away. Oh, and please stop by and grab a feature button and wear it proudly! You deserve it!

    Reply
  4. cutiefruit21 says

    November 29, 2013 at 8:28 PM

    I would love to make this but I was wondering how you did the pieces for the tre what size are they? I know you said 1×2 but how long are they ? Im very in experienced but would love to make it!!! So any more details you could provide would be great!!!!

    Reply

Leave a Reply Cancel reply

Your email address will not be published. Required fields are marked *

Primary Sidebar

Hi! I’m Jaime

Jaime Costiglio

Hello!

Thank you for stopping by.
Join me for lots of DIY.

Read more

Get new posts via email

Handbuilt Holiday: Gift Project Plans

handbuilt holiday gift project plans

Collection of DIY gift project plans to build.

The Home Depot Tool Prospective

THD Prospective

Tools to consider for the DIYer.

Archives

The Home Depot Logo
Copyright © 2023 Jaime Costiglio · Custom site by Moonsteam Design

Privacy Policy