• Home
  • Blog
  • About
  • Contact
    • Disclosure
    • Privacy Policy
  • SHOP
  • Widget area for main menu

    • Email
    • Facebook
    • Instagram
    • Pinterest
    • Twitter
    • YouTube
  • Skip to primary navigation
  • Skip to main content
  • Skip to primary sidebar

Jaime Costiglio

build - paint - sew

  • BUILD
    • BEDS
    • BENCHES
    • DESKS
    • DRESSERS
    • GAMES & TOYS
    • SCRAP WOOD
    • SHELVES
    • STORAGE
    • TABLES
  • TOOLS
  • PAINT
    • CRAFTS
    • FURNITURE
    • HOME DECOR
  • SEW
    • GIFTS
    • HOME DECOR
    • POUCHES
  • HANDBUILT HOLIDAY
    • 2021
    • 2019
    • 2018
    • 2017
    • 2016
    • 2015
    • 2014
    • 2013
  • GIFTS
    • BABIES
    • KIDS
    • FOR HER
    • FOR HIM
    • TEACHERS
    • WEDDINGS
  • SEASONAL
    • 4TH OF JULY
    • FALL
    • HALLOWEEN
    • CHRISTMAS
    • SUMMER
    • SPRING
    • ST. PATRICK’S DAY
    • THANKSGIVING
    • VALENTINE’S DAY
    • WINTER
  • SALTBOX PROJECT
    • BATHROOMS
    • DINING ROOM
    • EXTERIOR
    • FAMILY ROOM
    • FOYER / MUDROOM
    • KIDS BEDROOMS
    • KITCHEN
    • LIVING ROOM
    • MASTER BEDROOM
    • PLAYROOM
  • SCROLL SAW

DIY Shutter Headboard

January 29, 2012

How to make a headboard using old shutters.
diy shutter headboard

shutter headboard
shutter headboard detail
I took these shutters:
old shutters before
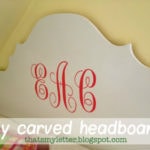
And made them into this:
old shutters after
 A little makeover for our Master Bedroom, we started with this:
(Yes it’s from my husband’s bachelor days but I did paint it white.)
master bedroom headboard before
And now have this:
master bedroom headboard after
chalk painted shutter headboard
Here’s how I made the headboard:
 
1. Find old shutters (my neighbor left these out on bulk trash day thank you!):
repurposed old shutters
2. Sand down to smooth then cut each shutter in half, making four equal pieces:
cut shutters in half
3. Paint one coat Annie Sloan paloma grey:


chalk paint on shutters
4. Then paint one coat Annie Sloan old ochre:


old ochre chalk paint on shutters
5. Sand to distress.
Apply Minwax Early American stain:


distressed and stained chalk paint
6. Prepare backing.
Using 3/8″ plywood cut 1″ less on all sides than shutter layout, attach scrap piece 1x in center for cleat.
Then attach cleat to 1x scrap piece and plywood:
** I also attached a 1x scrap piece near the bottom so the headboard hangs flat against the wall.
plywood headboard backing
7. Place shutters face down (notice I did not paint the backsides) then place plywood backing on top of shutters:


french cleat on plywood backing
8. Predrill and countersink plywood to shutters using 1 1/4″ wood screws.
Use 4 screws on each shutter at the corners:


attach plywood to shutters
9. Secure other half of cleat to wall, be sure it’s level:
(This cleat claims to be able to hold 200# but the headboard only weighs about 40#.)
french cleat installed on wall
10. Carefully place headboard side of cleat into wall side:
headboard hanging on french cleat
Now move bed back into place:
master bedroom shutter headboard
And you would never know the headboard is not attached to the bed.


rustic distressed shutter headboard
The shutters add a bit of character and charm.


rustic repurposed shutter headboard

You may also like...

  • DIY Carved Headboard with MonogramDIY Carved Headboard with Monogram
  • DIY Heather WreathDIY Heather Wreath
  • Wall Mounted Sink New LifeWall Mounted Sink New Life
  • Swap It Like It’s Hot: Flower & Chalkboard MagnetsSwap It Like It’s Hot: Flower & Chalkboard Magnets
Share this post:

Filed Under: BEDS, BUILD, DIY, FURNITURE, HOME DECOR19 Comments

Reader Interactions

Comments

  1. Sweet Cottage Dreams says

    January 29, 2012 at 4:42 PM

    WOW!

    I love your new headboard!!!
    You did an amazing – AMAZING – job!!!

    Thanks for the tutorial, too.

    Becky

    Reply
  2. Amy says

    January 29, 2012 at 4:44 PM

    Love it. Especially the part where you thankedyourneighbors for the shutters… Awesome. I have to try that annie sloan paint. Looks amazing.

    Reply
  3. Cassie @ Primitive & Proper says

    January 29, 2012 at 5:28 PM

    that looks awesome! i really love the buttery warm color you used!

    Reply
  4. Vickie @ Ranger 911 says

    January 29, 2012 at 6:00 PM

    I'm thinking of replacing our full-size ancient brass bed with a king and this would be perfect for a vintage looking headboard. Thanks so much for sharing your awsome idea. And the tutorial too!!

    Reply
  5. Feral Turtle says

    January 29, 2012 at 6:20 PM

    Thanks for the inspiration. I have had some old shutters forever and was waiting for the perfect use. Now I have it! Cheers.

    Reply
  6. Lucy says

    January 29, 2012 at 7:28 PM

    Love it! I wish our town had good trash days like yours. I've been on the hunt for shutters for some time. These sure do add warmth to the room, both in texture, architecture & color.

    Reply
  7. Lesley says

    January 29, 2012 at 7:46 PM

    One of my favs you have ever done! Super cool! Did you change your pic on your profile?? You look completely different! I threw me for a minute. lol

    Reply
  8. [email protected] says

    January 29, 2012 at 9:51 PM

    This is just lovely! How wonderful that you were able to get those shutters for FREE!

    Reply
  9. Meg and Mum's says

    January 30, 2012 at 12:08 AM

    It looks gorgeous Jaime! Great work and so much better. I'd love it if you'd share this at my Saturday Splendour Party which is still open 🙂

    Reply
  10. Inspire Me Heather says

    January 30, 2012 at 2:53 PM

    You. Are. Amazing. Love it Jaime, the prefect amount of shabby too!

    Reply
  11. [email protected] says

    January 31, 2012 at 10:01 PM

    Love the color. Nice job.

    Reply
  12. Tisha says

    February 2, 2012 at 1:44 AM

    I have a pair of found-in-the-trash unpainted shutters, already cut in half. I've just been waiting for the right inspiration to hit me. Boom! Thank you!! Pinning, following, and hoping you'll share this great project at my linkup party going on now @ the Delectable Home.

    Reply
  13. Stephanie says

    February 5, 2012 at 2:04 PM

    Pinned it – Love it – Want one too. Thanks for posting. The directions are great abd easy to follow.

    Reply
  14. Meg says

    February 8, 2012 at 1:51 PM

    That looks awesome!! I love the shutter look!

    Reply
  15. Lisa - A Room with A View says

    February 10, 2012 at 11:18 PM

    Fabulous work once again..I am impressed!

    Reply
  16. Faith, Trust and Pixie Dust says

    February 12, 2012 at 6:11 AM

    I really like seeing unconventional ways of making headboards. This looks fantastic! And thanks for showing how you hung it.

    Warmly, Michelle

    Reply
  17. aimee says

    February 12, 2012 at 3:42 PM

    what a beautiful idea i love it. it would be great if you get chance to link this up to my party going on now at http://twiggstudios.blogspot.com/2012/02/sunday-show-off-linky-party.html

    thanks aimee xxxx

    Reply
  18. Mel says

    January 9, 2014 at 7:58 PM

    I never even heard of a cleat but I love how it looks like its hanging in air! Great job!

    Reply

Leave a Reply Cancel reply

Your email address will not be published. Required fields are marked *

Primary Sidebar

Hi! I’m Jaime

Jaime Costiglio

Hello!

Thank you for stopping by.
Join me for lots of DIY.

Read more

Get new posts via email

Handbuilt Holiday: Gift Project Plans

handbuilt holiday gift project plans

Collection of DIY gift project plans to build.

The Home Depot Tool Prospective

THD Prospective

Tools to consider for the DIYer.

Archives

The Home Depot Logo
Copyright © 2023 Jaime Costiglio · Custom site by Moonsteam Design

Privacy Policy