• Home
  • Blog
  • About
  • Contact
    • Disclosure
    • Privacy Policy
  • SHOP
  • Widget area for main menu

    • Email
    • Facebook
    • Instagram
    • Pinterest
    • Twitter
    • YouTube
  • Skip to primary navigation
  • Skip to main content
  • Skip to primary sidebar

Jaime Costiglio

build - paint - sew

  • BUILD
    • BEDS
    • BENCHES
    • DESKS
    • DRESSERS
    • GAMES & TOYS
    • SCRAP WOOD
    • SHELVES
    • STORAGE
    • TABLES
  • TOOLS
  • PAINT
    • CRAFTS
    • FURNITURE
    • HOME DECOR
  • SEW
    • GIFTS
    • HOME DECOR
    • POUCHES
  • HANDBUILT HOLIDAY
    • 2021
    • 2019
    • 2018
    • 2017
    • 2016
    • 2015
    • 2014
    • 2013
  • GIFTS
    • BABIES
    • KIDS
    • FOR HER
    • FOR HIM
    • TEACHERS
    • WEDDINGS
  • SEASONAL
    • 4TH OF JULY
    • FALL
    • HALLOWEEN
    • CHRISTMAS
    • SUMMER
    • SPRING
    • ST. PATRICK’S DAY
    • THANKSGIVING
    • VALENTINE’S DAY
    • WINTER
  • SALTBOX PROJECT
    • BATHROOMS
    • DINING ROOM
    • EXTERIOR
    • FAMILY ROOM
    • FOYER / MUDROOM
    • KIDS BEDROOMS
    • KITCHEN
    • LIVING ROOM
    • MASTER BEDROOM
    • PLAYROOM
  • SCROLL SAW

“G” is for Guest #2

June 1, 2011

Today I’m over at Infarrantly Creative where Beckie blogs about the most creative projects in blogland.

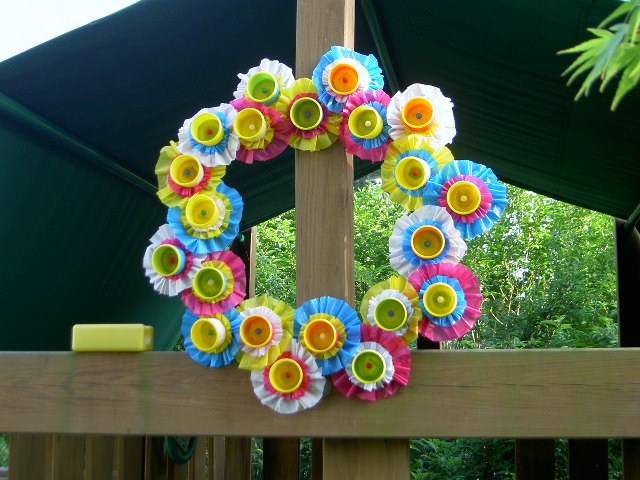
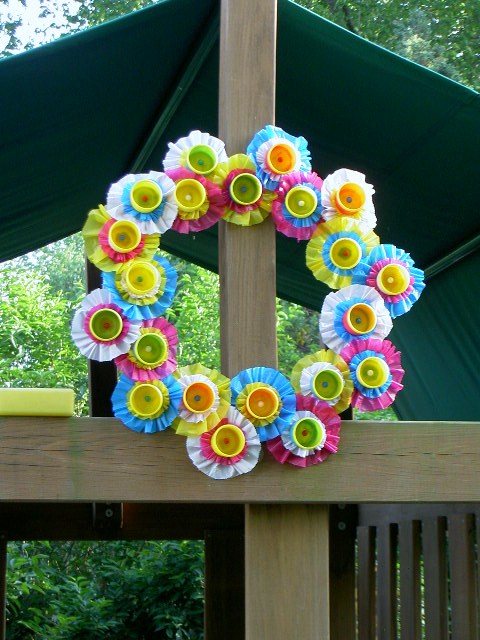
I made a weather resistant wreath from playdoh containers:

I was shocked to receive Beckie’s email request and I hope my project fulfills all expectations!
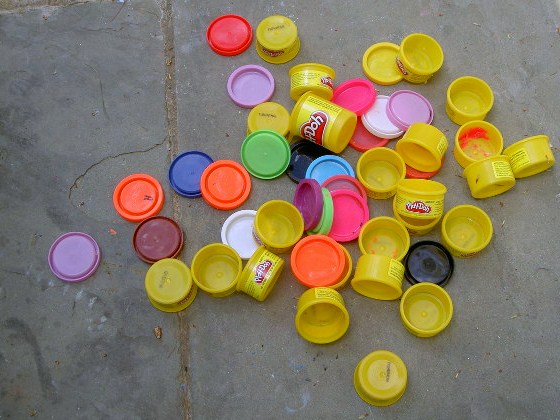
I started with this:

And made this:

Click on over to Beckie’s place Infarrantly Creative to get the full tutorial.
I’m linking up to:
 button_thumb[12]
SYS Thurs Transformation ThursdayBLOG TITLE Chic on a Shoestring Decorating The Girl Creative The Shabby NestThis Week Photobucket Thumbnail for 'Made By You Monday' MakingThe DIY Show Off  http://linda-coastalcharm.blogspot.com/Photobucket The Lettered Cottage  PhotobucketA BEACH COTTAGE
Home Stories A to Z
http://www.centsationalgirl.com/
Wreath Party @ Nesting Place

You may also like...

  • DIY Jewelry StandDIY Jewelry Stand
  • Master Bedroom MakeoverMaster Bedroom Makeover
  • Dremel Multi-Max Oscillating Tool Accessory SetsDremel Multi-Max Oscillating Tool Accessory Sets
  • DIY Vintage Style Doll CribDIY Vintage Style Doll Crib
Share this post:

Filed Under: Uncategorized27 Comments

Reader Interactions

Comments

  1. Sawdust and Paperscraps says

    June 1, 2011 at 7:32 PM

    clicking over now (And can you please get rid of your word verifications already!?!) :0)

    Reply
  2. Inspire Me Heather says

    June 1, 2011 at 10:45 PM

    Oh that's so cute Jaime!

    Reply
  3. Fishtail Cottage says

    June 2, 2011 at 3:58 AM

    so so so cute! thanks for sharing over here at Fishtail Cottage's garden party! oxox, tracie

    Reply
  4. Tanya @ Greetings From the Asylum says

    June 2, 2011 at 4:09 AM

    I love how you recycled those Play Doh cups! Did you know that the recipe for Play Doh used to be a wallpaper cleaning compound? It's true! Thanks for sharing your cutie cute wreath!

    Reply
  5. imsteelefullofscrap says

    June 2, 2011 at 10:19 AM

    What an adorable idea to recycle those, guess I will have to stalk the neighbors and see if they have any containers my children are too old for play dough now. I bet you could even spray paint them in different colors and use pretty paper on the outside to get a different look and color

    Reply
  6. Dragonfly Treasure says

    June 2, 2011 at 2:34 PM

    Great way to recycle!
    *hugs*Deb

    Reply
  7. Lori @ Beneath the Rowan Tree says

    June 3, 2011 at 12:25 AM

    SO clever! Now I know what to do with all of those containers!!
    I would love if you would share this on our Weekly Playdate linkup at: http://beneaththerowantree.blogspot.com/2011/05/playdate-link-party-everyone-welcome.html
    Itis a play and kid themed link up 🙂

    Cheers,
    Lori
    Come & Play!
    http://beneaththerowantree.com

    Reply
  8. Just Jaime says

    June 3, 2011 at 2:38 AM

    Great idea! I love it. Oh and I like your name =D

    Reply
  9. Confessions of a Stay at Home Mommy says

    June 3, 2011 at 2:05 PM

    I LOVE this! I'm your newest follower!
    ~Macy http://www.craftyconfessions.com

    Reply
  10. Brit @ JandMs Eye Candy says

    June 3, 2011 at 2:59 PM

    that is a great idea! I have tons of those things laying around, most of them full of dried up Play Doh! Weekend project for me! Thanks for sharing 🙂
    jandmseyecandy.blogspot.com

    Reply
  11. Michelle says

    June 4, 2011 at 3:39 AM

    This is absolutely fantastic!!! I would love if you could link this up to my Delicately Constructed Friday!! Thanks so much!
    Have a great weekend!
    Michelle
    http://www.delicateconstruction.blogspot.com

    Reply
  12. Dacia says

    June 4, 2011 at 6:13 AM

    Wow, that's really creative! Cute! Visiting from TT&J

    Reply
  13. Kim @ KimsKandyKreations says

    June 5, 2011 at 3:40 PM

    So cute! I am totally in love with this wreath idea. I will have to start saving my playdough when it gets all dried up and nasty now.

    Thanks for sharing such a great idea. I had to share it on my Shout Out Sunday post today! I'll be back to check out more of your great ideas.

    http://kimskandykreations.blogspot.com/2011/06/shout-out-sunday.html

    Reply
  14. aggieam01 says

    June 6, 2011 at 1:03 AM

    Super creative. Love the bright colors!!!!!

    Reply
  15. Heather - Dollarstorecrafts.com says

    June 7, 2011 at 3:16 AM

    Fun! I'm linking up at Dollar Store Crafts tomorrow.

    Reply
  16. Mrs.D says

    June 8, 2011 at 4:23 PM

    What a CUTE idea! We'd love to see you link up to our Monday Link Party at http://www.dimpleprints.com so you can share this with our readers.

    Reply
  17. Desiree @ The 36th Avenue says

    June 10, 2011 at 6:47 AM

    Now, this is FUN! I'd love for you to share it at my link party. AWESOME idea 😉

    Reply
  18. Sommer says

    June 10, 2011 at 11:45 PM

    No way! That is incredible lol. Of course I don't think I've come across one of your projects I haven't said that about lol. What a fun project idea! Please stop by and join my party this weekend at http://designergarden.blogspot.com/2011/06/vip-party-18.html

    Reply
  19. [email protected] says

    June 10, 2011 at 11:57 PM

    awesome! what a great way to recycle!

    Reply
  20. [email protected] Stories of A2Z says

    June 11, 2011 at 1:47 AM

    How fun!

    Reply
  21. Wendys Hat says

    June 13, 2011 at 3:27 PM

    This is so cute!

    Reply
  22. ~The Bargain Babe says

    June 29, 2011 at 10:05 PM

    Genius and adorable!! Going to read the full tutorial now. :

    Reply
  23. kasia says

    July 7, 2011 at 10:22 PM

    That is such a great idea! Thanks for sharing

    Reply
  24. [email protected] says

    July 8, 2011 at 3:30 AM

    Jaime,
    What a clever idea! love it! I'm stopping by as the guest judge for the CSI project 🙂
    happy crafting!
    Linda

    Reply
  25. [email protected] Road says

    August 5, 2011 at 3:57 PM

    It's a great project!

    Reply
  26. Hello, I'm Laura says

    September 4, 2011 at 11:43 PM

    What a completely adorable wreath ~ I love it!

    Have a Happy Labor Day.

    Reply
  27. bendedspoon says

    September 5, 2011 at 2:27 PM

    Another fun and lovely project for me and my kiddos! 🙂

    Reply

Leave a Reply Cancel reply

Your email address will not be published. Required fields are marked *

Primary Sidebar

Hi! I’m Jaime

Jaime Costiglio

Hello!

Thank you for stopping by.
Join me for lots of DIY.

Read more

Get new posts via email

Handbuilt Holiday: Gift Project Plans

handbuilt holiday gift project plans

Collection of DIY gift project plans to build.

The Home Depot Tool Prospective

THD Prospective

Tools to consider for the DIYer.

Archives

The Home Depot Logo
Copyright © 2023 Jaime Costiglio · Custom site by Moonsteam Design

Privacy Policy