Back with another Handbuilt Holiday gift idea this Friday. Today is a scrap wood project you can make almost any size to fit your needs. And it makes the most perfect gift giving container as well!

A DIY tutorial to build a wood trug. Make this super functional wood trug to contain all the things! Books, toys, magazines, blankets and more.
It’s Friday which means Ana White and I have another new plan perfect for your holiday gift giving.

Today it’s a wood trug or carryall or handled bin. Whatever you want call it it makes a very versatile and useful gift. It could even be a gift to hold other gifts!

Ana’s plans will have you building not one but multiple trugs for nearly everyone on your holiday list. And you can use scrap wood of almost any size to make these wood trugs.

These wood trugs hold everything: toys, themed gift basket, craft supplies, books, blankets and more.

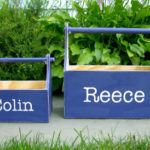
I painted stripes on these trugs but the finish possibilities are endless. You could even personalize them by adding a name using the same technique from the folding desk last week.


And don’t worry the handles won’t ever fall out of position. I used small perpendicular wood dowels as stoppers at each end to keep the dowel in place.

For the finish I opted to leave the interiors unfinished – look at all that space!

Here’s how to build a wood trug:
1. Follow Ana’s plans and cut your lumber.

Below are the cut lists for the 3 trugs pictured:

2. To make the curved end piece mark where the side meets up with the end (on both sides) and then mark the center at top.

3. Use a small diameter container (paint sample etc) and trace the upper edge to get the top curve.

Then use a larger diameter can (regular paint can, plastic takeout container lid, etc) and trace the edge of the can to get the bigger side curve.


Now cut out the curved end with a jig saw.

To make the second end piece trace around the first to get matching ends.

6. Drill holes for handle using a spade bit that is the same diameter as the dowel.
(I prefer my handle to move freely therefore I drilled this hole a bit wide to give a tiny extra room.)


7. Before assembling the wood trug consider sanding the curved edges well.
8. Then use wood glue and 1 1/4″ finish nails and nailer (or hammer) to attach sides to one end.

I used 4 nails in each end.


Finally cut base to fit and glue and nail into position.
For the handle cut the dowel to fit, leaving at least 1/4″ overhang at each end. Then make a mark for smaller stopper dowel just inside the ends and predrill a hole. Slide one stopper in place, place handle in position, then insert other stopper.

12. To paint the stripes simply measure and tape off with painters tape:

Keep moving the tape and making new lines until you have all the stripes you want.
13. Seal with Minwax clear satin poly:

And check back each and every Friday through Christmas for another new gift build plan for the Handbuilt Holiday series.


These are super cute, Jaime! I love the stripes. I'm thinking my boys need some of these for Christmas for all their treasures!
I really love the project. I use hardwood plywood when building blocks of wood for bandsaw boxes. When the edges are hit with some Danish oil after all of the sanding is done you would be amazed how the plywood just pops out at you. Try it on one of our trugs and I think you will be pleased.
These are wonderful and the possibilities are endless!