• Home
  • Blog
  • About
  • Contact
    • Disclosure
    • Privacy Policy
  • SHOP
  • Widget area for main menu

    • Email
    • Facebook
    • Instagram
    • Pinterest
    • Twitter
    • YouTube
  • Skip to primary navigation
  • Skip to main content
  • Skip to primary sidebar

Jaime Costiglio

build - paint - sew

  • BUILD
    • BEDS
    • BENCHES
    • DESKS
    • DRESSERS
    • GAMES & TOYS
    • SCRAP WOOD
    • SHELVES
    • STORAGE
    • TABLES
  • TOOLS
  • PAINT
    • CRAFTS
    • FURNITURE
    • HOME DECOR
  • SEW
    • GIFTS
    • HOME DECOR
    • POUCHES
  • HANDBUILT HOLIDAY
    • 2021
    • 2019
    • 2018
    • 2017
    • 2016
    • 2015
    • 2014
    • 2013
  • GIFTS
    • BABIES
    • KIDS
    • FOR HER
    • FOR HIM
    • TEACHERS
    • WEDDINGS
  • SEASONAL
    • 4TH OF JULY
    • FALL
    • HALLOWEEN
    • CHRISTMAS
    • SUMMER
    • SPRING
    • ST. PATRICK’S DAY
    • THANKSGIVING
    • VALENTINE’S DAY
    • WINTER
  • SALTBOX PROJECT
    • BATHROOMS
    • DINING ROOM
    • EXTERIOR
    • FAMILY ROOM
    • FOYER / MUDROOM
    • KIDS BEDROOMS
    • KITCHEN
    • LIVING ROOM
    • MASTER BEDROOM
    • PLAYROOM
  • SCROLL SAW

DIY Filament Bulb Sconce

July 15, 2013

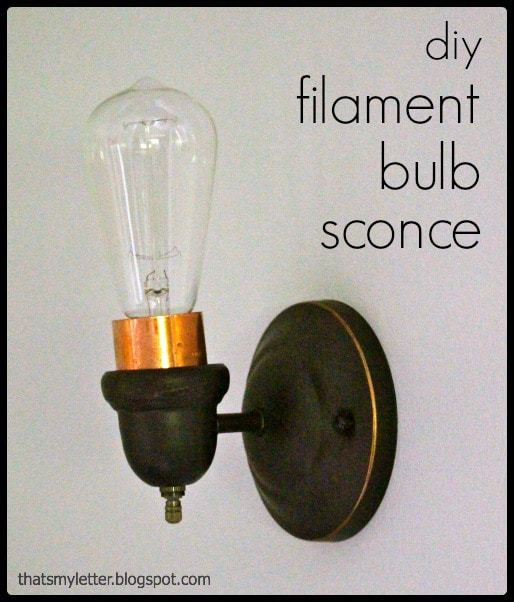
Build: diy exposed filament bulb sconce

Filament bulbs are everywhere and having just moved into a truly vintage home they make the perfect addition.


However, when you need to replace nearly every interior light fixture the costs can add up.
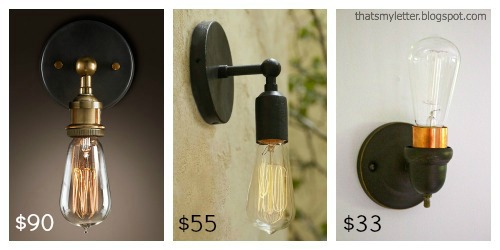
Get a similar look for less:

LEFT: $90 Restoration Hardware filament bulb sconce
CENTER: $55 Pottery Barn Jasper sconce
RIGHT: $33 diy filament bulb sconce
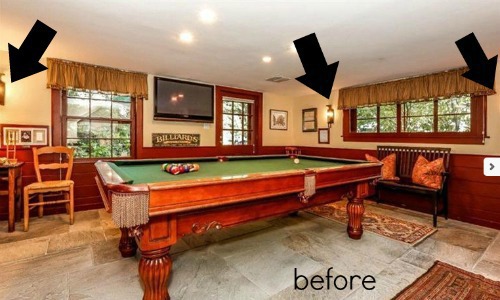
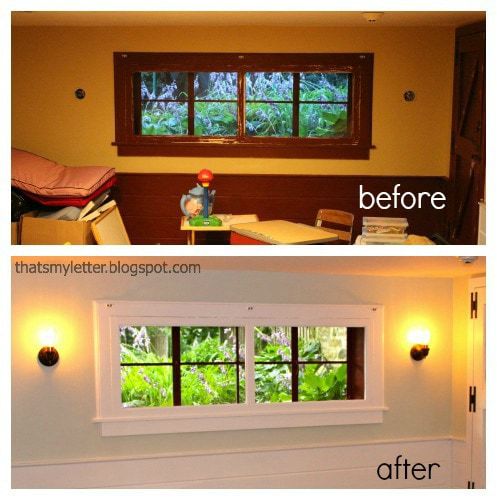
This is the kids play space and below is the MLS listing picture as we saw the house before buying it.
We call it the pool room because it had a pool table and that door in the corner leads out to the pool.
There were 3 sconces to be replaced:

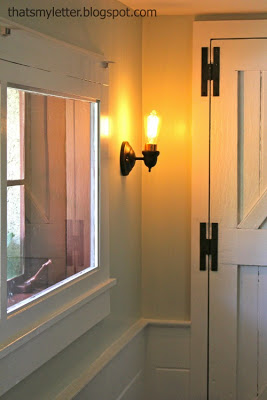
 And after moving day I knew immediately all that red paneling needed to be painted white and the new sconces installed:

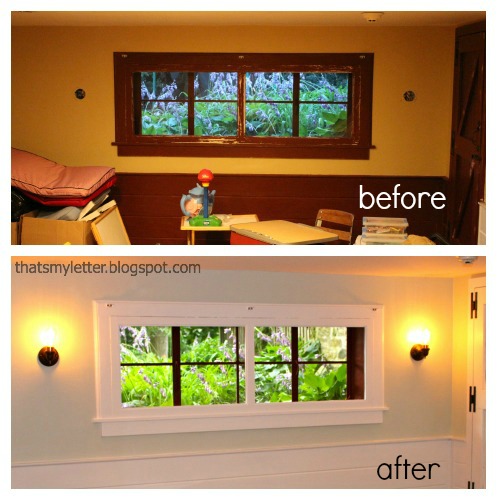
The wall color is Benjamin Moore grey owl.


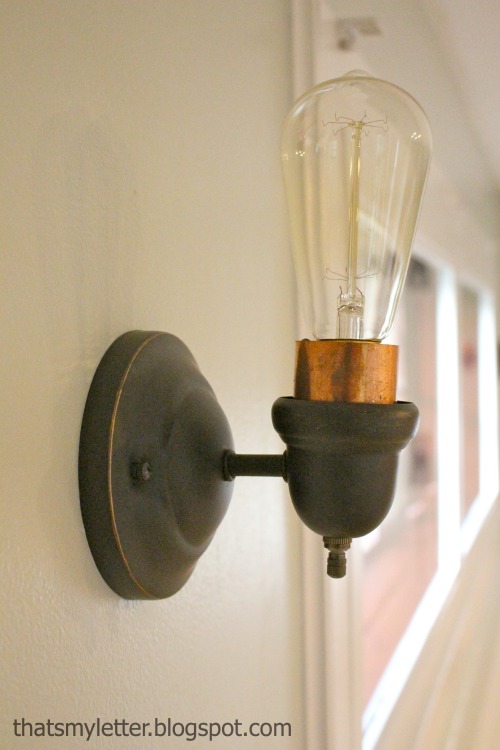
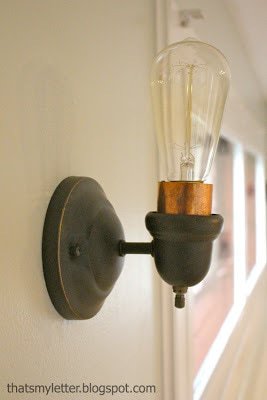
How to build an exposed filament sconce:
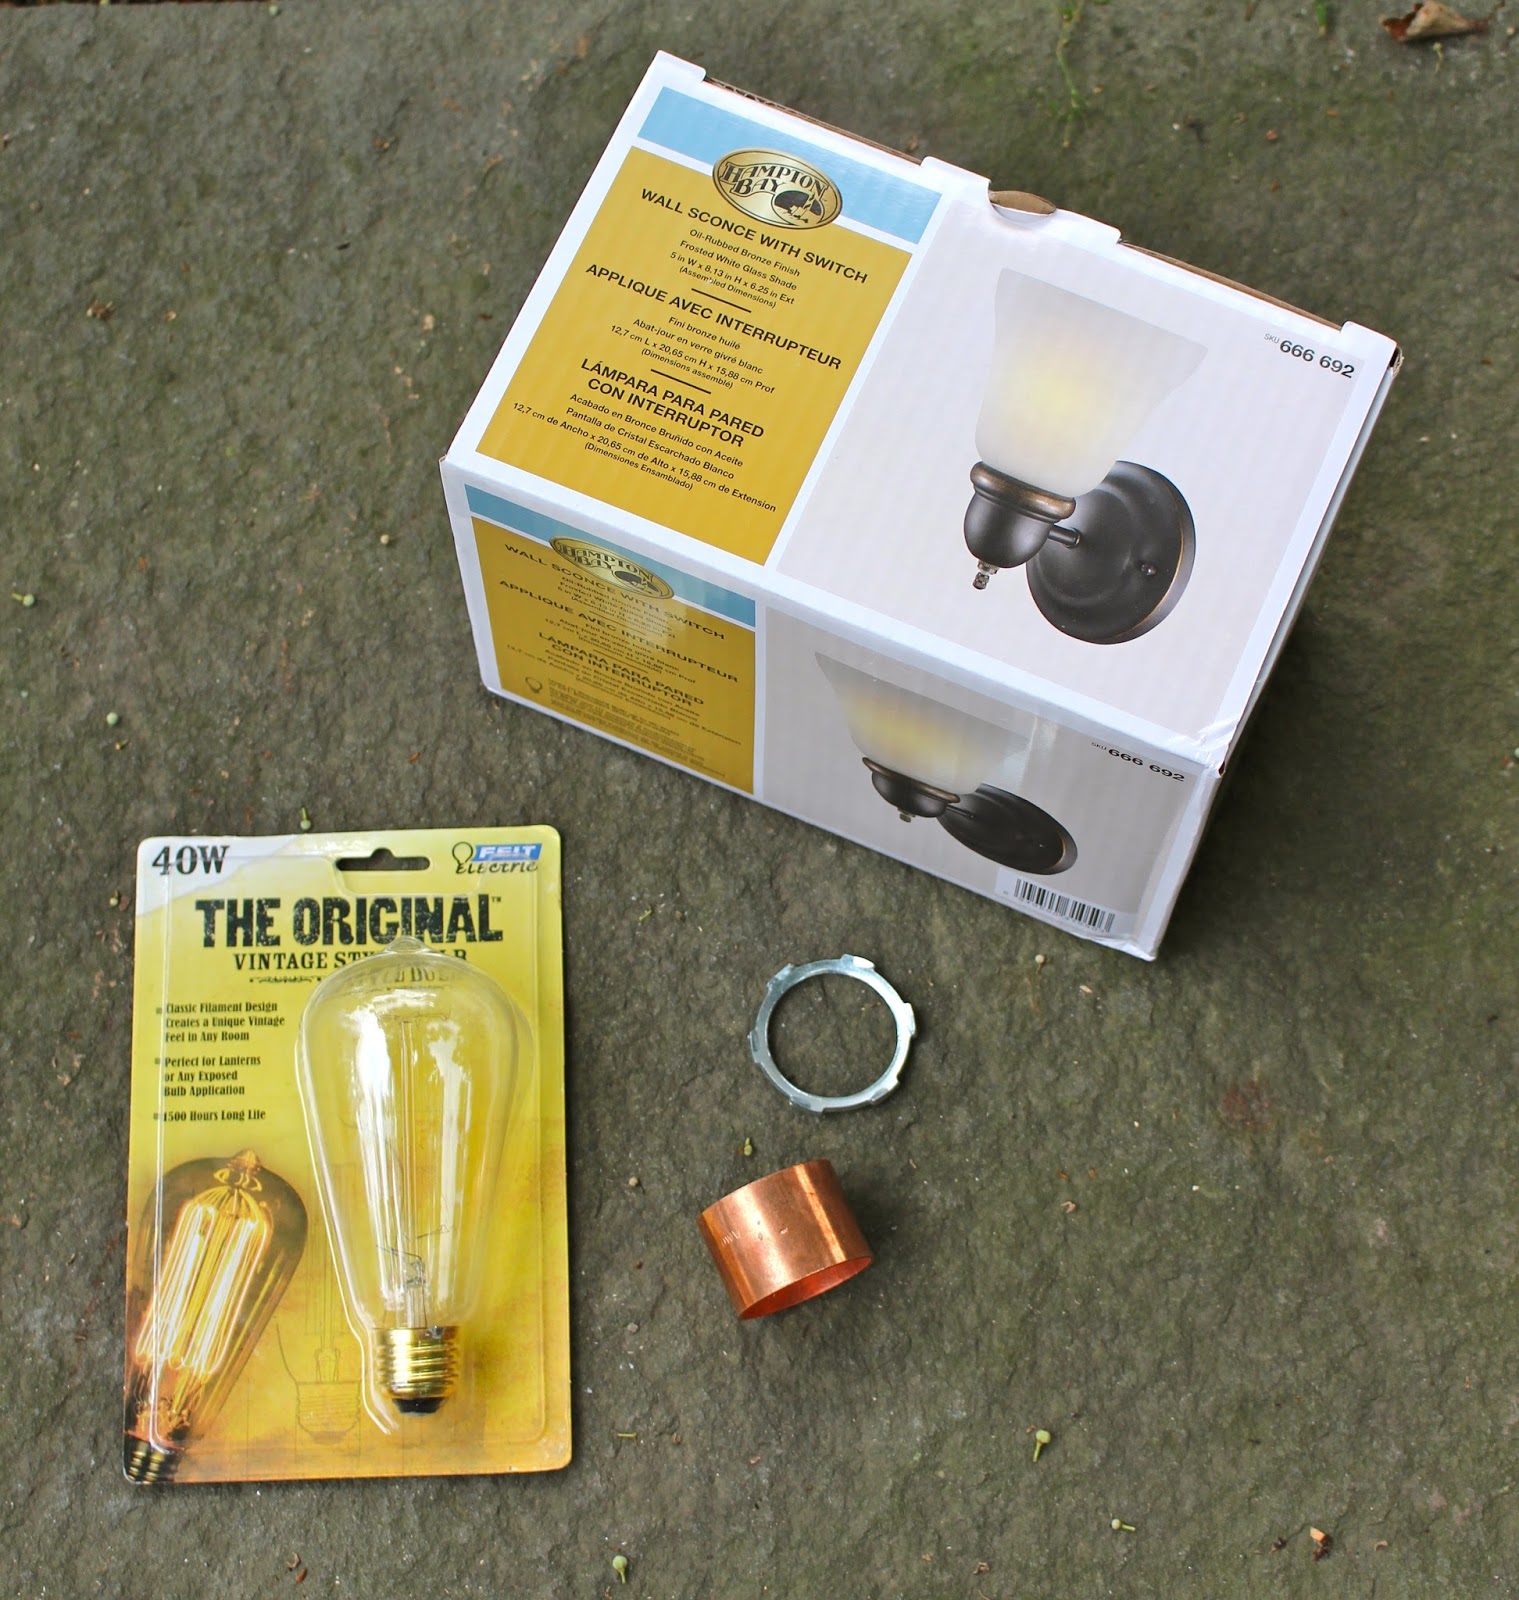

Supplies:

– oil rubbed bronze wall sconce
– 3 – 1 1/4″ conduit locknuts (found in electrical)
– 1 1/2″ copper coupling (found in plumbing)
– edison bulb

** If anyone can find a brass coupling to fit I would love your source, the copper is a bit shiny and orange.  I might paint it to dull it down. **

1. Remove the sconce housing from the package and unscrew the glass shade nut.
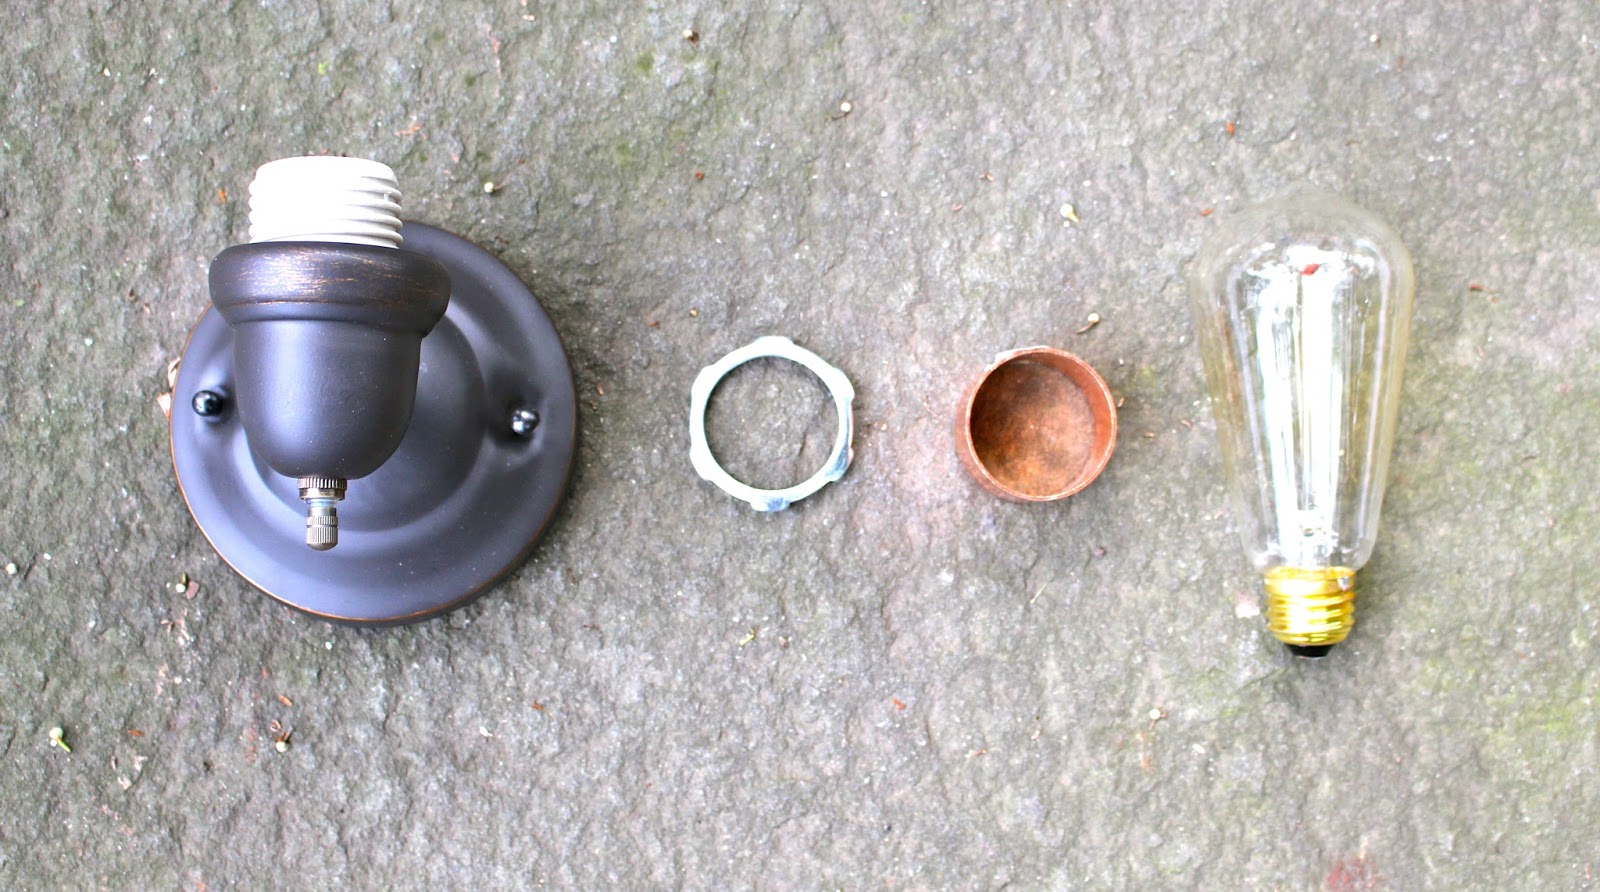
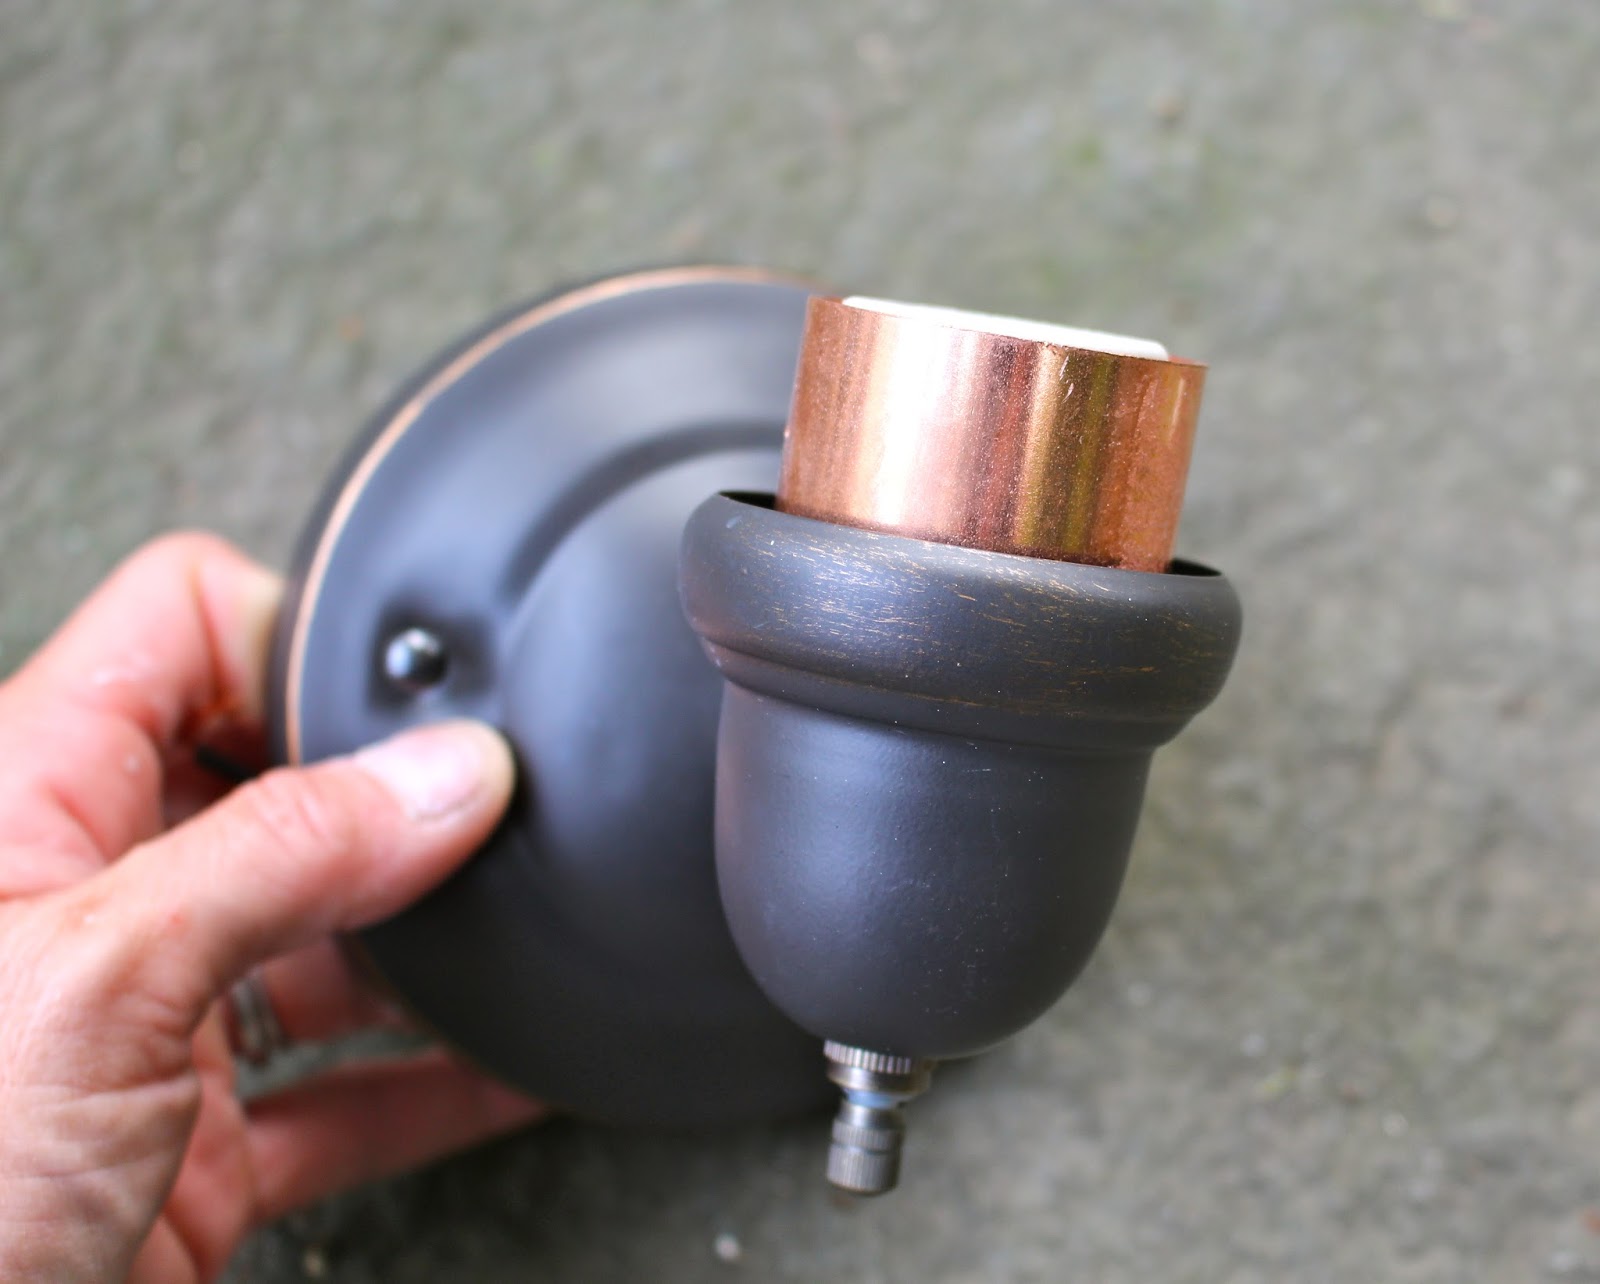
2. Drop the conduit locknut down into the housing around the ceramic bulb holder, you may need 2 or 3 locknuts to depending on the length of your copper coupling in order to get enough heigh to cover the ceramic holder:

3. Install the bracket onto the mounting box:
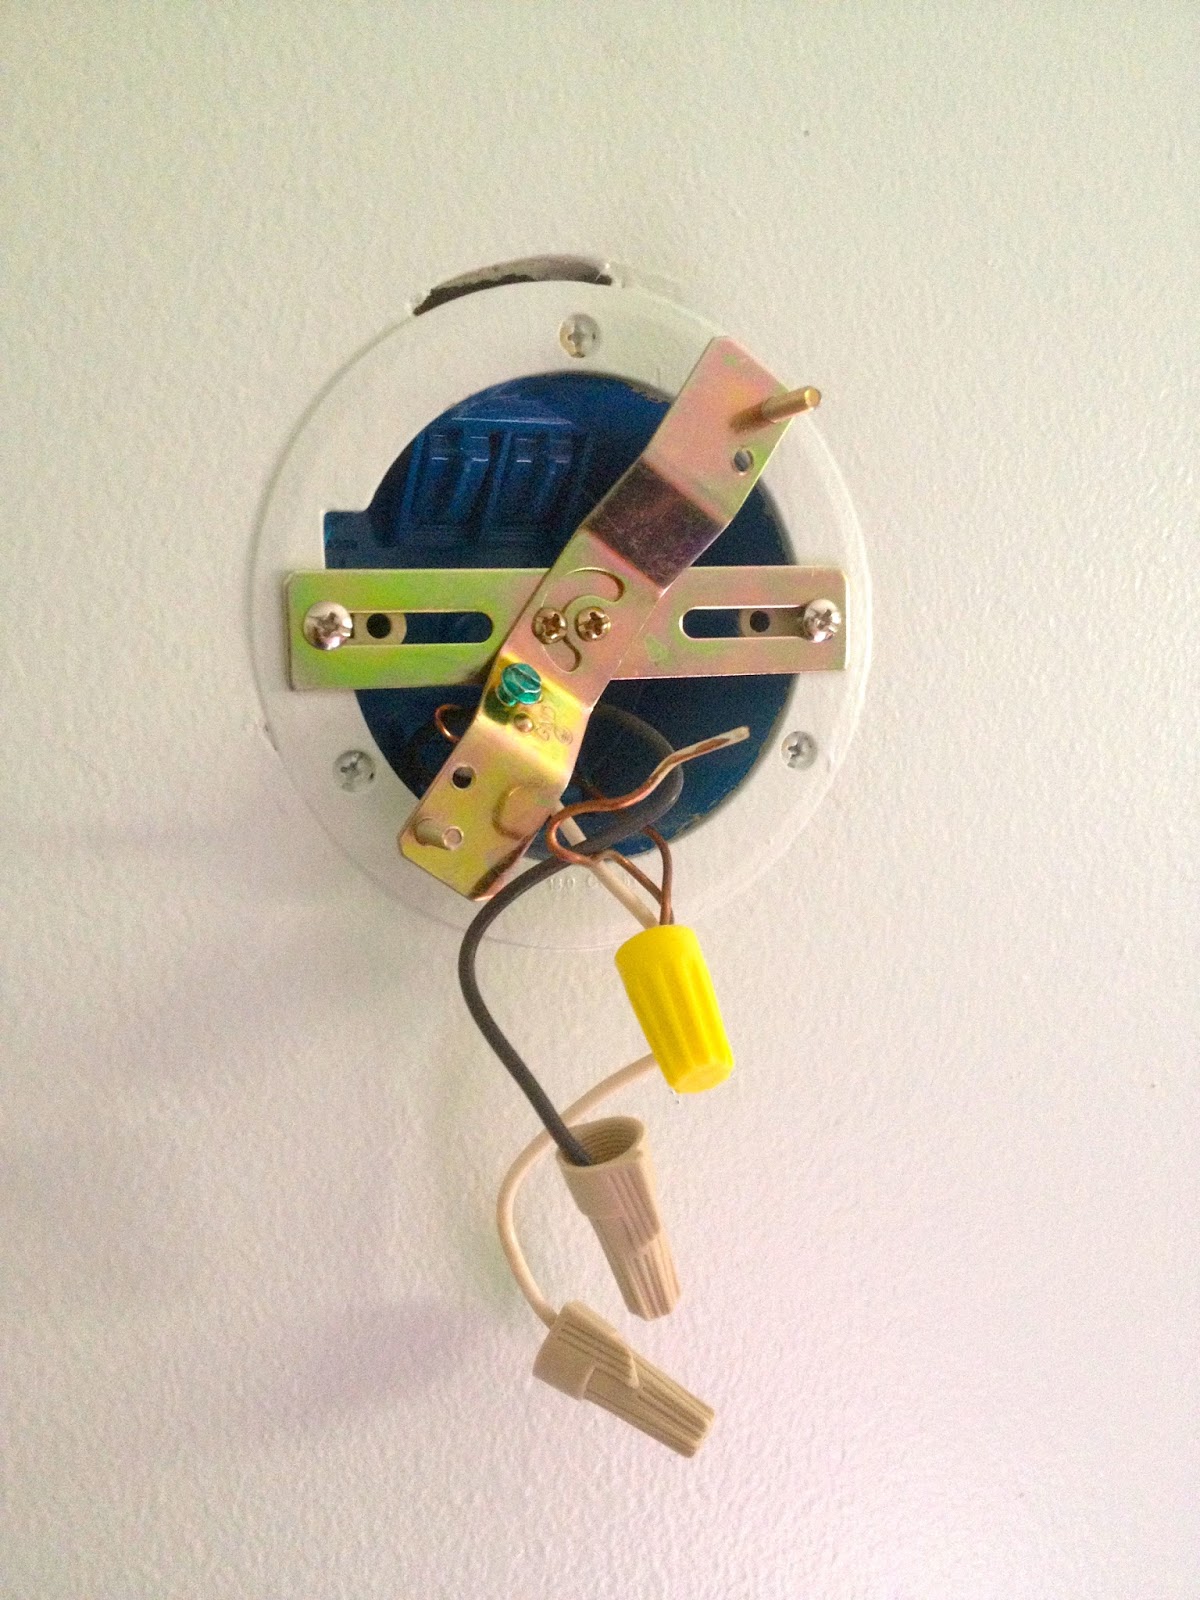
4. Connect the grounds, white neutral and hot black wires:

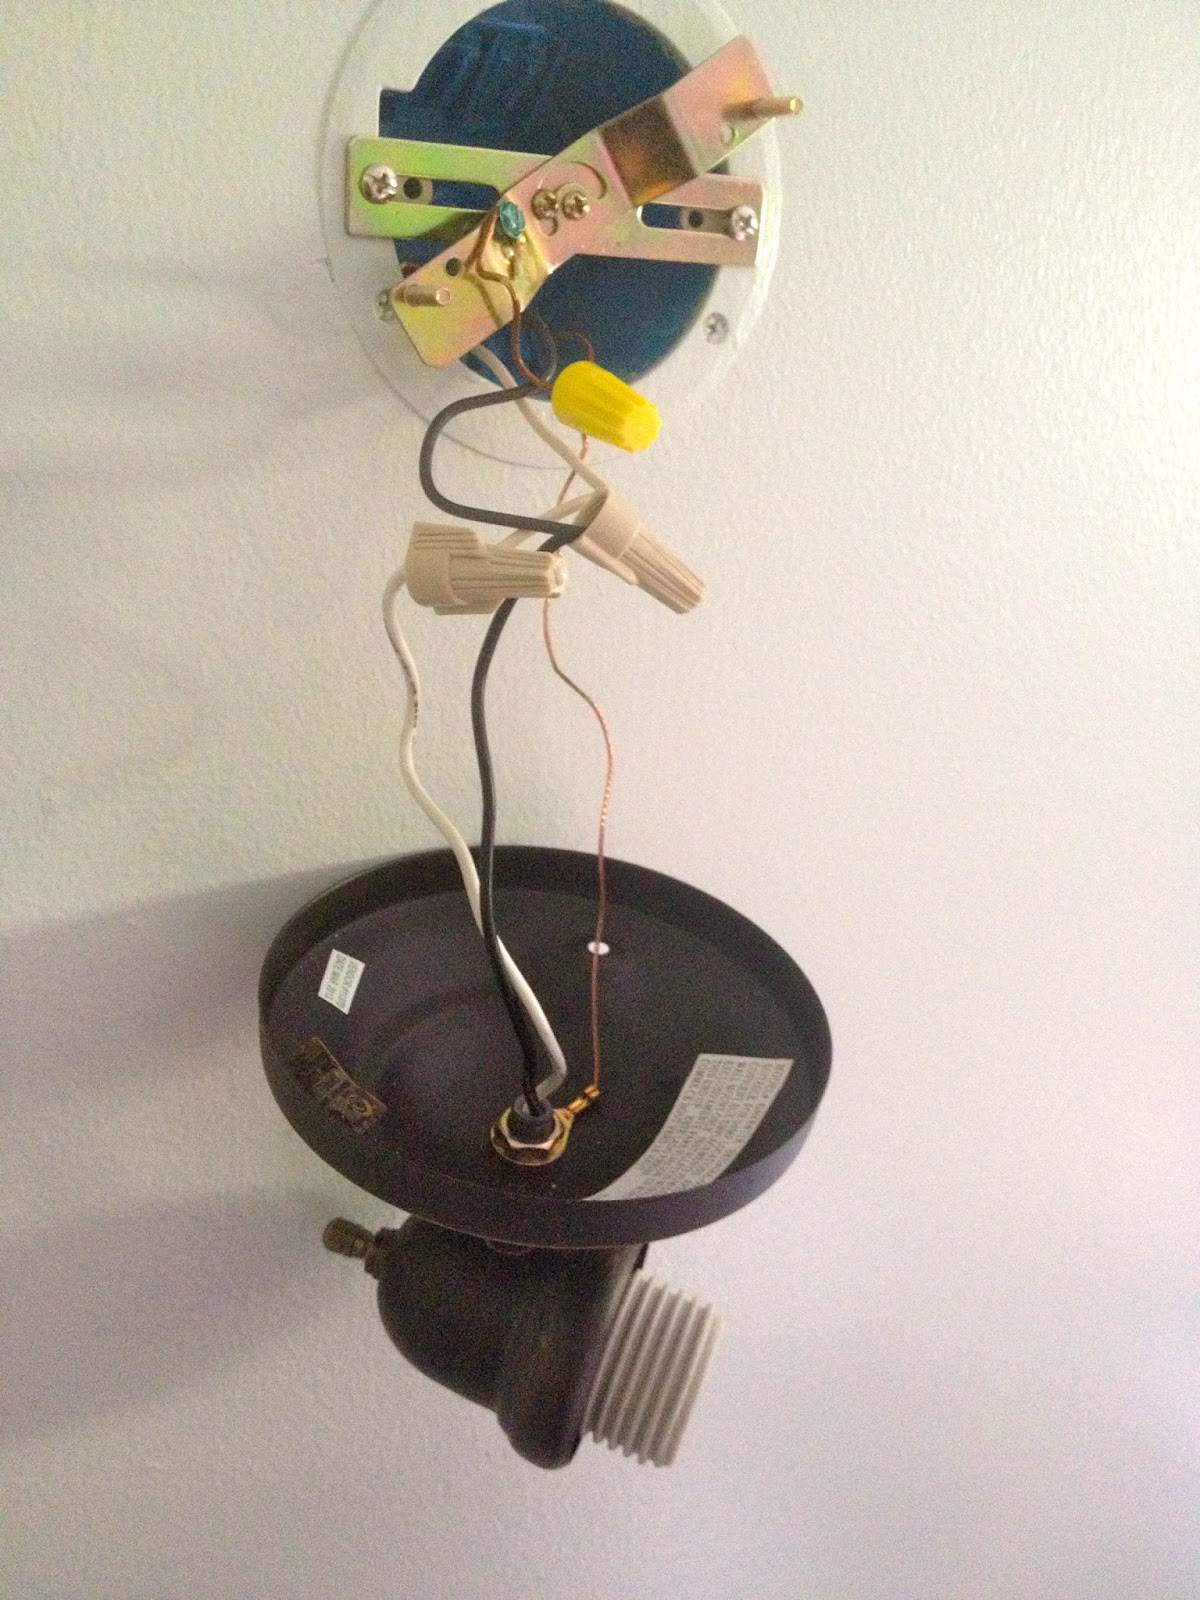
Place housing on screws and secure with nuts, add bulb:

You may also like...

  • DIY Mini Marquee Sign using Dremel 4300 Rotary ToolDIY Mini Marquee Sign using Dremel 4300 Rotary Tool
  • DIY Giant Marquee LettersDIY Giant Marquee Letters
  • Back Foyer MakeoverBack Foyer Makeover
  • DIY Number Marquee SignDIY Number Marquee Sign
Share this post:

Filed Under: DIY, HOME DECOR, PLAYROOM, SALTBOX PROJECT6 Comments

Reader Interactions

Comments

  1. Olivia says

    July 15, 2013 at 1:10 PM

    What a transformation! It looks great Jaime.

    Reply
  2. [email protected] says

    July 15, 2013 at 3:13 PM

    Love the new sconces! The new paint is SO much better too!

    Reply
  3. Tammy Henderson says

    July 16, 2013 at 2:00 PM

    Great transformation…love it Great idea…would love it if you came by One More Time Events and shared http://www.onemoretimeevents.com/2013/07/share-it-one-more-time-features-and.html …Tammy

    Reply
  4. SheilaG @ Plum Doodles says

    July 21, 2013 at 2:02 PM

    Great idea! The new sconces look wonderful, and I love the new paint color- it really brightens up the room.

    Reply
  5. Megan says

    July 27, 2013 at 12:05 AM

    Wanted to let you know this project was highlighted on the at play blog today!

    http://atplayonline.com/2013/07/26/515/

    Megan

    Reply
  6. Hunter says

    July 19, 2018 at 2:39 PM

    Instead of using the copper, how about painting a piece of PVC? Would that help customize the look?

    Reply

Leave a Reply Cancel reply

Your email address will not be published. Required fields are marked *

Primary Sidebar

Hi! I’m Jaime

Jaime Costiglio

Hello!

Thank you for stopping by.
Join me for lots of DIY.

Read more

Get new posts via email

Handbuilt Holiday: Gift Project Plans

handbuilt holiday gift project plans

Collection of DIY gift project plans to build.

The Home Depot Tool Prospective

THD Prospective

Tools to consider for the DIYer.

Archives

The Home Depot Logo
Copyright © 2023 Jaime Costiglio · Custom site by Moonsteam Design

Privacy Policy