
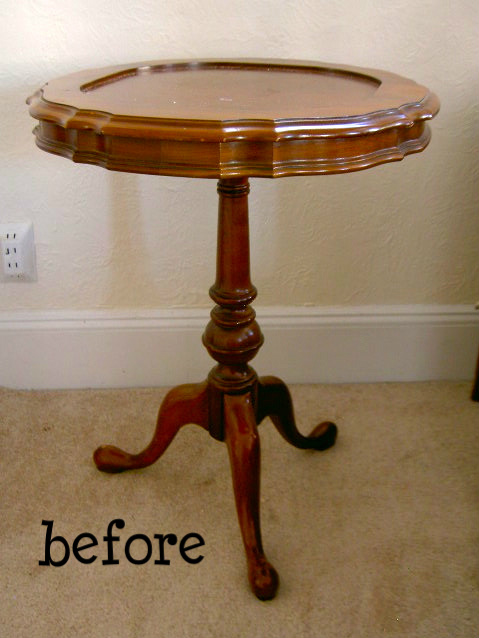


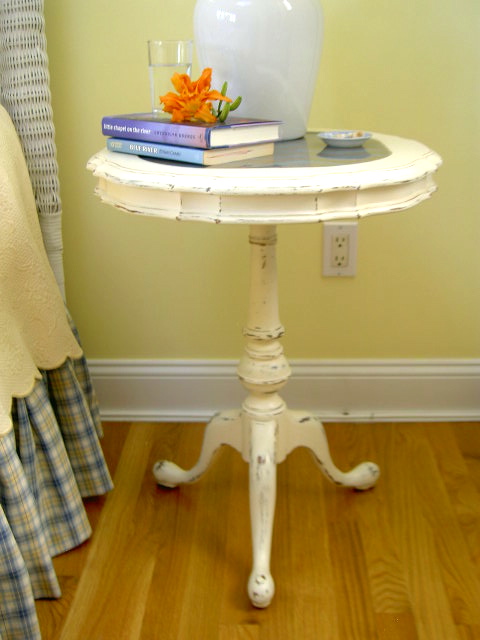
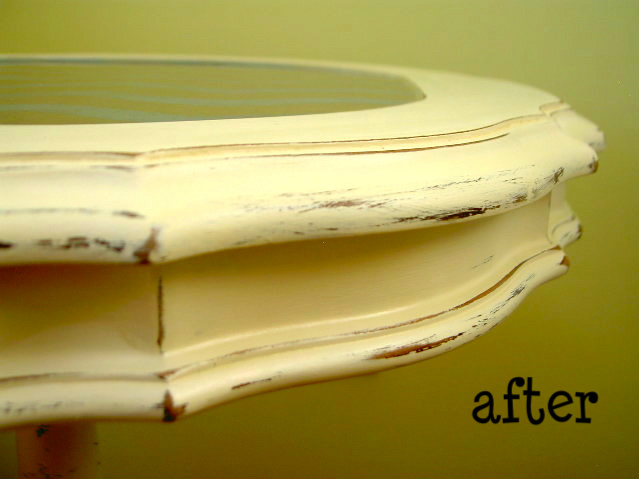
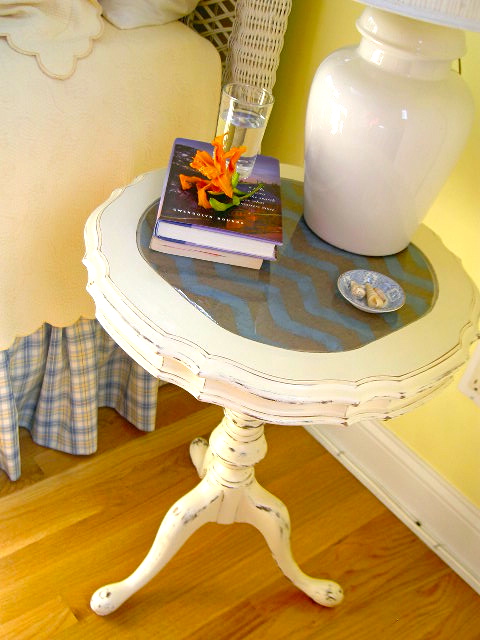
1. Sand off old finish. Prime.
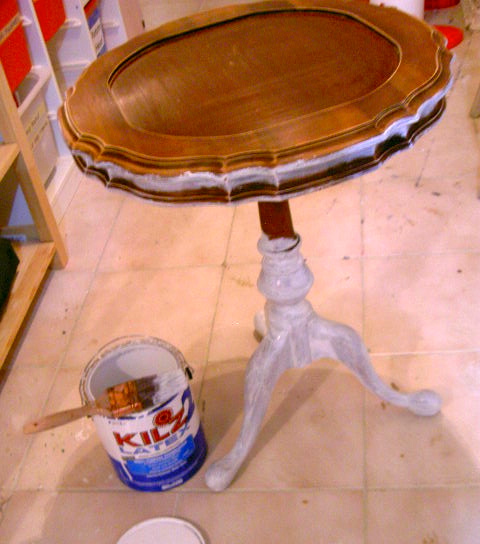
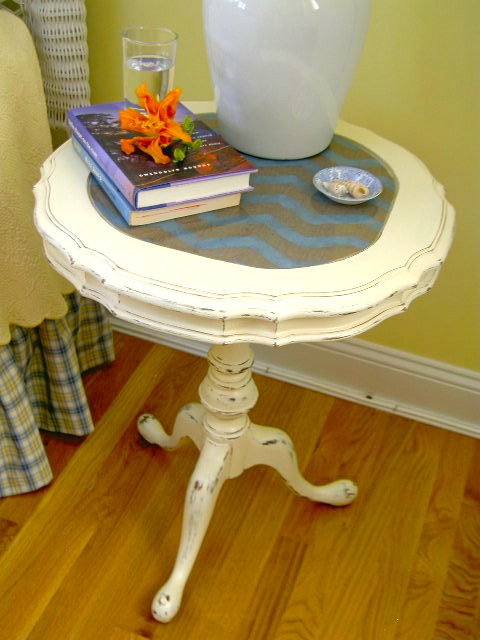
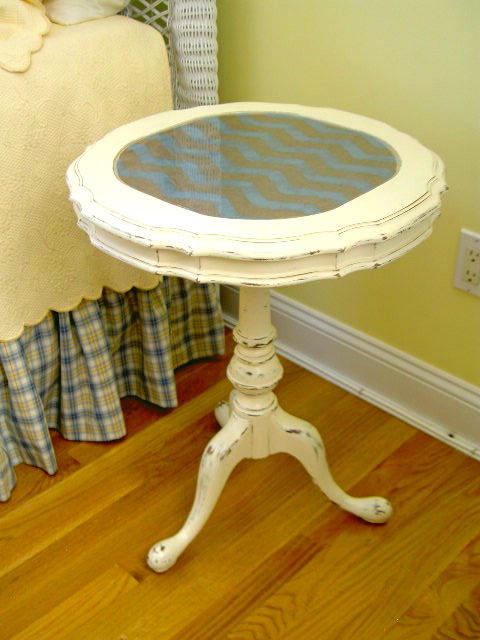
2. Paint two coats BM sugar cookie, sand to distress.
Seal with poly satin finish.

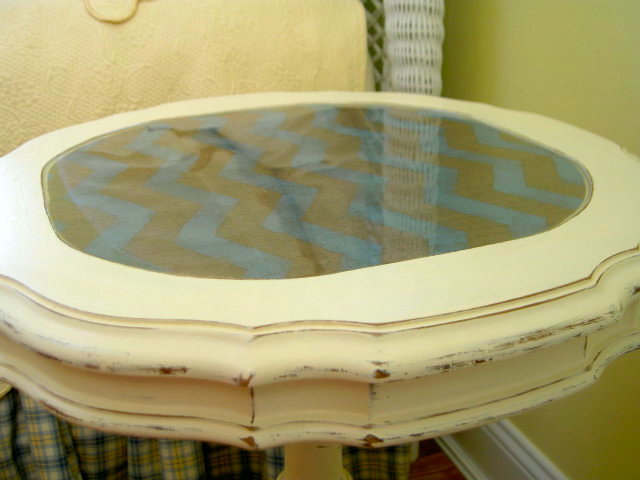
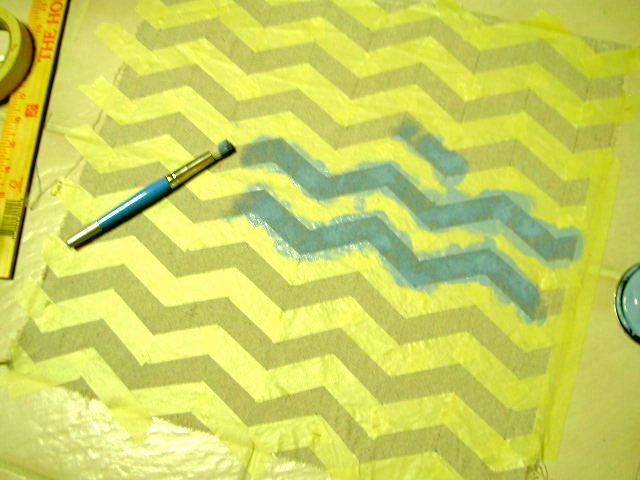
3. Prepare fabric piece for under epoxy. I choose to paint a chevron pattern on some drop cloth canvas.
Tape off chevron pattern:

4. Paint design.
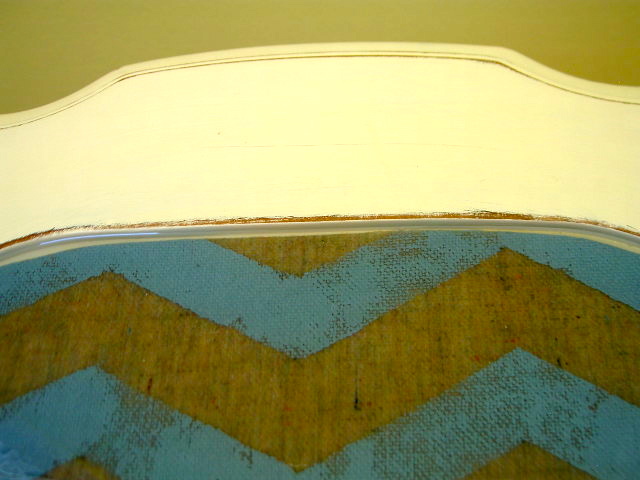
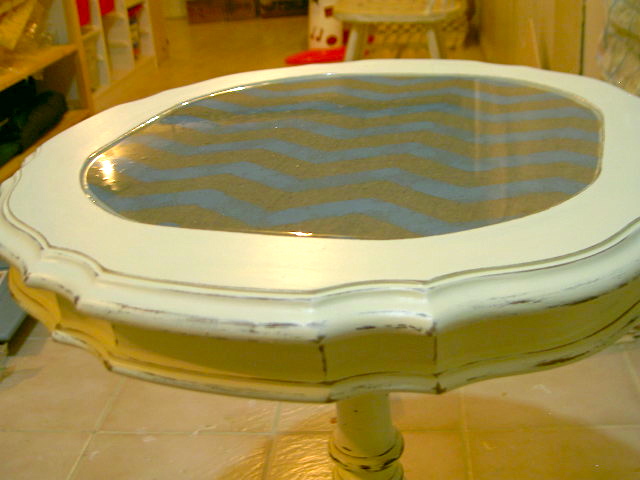
5. Once dry remove tape and cut canvas to fit into inset.
Use spray adhesive on back of canvas to ensure it will stay flat on table surface.
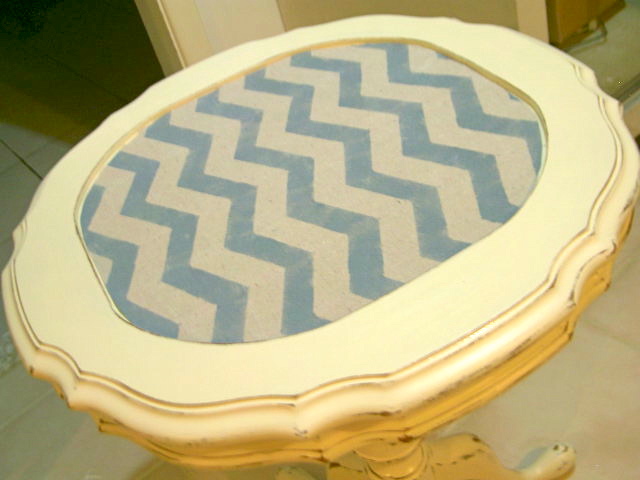
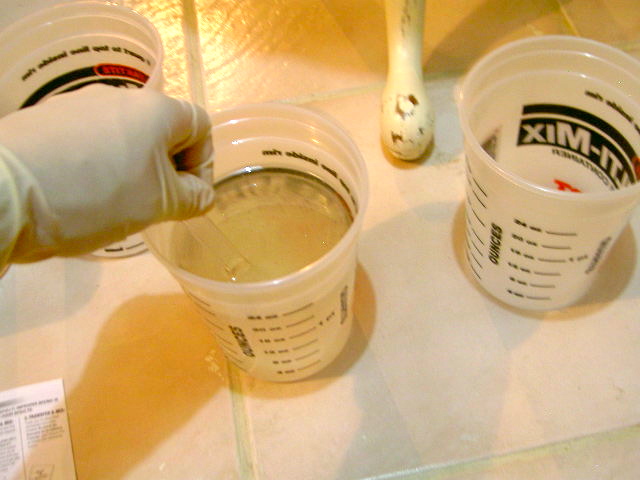
6. Prepare epoxy as per directions.
I used Parks Super Glaze from Home Depot.

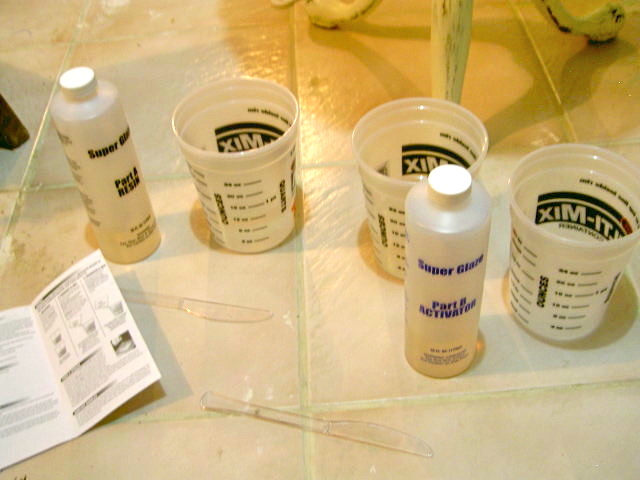
7. Be sure to stir for suggested time, you want the epoxy crystal clear.
8. Be sure table is on a level surface, pour epoxy onto table surface, epoxy will immediately flow into space. Pour slowly until epoxy reaches inset top edge.

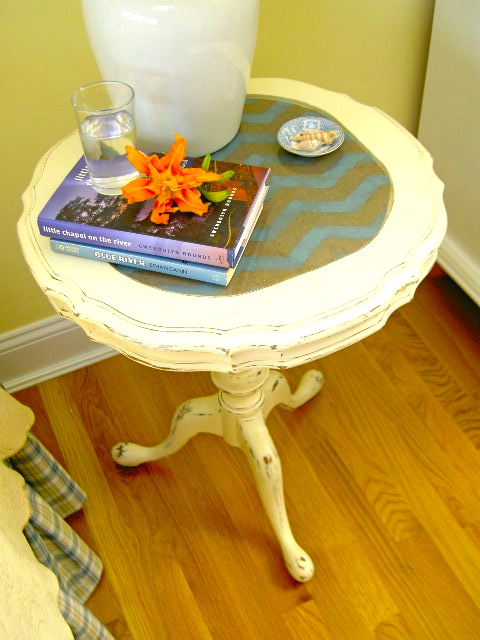
If ever the chance presents itself I would use the epoxy again in a heartbeat.
http://www.perfectlyimperfectblog.com/
http://www.504main.com/
http://chiconashoestringdecorating.blogspot.com/
http://sistersofthewildwest.blogspot.com/
http://www.thegirlcreative.com/
Before & After Party @ Thrifty Decor Chick


Yay, it looks fantastic!!!
I love this redo! It turned out amazing. I have seen so many projects using Epoxy – gotta try it for myself SOON! 🙂
"E" is for Excellent my friend!
Susan
that is awesome! i have been wanting to try that as well- i think it looks so cool and so durable. i may have to now!
and woo hoo- you will have furniture for my party this week! 🙂
It looks fabulous. I love it. Hugs, Marty
It looks amazing! I noticed you used Kilz latex primer. Do you use that for all your projects…or do you find that you have to use an oil-based primer on some things? (I'm going to redo my dining room table, and I'm trying to figure out what kind of primer to use!)
Great makeover! It looks awesome!!
great idea,, the table looks great.
Amazing! I love the transformation from blah table to fabulous conversation piece!
How cool! Way prettier than the picture I have in my head of the brass tray thingy that was there. 🙂
How long did it take to cure?
Your table looks awesome! What a wonderful idea! Now I'm inspired to try Epoxy!!
That tabletop is soooo unique and pretty. Please consider joining my linky party, Suzy's Open House Thursday, at http://www.savedbysuzy.blogspot.com.
What a great table! I love the finish and the design on the top. Stopping over from Miss Mustard Seed.
so cool. I love the texture under the epoxy.
megan
craftycpa.blogspot.com
I've never used epoxy before, what a great idea:) Thanks for the tutorial:)
Thanks for sharing your lovely table with us. I will remember this product in case I run across something that needs this touch. It's so appreciated.
OMIGOSH, just FABULOUS!! I have a beautiful but very sad looking coffee table I picked up for $4 at Goodwill, and it has the same kind of inset…bookmarking your project with your generous tutorial…THANKS for the inspiration!!
Love this little table. It turned out amazing.
Ruth
looks awesome. that was the perfect table for some expoxy. great tutorial too. i am always on emily's case because she skips steps and doesn't take enough pics through the process. she is in too big og a hurry! great job!!
Amy
Great makeover with such a unique twist…love how this turned out!
I've seen epoxy before while shopping at the craft store and always wondered what it would look like on a finished project. Your table looks fantastic, and you found a very creative away to salvage an old table too!
It turned out amazing. I’m also having a link party today and every Monday. I would love for you to stop by and link up your table and any other projects you would like to share. http://diyhshp.blogspot.com/
What an adorable DIY project! Thank you so much for sharing.
Happy Monday!
Haha-wow it's you again- 2 from the same party and they were my favs! This epoxy stuff is very cool and you made it seem easy enough for me to try-thanks for the tip-stop by for a visit!
Looks totally awesome!
I love that idea! I've always wanted to use epoxy in some way. Maybe I will now…
Thanks for the idea!
Looks wonderful! I love how shiny and glassy the top turned out. I definitely see epoxy in my future too!
I love this!! You did an awesome job. I need to find a project so I can use epoxy lol.
I'm dying to try an epoxy project! This turned out so adorable. I can't believe you even designed your own fabric! {Wonder if it would work with paper?} I'd love to feature it next time if you would like to link it up to my party.
http://michellelunt.blogspot.com/2011/08/fabulous-friday-linky-party-6.html
Warmly, Michelle
Ohh I LOVE this idea! It turned out gorgeous!
xo-
Jamielyn
I ♥ Nap Time
I LOVE YOUR TABLE! I'm inspired…but a little worried about what I want to do. I have a small 4-panel solid wood door that I've painted with acrylic latex paint and built into a coffee table. I want to fill the inset panels with epoxy to level out the surface so we don't spill any drinks (!) and then put a polyurethane coat on it to get the paint and epoxy finishes to "match". Do you think all those products will work together?
We are Cool Earth Contracting & Coating.This seems to be a great site which offers Reflective Paint Austin, Commercial roof, Commercial roofing, Cool roof etc. and i would surely like to try their service…i had been relying on Foil Radiant Barrier earlier and they too offered good stuff. You will be glad you decided to work with them.
From trashy look into a classier furniture! Well done, Jaime! You absolutely nailed on turning that little table into a more attractive and useful furniture for your house. Anyway, it was a smart idea that you used the epoxy. That’s the best solution for the surface of the table to have one level. Kudos! @ Adhesive Systems, Inc.