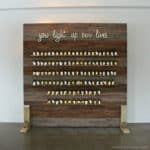
We celebrated a recent graduate with a backyard family party. In keeping with the school theme I created a self standing schoolhouse chalkboard for the occasion. It makes a great party backdrop to anchor the space and I’m sharing the free plans down below.

A DIY tutorial to build a schoolhouse chalkboard. Make a self standing schoolhouse style chalkboard using my free plans. Great for play and party decor.
I secretly always wanted a large chalkboard for playing school when I was little. Now that I’m an adult it’s time to make those childhood dreams come true. And what better reason than to celebrate my daughter’s graduation.

I designed this self standing chalkboard using one full sheet (4′ x 8′) of 1/4″ plywood but you could easily modify the plans if you prefer a smaller scale.

What chalkboard would be complete without a chalk ledge? It’s a simple addition that provides the perfect spot for chalk and adds additional cross support to the posts.

I love the classic shape and feel of an old style chalkboard. It evokes those nostalgic feelings and makes a statement without being overwhelming. You could also add wheels to the feet for mobility. If you did add wheels I would consider making the feet longer (maybe 36″) to help with stability.
For my purposes I used the chalkboard as a party backdrop and added outdoor string lights. Additionally I hung a string with my daughter’s school photos from every grade throughout the years.


Having the chalkboard behind the sofa helped anchor the outdoor furniture. We moved the furniture off the patio into the side yard to make room for a party tent with tables and chairs.

Below I am sharing the free plans to build this schoolhouse chalkboard. Please read through the plans entirely before beginning and always follow all tool safety guidelines.

Click here for a free printable PDF versions of the plans.
Supplies:
- 1 – ¼” plywood 4’x 8’ sheet
- 2 – 2x3x8 studs
- 1 – 2x2x8 boards
- 6 – 1x2x8 boards
- 16’ – ¼” x 1 1/8” flat moulding
- 3” wood screws
- 2” finish nails
- 1 ¼” pocket hole screws
- Wood glue
- ¾” wood screws
- ¾” finish nails

In Step 4 attach the frame to the posts using wood glue and 1 1/4″ pocket hole screws.

Tip: paint your plywood with chalkboard paint BEFORE attaching to the frame.
I finished the frame using Minwax Early American stain. Also note this is not meant to live outside permanently as I have shown it here. If you want an outdoor chalkboard consider using exterior grade plywood and boards.

Fingers crossed you have a great reason to build a schoolhouse chalkboard. It makes the perfect addition to a playroom, basement, locker room space or simple as a party backdrop. Be sure to share and follow me on social media for more project inspiration:
Instagram / Pinterest / Facebook / Youtube / Twitter

SHOP THIS PROJECT:


This is so fun, you’re right perfect way to anchor the space!
Thanks Amy, making my childhood dreams come true as an adult 🙂
how big as in width and height is this chalkboard?*
Hi Lynn, all the dimensions are on the plans and in the digital sketch above. The width is 99″ and the height is 76″.
wow this i the perfect way & this is so fun.
I love your design and the instructions are easy to follow. This will be perfect for a school chalkboard I am builing for my son’s 7th grade school play.
I have one question though. In step 6 you say to attach trim to the chalkboard, but I’m not certain what size trim you are telling me to use, the 1″x2″board, or the 1/4″x 1 1/8″ flat moulding?
Can you clarify for me please?
Hi Brad, Thanks for sending your question. In Step 6 the trim is a 1×2. My apologies that is definitely not clear on the plans. Technically it is the back portion of the framing so I probably should’ve said ‘frame’. The 1/4″ x 1 1/8″ flat molding is the front and back lip edge on the chalk tray running across underneath the board. Also if I were building this for a school play I might consider extending the length of the feet for more stability if they will be moving this prop piece during the show. I’ve done lots of set pieces and you know how crazy it gets with moving parts and actors.
Thank you for making these plans free. They will be so helpful to so many this Fall with backyard learning being an absolute necessity in so many parts of the country. Thanks!
Thanks for showing every one step by step how to make a chalk board awesome I love it
Hi! Love this and considering for a family reunion! Do you have a rough estimate on price for materials?
Do you have plans for just the stand? Trying to figure out how I can attach an actual chalkboard that is framed to a stand. I want to use it for a photo shoot for back to school. For my clients.
Hi Suzanne, in the plans above you will see the stand is built separate from the chalkboard portion. Just adjust the size to fit your chalkboard.
Hi there,
Thanks for listing the materials and plans (etc.) of your beautiful project, it’s amazing. I do wonder, how long did it take you to construct this chalkboard?
Thanks
Sebastian
Hi, I’m a small musician, and I’ve been working on an album for quite some time. I’ve reached the point where I need to start working on visuals for lyric videos, my idea is to do a collage/stop motion thing, and I was wondering if I could use the empty chalkboard picture. Thanks!