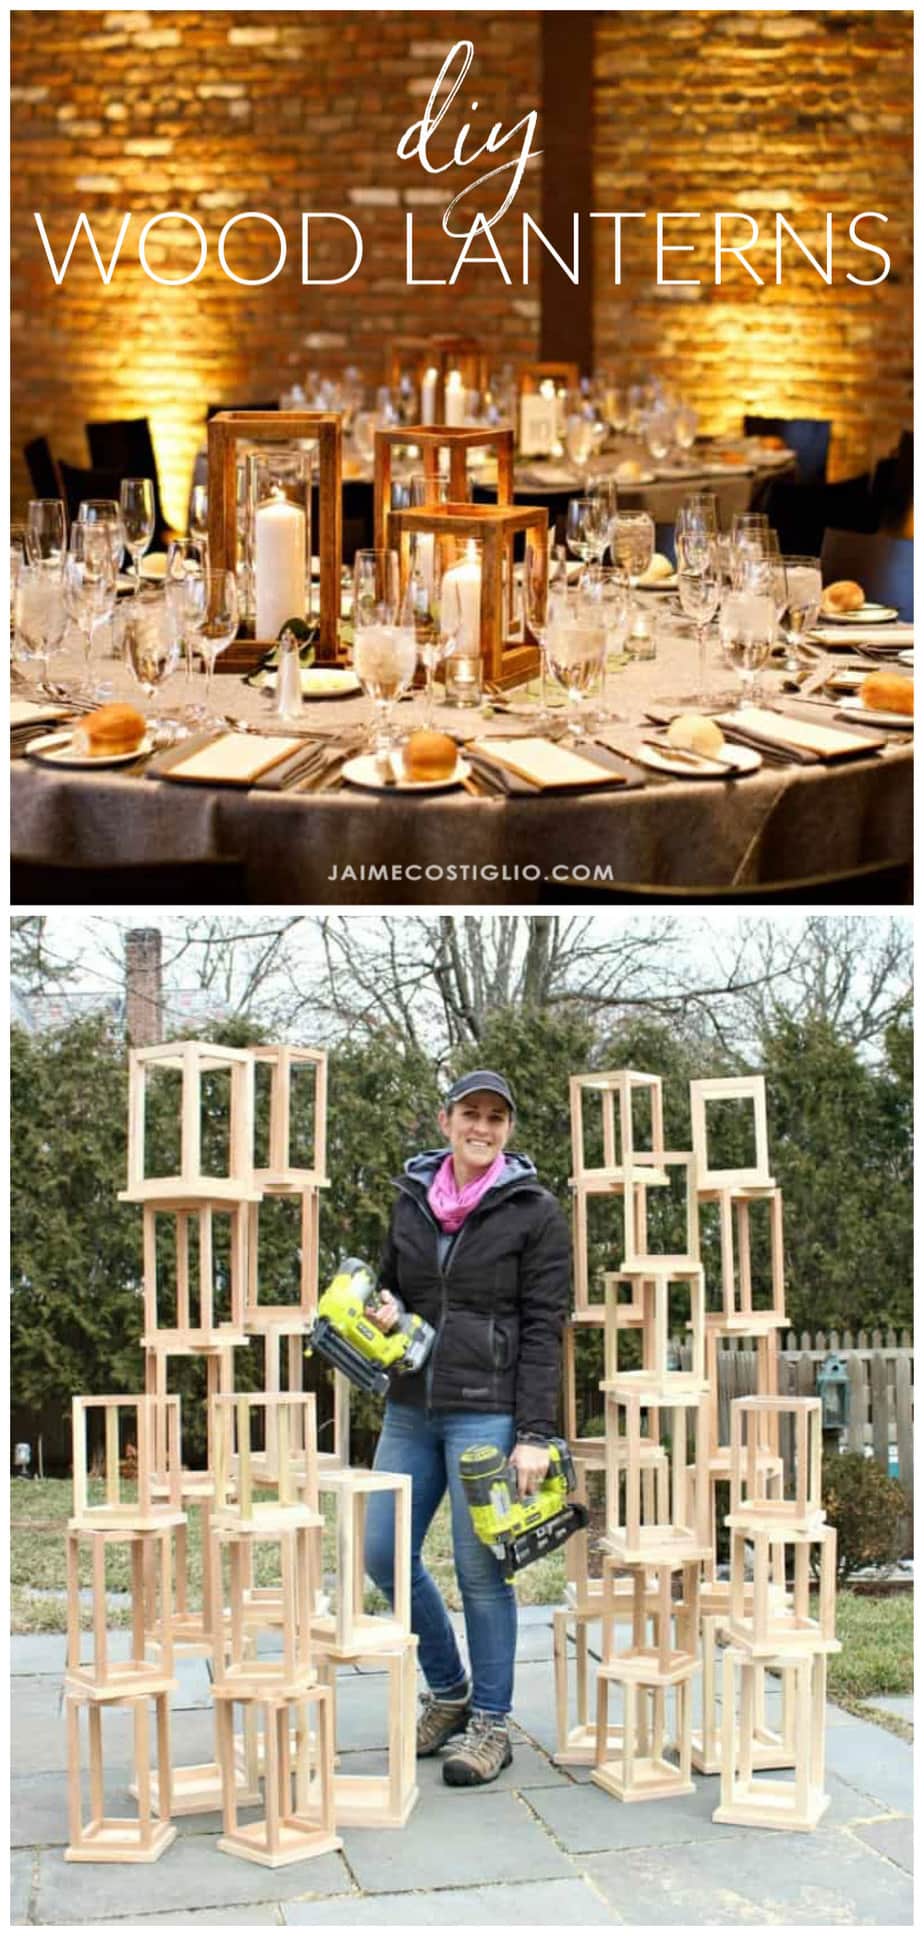
If I had the chance to get married again, to the same man of course, I would definitely be making these wood lantern centerpieces for my wedding. This is a very simple DIY project perfect for any skill level. Make a huge impact with little effort using my favorite material: wood.

Make your own wedding table decor with beautiful DIY wood lantern centerpieces. Perfect for any event – holiday party, special celebration – and super easy to construct.
Such a fun project that you can make well in advance of your wedding day and have them ready to go. This is a wonderful DIY wedding decor idea perfect for that special day.
Event Ideas:
- bridal shower
- holiday table
- special party
- birthday
- baby shower
- outdoor decor

Speaking of DIY wedding decor ideas you should check out this mini lantern favor wall, self-standing wooden arch or exterior planter to fill up that outdoor space.
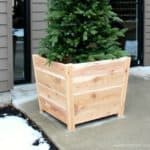
For this wedding I made 48 lanterns using both 3/4″ and 1″ wood dowels. I also varied the height and width of the lanterns just a bit to create visual interest. You definitely don’t want three lanterns all the same size in the middle of the table unless maybe it’s a long straight table and you place them in a row.

Lantern Plans:
I have added the free plans for four sizes of wood lanterns here. The construction process is the same regardless of size however the cut lists for the four sizes will vary.
I guarantee your guests will love the wood lanterns with glowing candlelight, so much so that many of them will want to take the lanterns home! Yes we had a few guests at this wedding asking to keep the lanterns, fine by me only because it’s less to store and I can always make more :).
Thanks for joining me for this wood lanterns project. Please leave any questions in the comments below and be sure to follow me on social media for sneak peeks, tools and project inspiration:
Instagram / Pinterest / Facebook / Youtube / Twitter
SHOP THIS PROJECT:


I love these! I think they will be cute on my farmhouse table in varying sizes, could easily be trimmed out for holidays, too…another “Jaime” project for me!
Thanks Marcie, I agree so perfect on your table and such a nice touch for the holidays. Do share if you make them!
What a great project! I’ll get my dad to make these for me when I visit this summer.
These are fabulous! Can you give the measurements for all three sizes you used? Want to make these for a sweet friends wedding.
Thank you Julie, the sizes vary from 14″ tall to 10″ tall and 6″w x 8″w. The bases are 8″ up to 9 1/2″ square. I also used both 3/4″ and 1″ square dowels. Hope that helps.
Perfect! I’ve got another of my kids getting married this fall. These will be perfect for me to make and WAY cheaper than flower arrangements. And what an impact! Perfect timing. Thank you.
So wonderful to hear, I agree cheaper than flowers AND reusable! Good luck with the wedding plans and what a great gift for your child.
I can’t to make these! Do you remember what stain and color you used? Also any more information on your measurements for making 3 different sizes? Are the plans for the large, small, or medium lantern?
Thanks!
Great to hear Kenzie, I love when others make my projects. I stained these with Minwax Early American. The plans are for the largest size. Good luck with your project!
Great, thank you! Do you have the measurements for the other two lantern sizes for materials?
Hi Vero, Using 1″ square dowels and the plans in the link above the cost would be about $20 (does not include the glass hurricane and candle). Hurricanes are inexpensive here and come in a variety of sizes: https://vasemarket.com/candle-holders/open-ended-chimney-tube-hurricanes-candle-holders-globes-shades
Hi Jaime, is that $20 for all 3 lanterns?
One lantern
Hi this os so great wow. Where do you bought the glasses for the candels?
Realy wow..
Thanks
The glass hurricanes are from here: https://www.candles4less.com/Hurricane-Vases_c_237.html
Please advise what size hurricanes you purchased? Thanks I’m advance!
Hi Taylor, the hurricanes are all 4″ in diameter and varying heights from 6″ to 12″ depending on which size lantern.
I’m trying to eyeball the size of your round table. Ours will be 5ft in diameter (seating 7-8). I’m wondering if I should scale down the sizes of my three? I’m thinking out loud, but if you have an opinion, I’d sure welcome it!
Hi Trudi, these tables sat 12 people comfortably but I don’t remember the exact size. The 3 lanterns were plenty big without overcrowding but yes I would scale down – perhaps go skinnier but not necessarily shorter since you still want volume. Good luck.
Hi Jaime! I would like to ask if I can’t find any glass hurricanes at my country, are there any other options that you would suggest? Can I change to a DIY cylinder made out of clear plastic? Will that work with real candles and wood?
Hi Trudi, You could use a glass vase instead. I wouldn’t recommend clear plastic with real candles but fake candles would work well. Good luck!
How did you get the base? Cut a large piece of lumber?
Hi Arianna, the base is a 1×10 board cut at 9 1/2″ which makes the square base. The link to the plans is here http://blog.homedepot.com/simple-diy-wooden-lanterns/
Thought I’d return for one last comment that might help you or other builders in the future. I bought my square dowels online at Woodworks Ltd (craftparts.com) and was THRILLED for a number of reasons. 1. Ended up being CHEAPER than Home Depot or Lowes per dowel 2. No picking through to find straight dowels. All came butter smooth and perfectly straight 3. Delivered straight to my door (no shipping since I ordered so many) 4. No sticky label to remove.
I really look forward to finding a reason to do business with them again. Great experience all around! And the lanterns are all coming along nicely! Thank goodness for stop blocks making all these cuts quick work:)
Thanks for this comment! I will definitely be looking into that. I saw she attached a link to get the hurricanes but were you able to find a place to get a good deal on the candles?
Hi Megan, the best deals I found on pillar candles was here: https://www.candles4less.com/Pillar-Candles
I did not see that they were cheaper, on your website it is showing $4.50 and home depot is showing $3.58. I am wondering if you used a different size?
Hi Jaime,
I would like to get started on making these beautiful lanterns but it would be to hang them.
Any advice on how I can go about that? What can I add on top that would keep the beautiful look?
Thank you,
Beatriz.
Hi Beatriz, Such a great idea to hang them. First I would route a place for the glass hurricane (or remove the glass altogether) and then I would use battery operated candles. Safety first 🙂 For the hanger a thick rope handle across the top would be pretty. Or a thick wire inserted through a predrilled hole on opposite cross supports then wrapped around itself? I’d love to see what you end up using! Good luck
So pretty. Just wondering what type and color finish you used on them?
Hi Taylor, thank you. These lanterns are finished with Minwax early american stain.
I’m co fused on the measurements. It says to buy three 36” dowels. The dowels total 108”. However, the cuts equal 112” so three dowels aren’t enough unless my math is wrong. Is there something I’m missing?
Thanks!
Good catch Beverly, yes it looks like you will need 4 dowels to make one lantern. Thank you for flagging.
So perfect! My 11 year old son and I make Christmas gifts for family every year (last year included bottles of homemade vanilla and jars of spice rubs) and we are getting ready to make six sets of these, painted glossy red with white candles. For one of the grandmothers, whose decor is gold and white, we will spray paint them gold. Thank you for the fabulous, instructions, and purchasing suggestions!
Hi Carey, I love hearing this and so wonderful to teach your son the value of handmade gifts. Can’t wait to see the glossy red version, so perfect for the holidays. Best of luck!
Hi there! I absolutely love these! I want to make these exact ones for my wedding. Is there anyway you could tell me the dimensions of all 3 lanterns?!
Thanks Rachel, the sizes vary from 14″ tall to 10″ tall and 6″w x 8″w. The bases are 8″ up to 9 1/2″ square. I also used both 3/4″ and 1″ square dowels. I will definitely put together dimension sketches for all 3 sizes immediately after Christmas. Hope that helps.
Hi Jamie!
I’m also looking to make all 3 sizes for our wedding! Can you direct me to where I can find the dimensions for the 3 sizes?
Thank you!
Hi Jessica, At the moment I only have plans for the one size but the other two vary from 14″ tall to 10″ tall and 6″w x 8″w. The bases are 8″ up to 9 1/2″ square. I also used both 3/4″ and 1″ square dowels. Hope that helps.
I would also like the dimensions for all three sizes ,my husband will be making these for my daughters wedding . Thanks Julie
Hi Julie, Yes I am working on plans for all 3 sizes. In the meanwhile the other 2 measure from 12″ tall to 10″ tall and 6″w x 8″w. The bases are 8″ up to 9 1/2″ square. I also used both 3/4″ and 1″ square dowels. Hope that helps while you’re waiting. Fingers crossed I get it posted this weekend.
Hi Jaime ,just found the update for the 4 sizes of lanterns just wanted to thank you for doing that . Can’t wait to build then .Julie
You’re welcome Julie, so glad to hear they are useful. Good luck!
How tall is the vase and the candle in your large lantern?
Thanks,
Jill
Hi Jill, the glass hurricane in the tallest lantern is 12″h x 4″diameter and the candle is 8″h x 3″diameter. The hurricanes go down from there 10″h and 8″h.
I am trying to stain the lanterns in the Early American, but the dowels are taking the stain a darker different color than the base. Do you have do something other than sand and then apply the stain to the dowels?
Thanks,
Jill
Hi Jill, my lanterns do have some variations and I just sanded then stained. You could try using the wood conditioner (stain pre-treat) to help keep things more even. My bases are pine boards and the dowels are aspen but they took the stain about the same.
Thank you Jaime for this great tutorial! Would it be okay to use a brad nailer instead of a finish nailer for assembly? I don’t have a finish nailer but I do have the AirStrike brad nailer. Thanks again!
Hi Laura, Yes you can use any pneumatic nailer that will accommodate the necessary length nail depending on the thickness of your dowels. (1″ dowels use a 2″ nail, 3/4″ dowels use a 1 1/4″ nail)
Hi Jaime, where did you buy the wood?
Hi Dolly, I buy the lumber from Home Depot.
What’s all the pieces of types of wood would I need to buy cause I would to make these for my wedding
Hi Katie, the cut list is in the plans.
Hi Jaime,
I love the idea! Where did you get the eucalyptus that you put on the table. I have been looking for affordable place to get the eucalyptus for my wedding.
Thanks Sierra, the eucalyptus was brought by the florist. Sorry I don’t have a source on that. Good luck with all your wedding plans!
Hi! I love these!
Thank you for all the info, any way you remember what the table clothes are? Everything is stunning!
Thank you
Thanks Ashley. The tablecloths were an option from the site but I don’t remember the specifics.
Ciao le tue lanterne sono bellissime , mi piacerebbe averne una da decorare con rose in velluto che faccio io a mano …..brava
Hello,
What would you say the average cost of one lantern was?
Hi Callie, The breakdown for cost per lantern is here: https://jaimecostiglio.com/wood-lantern-centerpieces-free-plans/ which includes the glass hurricane and candles. It really all depends on sizing, quantity and your lumber.
I love these lanterns. I’ve been trying to make them but my small dowels don’t stay glued and i’m having trouble nailing them with my brad nailer. I’m using clamps but it doesn’t seem to be helping. Any tips for this part of the project?
Hi Diana, I recommend using 3/4″ dowels and wood glue. Make 2 long side rectangles first, nail and glue and let dry. Aim to nail just off center so when you go to nail the opposite direction your nails can pass without hitting each other. Also watch the YouTube video linked up above, it shows me making the lanterns. Good luck!
I was wondering did you varnish the wood after staining. I don’t want my lanterns to be dark…so I’m worried about what stain to use.
Hi Lori, My lanterns are finished with just stain – no varnish, no poly. If you don’t want the finish to be dark then I would just go with the natural wood and clear finish.
Hi I’m hoping to move Spain soon, even during this rubbish brexit and Covid lark… I am hoping to start my own business making these type of wooden lantern to sell as table displays for weddings as a business xx thank you for sharing your ideas and plans xx
Hi Jamie just wondering where you found the glass hurricanes for candles
Love the lanterns, will try to make them. Thank you for sharing.
What type of nailer are you using?
18 gauge pneumatic nail gun