Our homes present all kinds of quirky challenges whether it’s decor or furniture or layout. My friend presented me with a little project to create a removable radiator cover for a built-in desk situation she had in an office. I searched and searched google and didn’t find what I was looking for so I made my own radiator cover version and I’m sharing the plans here.

A DIY tutorial to make a removable radiator cover. Hide that unsightly radiator with framed sheet metal that’s easily removable for access.
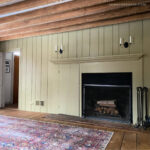
Let’s start back in the beginning when my friend emailed me a photo of her built-in desk (down below) with a huge gapping hole ripped in the radiator cover. I’ve lived in many homes with radiators and one thing I do know is you definitely need to access those radiators from time to time.
BEFORE:

Unfortunately whoever designed and installed these built-ins did not take into consideration the radiator access. So, last winter the heat service person needed access to the radiator and had to tear through the sheet metal. Rather unsightly and a bit of a hazard I came up with a removable cover solution for this built-in desk area.

Radiator Cover:
- framed perforated sheet metal
- three sides attached to metal
- one side attached to built-in
- easily remove cover any time you need access
Below I will share the process of building the removable radiator cover. Please be sure to take into consider your existing conditions and dimensions.

Click here for printable PDF version of plans.
Supplies:
- 1 – 1x2x8
- 1 – 36” x 36” perforated sheet metal
- ½” staples
- staple gun
- 1” brad nails
- Wood glue
- table saw
- miter saw
- brad nailer
- drill & drill bits
- window screen clips
Create Frame:

First up you need to create a frame for the metal screen. Be sure to miter the corners 45 degrees for a nice finished edge.

Then create a groove in each frame piece down the middle at least 3/4″ deep. This is where the metal screen will live and stay secure. You will need a table saw to create this groove.

Then attach three sides of the frame together using wood glue and 1″ brad nails. Let it dry. This three-sided frame will be a bit flimsy at the moment.
Perforated Sheet Metal:

I opted to cut down the sheet metal using a metal cutting blade on my circular saw. There are a variety of ways to cut sheet metal, even tin snips will work but be careful not to bend the sheet metal during the cutting process.

Once the sheet metal is cut to size slide it into the groove in the frame and secure it using 1/2″ staples on the back side. I also added a few staples on the mitered corner seams for good measure.

Now you are ready for primer and paint.
Final Radiator Cover Installation:
To install the cover I attached the bottom permanent trim piece first using wood glue and 1 1/4″ brad nails.

Then slide the radiator cover into position.

Once the cover is in position you can mark where you want the screen clips. Predrill for the mollies or metal inserts.

Then place the screen back in position and screw in the screen clips! Now you can remove the radiator cover whenever you need access!
Thanks for joining me for this removable radiator cover project. Please leave any questions in the comments below and be sure to follow me on social media for sneak peeks, tools and project inspiration:
Instagram / Pinterest / Facebook / Youtube / Twitter
SHOP THIS PROJECT:


Leave a Reply