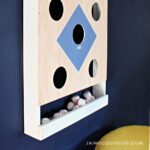
Making all the childhood dreams come true these days. It’s another Handbuilt Holiday gift plan from Ana White and me! Today we are sharing this cutie DIY play vanity beauty box. It’s the ultimate gift for any little one who loves playing with make up and beauty products.

A DIY tutorial to build a play vanity beauty box for kids. Make this portable play vanity complete with mirror and accessories.
Of course I say it’s for kids but let’s be honest, I’m loving this play vanity as an adult. And you know I made this entirely from my scrap wood pile so that’s a definite win in my book.

Play Vanity Design Features:
- 5″ x 7″ mirror
- two large storage areas
- hinged palettes fold open and closed
- latching top
- handle for portability

Ana is the mastermind behind this amazing design that literally folds into itself and let’s you play beauty shop anywhere. One of my biggest pet peeves about kids toys is when they come with a bazillion pieces and parts and no where to store all the accessories. This play vanity has plenty of storage under the palettes that fold inside for transport.
Then you flip the top down, twist the latch and you are ready to go!

Secret Tip
The closing latch on this play vanity is actually a piece of hardware from an Ikea light kit. I highly recommend saving all those of weird extraneous hardware pieces for good reason. Case in point. I can almost guarantee you will end up using those weird extra hardware parts for another application some day. They are small and useful and worth saving.

Back to this play vanity set complete with beauty accessories that I whipped up from scrap pieces. Ana has the plans here so you can make one too! But before you go be sure to read through my notes below. I share detailed specifics about the construction process that may be useful.
Play Vanity Design Details
First off, I created a template for the side palette pieces if you would like to print and use. Click here for the free palette printable pattern.


The carrying handle acts as a stop for the top which keeps it open and upright so kids can see in the mirror. Ana added this clever design feature to the plans, she’s truly a genius!


All the accessories fit down inside the storage area below the palettes. You have 2″ of depth in the storage area for all kinds of beauty bits and accessories.

Supplies:
- 1 1 /4″ forstner bit
- 4 – 1 1/2″ hinges
- #6 – 1/2″ wood screws
- 4″ C shape drawer pull
- eye shadow palette template
- 5″ x 7″ locker mirror

Start with the box top and bottom as per Ana’s plans. For the center divider I opted to rip down a 1×3 to make it 2″ wide. This center divider is where the side palettes will rest when folded in. The side palette pieces are each 2 – 1/4″ thick plywood pieces glued together.

Next make the side palettes using a forstner bit. I created a template and stack cut the pieces for accuracy. Click here for a printable version of the eye shadow palette template.

To assemble the play vanity the hinges act as a bit of a space buffer which helps prevent pinched fingers. Attach the top and then the side palette pieces.

Play Vanity Beauty Accessories
To make the accessories I used little bits of dowels and left over scrap wood. Make all sorts of sizes and shapes for various beauty products:
- nail polish
- lip stick
- perfume
- small bottles
- pressed powder
- brush applicator

In order to assemble the small beauty accessories I used a wood skewer as a dowel and applied wood glue to both ends for a secure fit. Then sand well, prime and paint.
Thanks for joining me for this kids play vanity beauty box project. Please leave any questions in the comments below and be sure to follow me on social media for sneak peeks, tools and project inspiration:
Instagram / Pinterest / Facebook / Youtube / Twitter
SHOP THIS PROJECT:


VERY cool! How did you make the brush?
Thanks Amanda, I used an inexpensive make up brush and pulled off the top portion then drilled a matching size hole into a slightly larger dowel. Applied wood glue to the brush portion and shoved it into the dowel.
How did you cut the rectangular section under the eye shadow circles?
The eye shadow palettes are made of 4 equal 1/4″ plywood pieces. I cut them on the miter saw. And then stacked the 2 top pieces and attached the template using contact paper. Then drilled holes for the eye shadows. Pull them apart and then glue the backing on and hold with clamps until dry.
What kind of paint did you use?
Hi Chelsey, just regular acrylic craft paint.