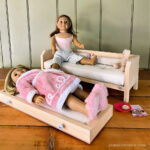
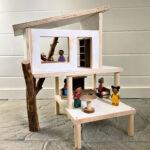
Happy Friday friends, only 7 more Fridays until the big day! That gives you plenty of time to build our latest Handbuilt Holiday gift plan – this modular dollhouse with furniture.

A DIY tutorial to build a modular style dollhouse complete with simple furniture. Make this dollhouse and furniture using scrap wood.
Ana designed this extremely versatile dollhouse to be completely modular. It’s simple and amazing we’re sharing all the details down below.

Handbuilt Holiday Series
If you are new here welcome to week 5 of this year’s Handbuilt Holiday series. You can see the previous 4 builds here plus 24 more from the past 2 years.
But today is all about this truly awesome modular dollhouse.

Modular Style Dollhouse
Modular to the max! Above are 3 combinations I put together using all the same pieces and when my girls came home from school they rearranged it again into something I never thought of!
Honestly this dollhouse will provoke those kids imaginations like you never thought before.

The 1×4 vertical pieces are super sturdy and function as walls, doorways and dividers. Ana is so slick coming up with this component system whereby each rectangular box will match up to any other box.

And there are roof and railing pieces too! The roof is open for easy access to the attic and playroom. Naturally everyone needs a balcony as well.


Dollhouse Furniture
It wouldn’t be a dollhouse without furniture so I chopped up some scrap wood and made these little lounge chairs and coffee table.


And a bright pink sofa from a 1×3 scrap piece of wood. The people are fun too but secretly I like the furniture more!


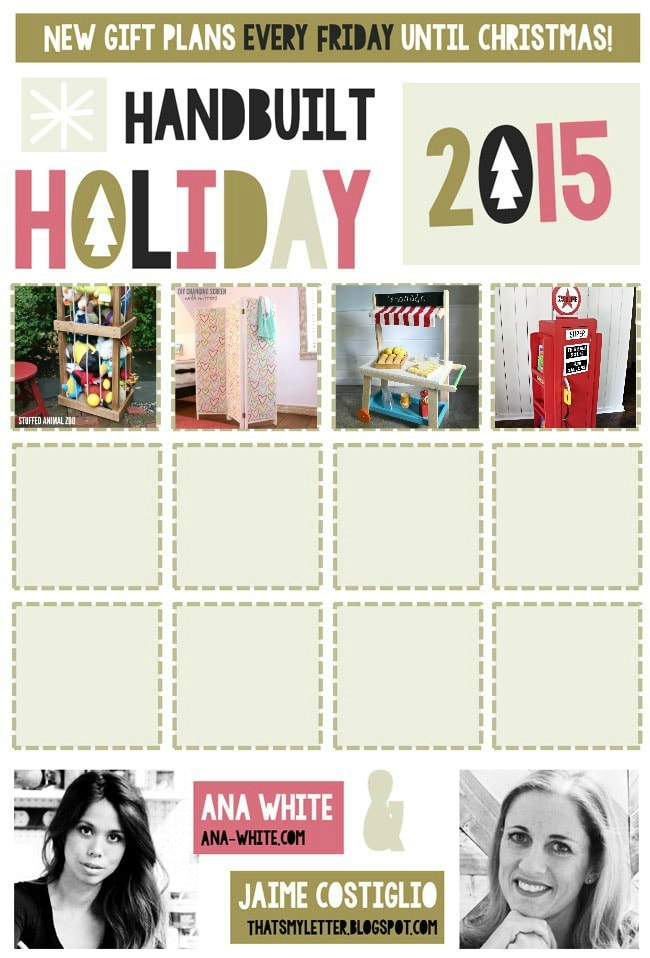
The queen bed is a 1×4 scrap. I’ve got the plans for all the furniture pieces down below.

This would be the brownstone version or it could be apartments.

Dinner on the roof deck anyone?

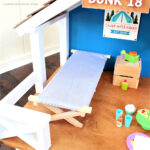
The modular component units are fairly lightweight. A 3-year old will have no problem maneuvering the pieces. Be sure to sand everything super smooth especially the corners considering we are using raw plywood for the components.


Ana has the plans for the dollhouse here with all the cut lists and step by step instructions.
Dollhouse Tips
I highly recommend painting the 1×4 ‘walls’ before you assemble the components.

For the railings drill matching 1/4″ holes into both upper and lower railings:

Then attach corners and middle dowels to one railing piece. Lastly apply glue and attach other railing piece:

Scrap Wood Dollhouse Furniture
Now let’s make furniture from all the scrap wood to fill this dollhouse!

Below are the dimensions, materials and cut lists and instructions. I recommend using a scroll saw for all cuts due to their short and small size.

Materials:
- 1×4 scraps
- 1×3 scraps
- 1×2 scraps
- ¾” square dowel scraps
- wood glue
- 1 ¼” finish nails
- ¾” finish nails

Dollhouse Sofa
Cut list:
- 2 – 1×3 @ 5” (seat & back)
- 2 – 1×3 @ 2 ½” (arms)

Step 1: Attach seat to back. Be sure to round back corners first. Use wood glue and 1 ¼” finish nails.
The trick to getting perfectly rounded corners is to trace a small paint bottle:

Use the scroll saw to cut on the curved line then sand smooth.

Step 2: Attach arms to sofa body using wood glue and 1¼” finish nails.

Dollhouse Lounge Chair
Cut list:
- 4 – 1×3 @ 2 ½”

Step 1: Attach seat to back. Use wood glue and 1 ¼” finish nails.

Step 2: Attach arms to chair body using wood glue and 1 ¼” finish nails.

Dollhouse Coffee Table
Cut list:
- 1 – 1×2 @ 5” (top)
- 2 – 1×2 @ 1” (legs)

Step 1: Attach top to legs. Use wood glue and 1 ¼” finish nails.

Dollhouse Dining Table
Cut list:
- 1 – 1×4 @ 5 1/2” (top)
- 2 – 1×2 @ 3 1/2” (legs)

Step 1: Attach top to legs. Use wood glue and 1 ¼” finish nails.

Dollhouse Queen Bed
Cut list:
- 1 – 1×4 @ 4 1/2” (bed)
- 2 – 1×4 @ 3” (headboard)
- 2 – ¾” dowel @ ½”l (legs)

Step 1: Attach legs to bed. Use wood glue and 3/4″ finish nails.

Step 2: Attach headboard to bed. Use wood glue and 1¼” finish nails.

Dollhouse Twin Bed
Cut list:
- 1 – 1×3 @ 4 1/2” (bed)
- 2 – 1×3 @ 3” (headboard)
- 2 – ¾” dowel @ ½”l (legs)

Step 1: Attach legs to bed. Use wood glue and 3/4″ finish nails.

Step 2: Attach headboard to bed. Use wood glue and 1¼” finish nails.

Sand everything well and smooth. Paint as desired. Be sure your paint is non-toxic especially if this dollhouse is for a younger child.
To see all the Handbuilt Holiday gift plans click here. See you back next Friday for another fun and fabulous gift build.

This is fabulous.. And yay another Blogger blogger 🙂 I definitely want to try making this for my sons- they love doll houses but I don't want a bright pink house. My oldest loves to take things apart and put them together so he will LOVE LOVE LOVE how this is modular.
Have you tried any purchased doll house people with this to see if they will fit?
This is so cute and clever. My kids are too big 'sigh' but some day there will be grand babies!
Deb: you could always make it Now and play with it yourself ;D, or stash it for when those grandbabies come along!
Such a cute project! I love the colors.
This is amazing! Do you mind sharing what type of paint you used? Did you seal the paint in any way? Thanks!
If only the rooms in houses were so easily interchangeable right? Haha! I would really love to have something similar for my storage cupboards in my house too!
I would like to 3d print the furniture parts. Any chance you still have your sketchup file you could share I would gladly share back the processed file after:)
Hi JP, the only piece I have is the queen bed. Unfortunately the others are on an old computer and I failed to save the docs but they are very simple sketchups to replicate. I will send the bed SKP file to your email shortly.
It took some time , but I’ve draw it back , If ever you need it
https://www.thingiverse.com/thing:3176485
Thanks JF, they look so sleek.
Hi, I love this house and have just completed it for my 2 year old grandaughter – Christmas will be special!! I’m about to start on the funriture , but wondered if you could share how you made the people and what sizes they are. Many thanks Sue
I am really considering making this for my granddaughter for her 3rd birthday. (I have 10 months, no pressure. LOL!
Do you have dimensions / plans for the peoples (meeples?). I am sure I could figure it out but I thought I might ask.
I also like the dining table “chairs” and “end tables” out of 1″ cubes
Thank you (and Ana) so much.
Dwayne