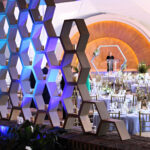
Life is a party and we should celebrate with DIY decor projects you can make. I built a giant hexagon frame for a recent benefit to serve as a focal point and backdrop for the stage area.

A DIY tutorial to build a giant hexagon frame. Make this large, open frame style hexagon as a backdrop or focal point for your next event.
This modern hexagon shape is a fairly simple build if you don’t mind miter cuts. And knowing that I would be building this giant hexagon at home and transporting to the event space I made sure to design the piece with transport in mind.

The size was actually determined by default. Each side of the hexagon is 48″ long or half of an 8′ board which makes the overall height about 86″. You could definitely go bigger by making each side longer.
I worked with a group of amazing women for this event and collectively we decided on the hexagon theme and then I proposed various decor ideas that fit the venue. In addition to the large, self-standing hexagon on the stage I also made:
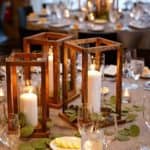
- hexagon trays for the floral table centerpieces
- large honeycomb hexagon wall
- table signage with hexagons as the base
In the coming days I will be sharing all of these decor projects with detailed instructions so you can tailor them to fit your situation.

I absolutely love the modern lines of the hexagon shape. The connotations are many and so appropriate for a school related function. The sharp, angular edges of the hexagon combined with the organic nature of the floral arrangements makes for an eye catching display.


Things to keep in mind:
- overall height – do you need the hexagon to take up more or less space?
- finish – paint or stain?
- lighting – will you attach lights? or will the finish speak for itself?
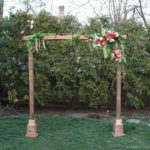
- floral – live or fake works great, maybe something more flowing and wrapped around the frame?
- fabric – draping a sheer fabric would be beautiful

For this giant hexagon I added two perpendicular feet to ensure the piece would not fall over. The open frame also allows for air movement so it’s very sturdy and secure. If you are concerned about windy conditions I would use 2×6 for feet to increase the weight at the base.

A few notes on the build process before you begin. As I mentioned this giant hexagon is designed to be transported in two pieces with the feet loose. Once you arrive at the event location you can attach the feet and then screw together the two sides. It’s a very simple set up and makes transporting easy and painless.

When attaching the two side pieces I recommend using a clamp to hold the boards together especially if you work alone like myself.

You can find the complete step by step instructions including supplies and cut list in the plans available here. Please leave any questions in the comments below or email me and I am happy to help. And if you do build the hexagon be sure to share and follow me on social media for more project inspiration:
Instagram / Pinterest / Facebook / Youtube / Twitter


Quite a project, the end result looks great, would have loved to see the hexagon centerpieces
Thanks Mom 🙂
I wasn’t able to go to the Home Depot blog to learn how to build the hexagon!
Can you send me the link or how i can get the story by step?
Thanks a lot
Hi Claudia, the link is here: https://blog.homedepot.com/diy-hexagon-backdrop-ideas/
0n those 2 1/2′ screws using a kreg jig they protrude from the other side. Do you have a trick on connecting those angle pieces is there a certain spot to connect?
Hi Albert, if the 2 1/2″ are protruding for you then switch to 2″.
Awesome creation!
I have a question….it says you use 2 x 2 x 8 pine timber, but the link takes you to 4 x 4 x 8 timber. Did you rip these into 2 x 2’s or are they truly 4 x 4’s? Thank you!
Hi Dave, Thanks for your comment. I used 2×2 select pine boards https://bit.ly/2yHolFX The link on the Home Depot page is incorrect, I will get that fixed. Thank you for catching that.
I was on the Home Depot page and I could not read the measurements, could you increase their size? (hexagon)
Thank you.
Hi Bob, I understand the measurements are small on the digital sketches. The measurements are also listed in the Cut List on the Home Depot page which is clearly legible.
Hello,
I love your project! It came out wonderful. I was actually thinking of making one as a backdrop for my wedding. One question on how to attach the top to the bottom piece. I see you have a picture of two clamps holding the cross supports together. How did you fasten the top portion to the bottom portion? I see the pocket hole screws fasten the cross supports to each side of the frame, but did you screw the bottom cross support to the top cross support?
Thank you,
Kris
Hi Kris, I attached the bottom to the top using 2 1/2″spax screws from the exterior starting at the bottom and screwing into the top. 4 screws. I was thinking if you used 1×2 for the cross supports here and angled them differently you could make them match up flush and then screw the top and bottom together at the cross supports. Good luck with your wedding plans!
Hi Jaime!
Do you have plans for using a thicker wood?
Like maybe a 4×4?
Love your easy to read plans on the Home Depot blog… I’m just hoping they’re adaptable for a little more thickness.
Thanks!
Hi Tabitha, Thanks for your question – I don’t have plans using 4x lumber. The angles should be the same but I would definitely consider lap joints with lag bolts or similar. good luck!
Hi there! I’m thinking of making this for my wedding. I’m an amateur. I see it calls for 6 cuts for the frame. Does this need to be doubled since there are two frames? Thanks!
Hi Lexie, yes each hexagon is 6 pieces so yes double it for the two hexagons.
Hi Jaime
These plans will be very helpful.
I have to build one for a wedding, and they will also be able to take it home for a garden arch.
Hello, I’m making this for my wedding. I wanted to do a flower wall backdrop. Do you know what type of sheet I can glue or screw on the front board for a flower wall backdrop?
1/4″ plywood should be fine if you’re just attaching lightweight flowers.