
Yes for friends who think alike and love to build furniture to fit their space and needs! Today I’m so, so happy to provide plans for my friend Charlotte over at Ciburbanity for her flip top mudroom bench.
Let’s start with the fact that Charlotte has 5 little ones and she still finds time to pull off this build – amazing. You absolutely must see the finished flip top bench over at her place and then come back for the plan details here.

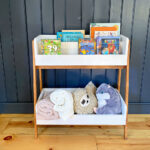
Charlotte designed the bench to flip up which creates shallow storage in the seat for gloves, hats, scarves, etc. And below she added pull-out bins for shoes, one for each of her kids.
All the finish details and hardware information are posted over at Charlotte’s place and below I have the step by step instructions for building your own flip top bench. Always follow all safety guidelines when operating power tools.
Supplies:
- 1 – ¾” plywood sheet
- 1 – ½” plywood sheet
- 2 – 1x4x6 pine board
- 1 – 1x3x6 pine board
- 50‘ – ¾” x ¼” lattice
- 1 ¼” pocket hole screws
- 1 ¼” finish nails
- ¾” finish nails
- wood glue
- 2 – 3” hinges
- 20 – 2” non-swivel casters
- 5 cup pulls
Cut List:
BENCH:
- 1 – ¾” plywood @ 62 ¼” x 15 ¾”
(top) - 1 – ¾” plywood @ 60 ½” x 13 ½”
(base) - 2 – 1×4 @ 60 ½” (storage front and
back) - 2 – ¾” plywood @ 18” x 15” (sides)
- 4 – ¾” plywood @ 14 ½” x 15”
(dividers) - 5 – 1×3 @ 11 ½” (base cross supports)
- 1 – ¾” x ¼” lattice
@ 62 ½” (front seat trim) - 2 – ¾” x ¼” lattice
@ 15 ¾” (sides seat trim) - 2 – ¾” x ¼” lattice
@ 62”, both ends 45 miter (front bench trim) - 2 – ¾” x ¼” lattice
@ 3 ½”, both ends 45 miter (front sides bench trim) - 6 – ¾” x ¼” lattice
@ 14 ½” (front trim)
PULL OUT BIN (for 1 bin):
- 2 – ½” plywood @ 13” x 11” (sides)
- 2 – ½” plywood @ 11” x 11” (front
& back) - 1 – ½” plywood @ 14” x 11” (base)
- 2 – ¾” x ¼” lattice
@ 11 ½”, both ends 45 miter (sides trim) - 2 – ¾” x ¼” lattice
@ 11”, both ends 45 miter (top &
bottom trim)

Step 1: Attach
front and back 1×4 sides to storage base using wood glue and 1 ¼” pocket hole
screws. Note predrilled pocket holes for
attaching sides in next step.
front and back 1×4 sides to storage base using wood glue and 1 ¼” pocket hole
screws. Note predrilled pocket holes for
attaching sides in next step.

Step 2: Attach sides
to bench portion using wood glue and 1 ¼” pocket hole screws.
to bench portion using wood glue and 1 ¼” pocket hole screws.

Step 3: Attach dividers to storage base using wood glue
and 1 ¼” pocket hole screws.
and 1 ¼” pocket hole screws.

Step 4: Attach base cross supports to dividers using
wood glue and 1 ¼” pocket hole screws.
wood glue and 1 ¼” pocket hole screws.

Step 5: Attach bench top using 3”
hinges. Consider a slow closing hinge to
avoid pinched fingers.
hinges. Consider a slow closing hinge to
avoid pinched fingers.

Step 6: Attach bench top trim
sides and front using wood glue and ¾” finish nails.
sides and front using wood glue and ¾” finish nails.

Step 7: Attach bench front trim
using wood glue and ¾” finish nails.
using wood glue and ¾” finish nails.


Step 1: Attach front and back to
sides using wood glue and 1 ¼” finish nails.
sides using wood glue and 1 ¼” finish nails.

Step 2: Attach base using wood
glue and 1 ¼” finish nails.
glue and 1 ¼” finish nails.

Step 3: Attach front trim using
wood glue and ¾” finish nails.
wood glue and ¾” finish nails.
Attach wheels to base at corners and handle pull at center.
A huge thank you to Charlotte at Ciburbanity for letting me make these plans to go along with her bench. Collaborating with friends and fellow builders is the best of both worlds and we’re all stronger together.

I am trying to view the pdf version of the flip top bench with 5 pullout bins and I have requested access but can still not view. Can I please have the plan emailed to me.
Hi Miki, the plans are available to anyone at this link: https://drive.google.com/file/d/0B85dRd-BoH0wb0tueWhaaXNLZlU/view?usp=sharing&resourcekey=0-WQHPoc2o08d1zywMWEdnyQ Please let me know if you still have trouble accessing.
Thank you so much I am able to view!
I love this bench and cannot wait to add it to my home!