• Home
  • Blog
  • About
  • Contact
    • Disclosure
    • Privacy Policy
  • SHOP
  • Widget area for main menu

    • Email
    • Facebook
    • Instagram
    • Pinterest
    • Twitter
    • YouTube
  • Skip to primary navigation
  • Skip to main content
  • Skip to primary sidebar

Jaime Costiglio

build - paint - sew

  • BUILD
    • BEDS
    • BENCHES
    • DESKS
    • DRESSERS
    • GAMES & TOYS
    • SCRAP WOOD
    • SHELVES
    • STORAGE
    • TABLES
  • TOOLS
  • PAINT
    • CRAFTS
    • FURNITURE
    • HOME DECOR
  • SEW
    • GIFTS
    • HOME DECOR
    • POUCHES
  • HANDBUILT HOLIDAY
    • 2021
    • 2019
    • 2018
    • 2017
    • 2016
    • 2015
    • 2014
    • 2013
  • GIFTS
    • BABIES
    • KIDS
    • FOR HER
    • FOR HIM
    • TEACHERS
    • WEDDINGS
  • SEASONAL
    • 4TH OF JULY
    • FALL
    • HALLOWEEN
    • CHRISTMAS
    • SUMMER
    • SPRING
    • ST. PATRICK’S DAY
    • THANKSGIVING
    • VALENTINE’S DAY
    • WINTER
  • SALTBOX PROJECT
    • BATHROOMS
    • DINING ROOM
    • EXTERIOR
    • FAMILY ROOM
    • FOYER / MUDROOM
    • KIDS BEDROOMS
    • KITCHEN
    • LIVING ROOM
    • MASTER BEDROOM
    • PLAYROOM
  • SCROLL SAW

DIY Cupcake Box (4 pack)

May 19, 2015

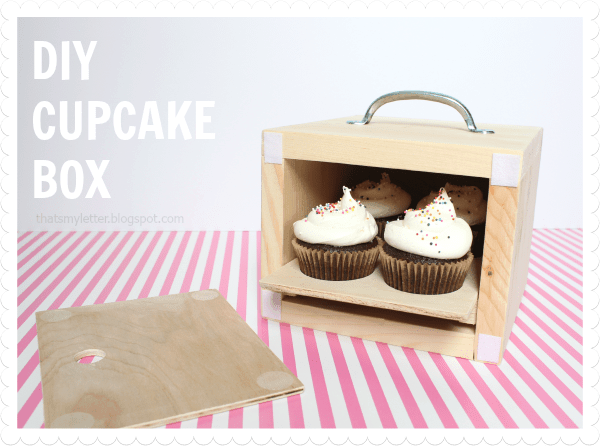
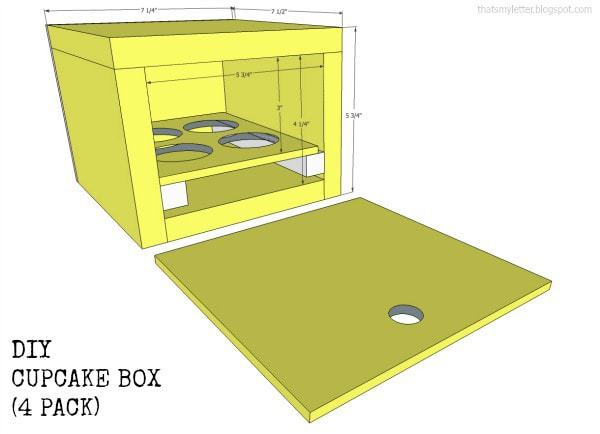
Maybe it’s the cuteness factor or the fact that I have a bazillion wood scraps lying around but I think everyone needs a cupcake box.  I’m sharing how to make your own diy cupcake box with no fancy tools (and by fancy I mean a router or table saw).

Click here for PDF version of these plans.
Because you never know when you might need to transport 4 cupcakes somewhere,
Perhaps a little get together for lunch or a gift for a friend?

I used velcro to attach the front cover.  Definitely consider super glue or stapling the velcro to the wood to ensure it stays in place.

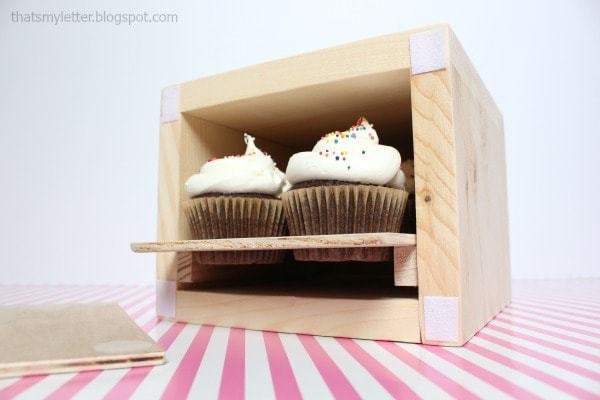
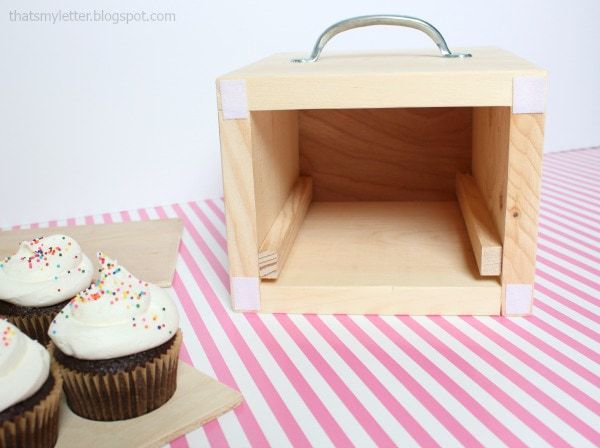
Proof that looks can be deceiving!  When the box is closed you would never know the deliciousness that is waiting inside.
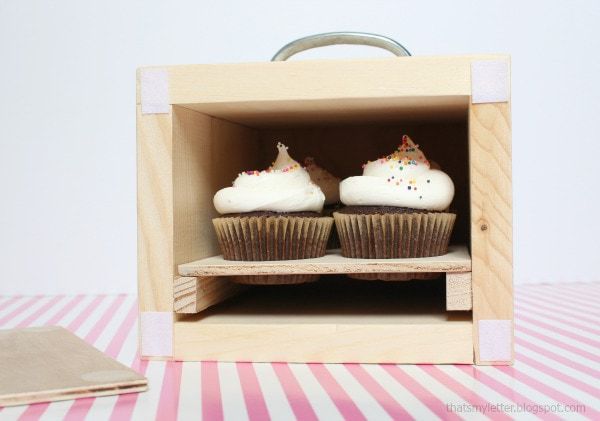
Surprise!
And now for the plans to make your own cupcake box.
 Click here for PDF version of these plans.
Materials:                                                       Cut
List:
           
1 – 1x8x6 pine board                                        2
– 1×8 @ 5” (sides)
1 – ¾” square dowel                                         1
– 1×8 @ 5 ¾” (base)
¼” plywood scraps                                           1
– 1×8 @ 7 ¼” (top)
                                                                          2
– ¾” square dowel @ 7 ¼” (glides)
2 1/8” hole saw                                                 2
– ¼” plywood @ 7 ¼” x 5 ¾” (back & front)
1 ¼” & ¾” finish nails                              1
– ¼” plywood @ 7” x 5 ½” (insert)
wood glue     
¾” spade bit

Read through plans first and please always use safety precautions with power tools!


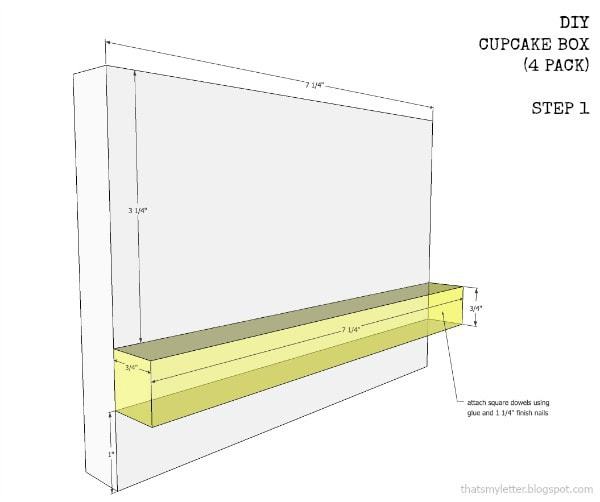
Step 1: Make sides.  Attach square dowel glides to sides using
glue and 1 ¼” finish nails.  Make 2
mirror images.


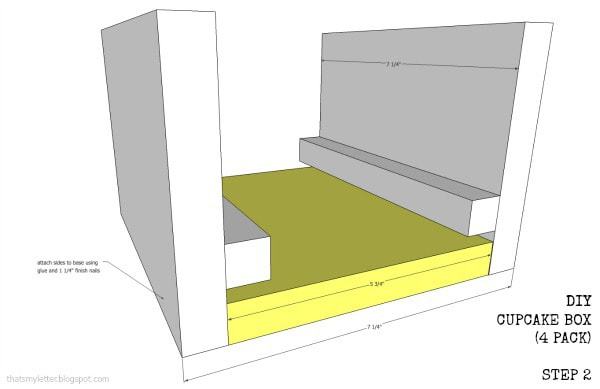
Step 2: Base.  Attach sides to base using glue and 1 ¼”
finish nails.


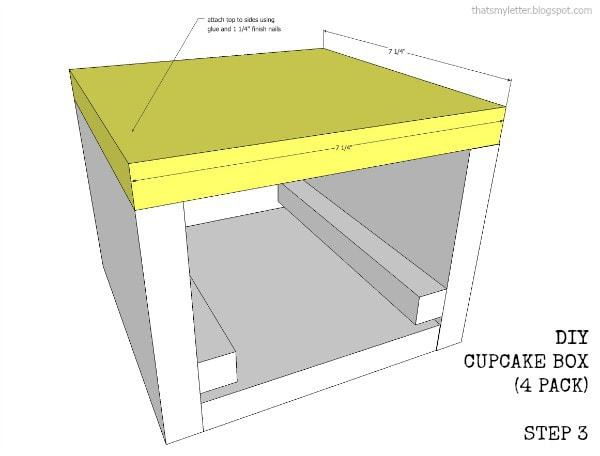
Step 3: Top.  Attach top to sides using glue and 1 ¼”
finish nails.


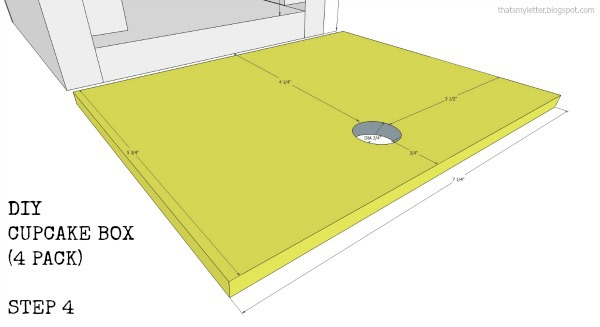
Step 4: Front cover.  Cut hole in front cover using ¾” spade bit.


Step 5: Back.  Attach back to box using glue and ¾” finish
nails.

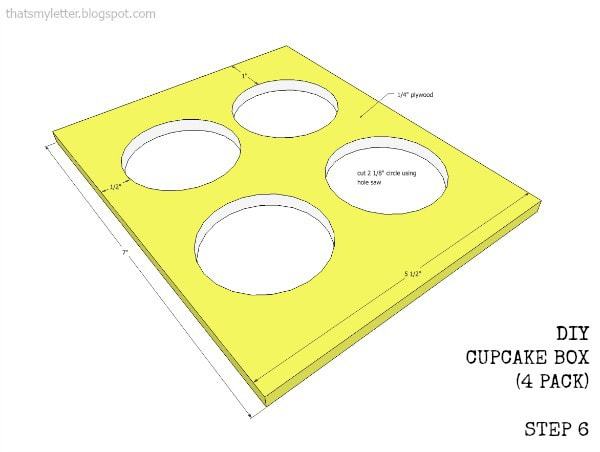
Step 6: Insert.  Make cupcake holder insert using 2 1/8” hole
saw (for doorknobs) with equal spacing.


Fill holes with wood putty and sand well.  Attach handle for carrying and velcro at front edge and front cover back for closing.


This post may contain affiliate links.

You may also like...

  • DIY Tabletop Ice Cream ParlorDIY Tabletop Ice Cream Parlor
  • DIY Stacking BurgerDIY Stacking Burger
  • DIY Portable Tabletop Play KitchenDIY Portable Tabletop Play Kitchen
  • DIY Wood Cake SlicesDIY Wood Cake Slices
Share this post:

Filed Under: BUILD, DIY, GIFTS, SCRAP WOOD, STORAGE1 Comment

Reader Interactions

Comments

  1. Our Pinteresting Family says

    May 19, 2015 at 7:49 PM

    So cut . I love seeing what you come up with when using scrap wood.

    Reply

Leave a Reply Cancel reply

Your email address will not be published. Required fields are marked *

Primary Sidebar

Hi! I’m Jaime

Jaime Costiglio

Hello!

Thank you for stopping by.
Join me for lots of DIY.

Read more

Get new posts via email

Handbuilt Holiday: Gift Project Plans

handbuilt holiday gift project plans

Collection of DIY gift project plans to build.

The Home Depot Tool Prospective

THD Prospective

Tools to consider for the DIYer.

Archives

The Home Depot Logo
Copyright © 2026 Jaime Costiglio · Custom site by Moonsteam Design

Privacy Policy