• Home
  • Blog
  • About
  • Contact
    • Disclosure
    • Privacy Policy
  • SHOP
  • Widget area for main menu

    • Email
    • Facebook
    • Instagram
    • Pinterest
    • Twitter
    • YouTube
  • Skip to primary navigation
  • Skip to main content
  • Skip to primary sidebar

Jaime Costiglio

build - paint - sew

  • BUILD
    • BEDS
    • BENCHES
    • DESKS
    • DRESSERS
    • GAMES & TOYS
    • SCRAP WOOD
    • SHELVES
    • STORAGE
    • TABLES
  • TOOLS
  • PAINT
    • CRAFTS
    • FURNITURE
    • HOME DECOR
  • SEW
    • GIFTS
    • HOME DECOR
    • POUCHES
  • HANDBUILT HOLIDAY
    • 2021
    • 2019
    • 2018
    • 2017
    • 2016
    • 2015
    • 2014
    • 2013
  • GIFTS
    • BABIES
    • KIDS
    • FOR HER
    • FOR HIM
    • TEACHERS
    • WEDDINGS
  • SEASONAL
    • 4TH OF JULY
    • FALL
    • HALLOWEEN
    • CHRISTMAS
    • SUMMER
    • SPRING
    • ST. PATRICK’S DAY
    • THANKSGIVING
    • VALENTINE’S DAY
    • WINTER
  • SALTBOX PROJECT
    • BATHROOMS
    • DINING ROOM
    • EXTERIOR
    • FAMILY ROOM
    • FOYER / MUDROOM
    • KIDS BEDROOMS
    • KITCHEN
    • LIVING ROOM
    • MASTER BEDROOM
    • PLAYROOM
  • SCROLL SAW

DIY Crayon Holder

April 2, 2017

Today is a DIY crayon holder.  This is the last and easiest gift build plan from Ana White and myself to finish off the Handmade Holiday series.
diy crayon holder

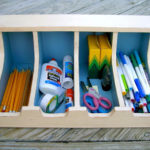
A DIY tutorial to make a crayon holder. Build this simple yet functional crayon holder for anyone who loves to color. A super easy gift idea.

handbuilt holiday series
It is the cutest crayon holder you ever did see.
diy crayon holder free plans

Ana made the most simple plans for this crayon holder.  It’s just 2 cuts and lots of holes.  I’m guessing you probably already have some 1×3 scraps lying around for this build.

crayons in wood holder view from top
At just over 8″ long this crayon holder packs a punch with 29 crayon slots.  And if you want space for more crayons you could make it longer.  Or use wider 1×4 boards for another row of crayons.
stacked wood boards
Ana designed the plans so you make the holes in the top board then laminate (glue and clamp) all the boards together to make a nice 3×3 square.
detail of handprinted letters

I opted to add the word ‘crayons’ on front in rainbow paint colors.  But of course you could personalize this crayon holder with the child’s name too.  And let’s not forger all those adults who love coloring too!  Heck this is a great gift for any age.

diy wood crayon holder
So I went a little off book.  I took Ana’s plans and made this crayon holder into a portable lap desk!
young girl with lap desk in car
crayon holder lap desk


portable lap tray with crayon holder

In place of the bottom board I simply glued the crayon holder onto a 3/4″ piece of plywood.  My plywood is cut at 9 1/2″ x 15″ in order to accommodate a 9″ x 12″ pad of paper.

crayon holder built into lap desk
Then at the bottom of the portable lap tray I attached a 1×2 to create a ledge.
lip edge on lap deskcrayon holder attached to lap desk

You could make this portable lap tray any size to fit your paper pad and I guarantee kids will love taking their portable lap tray in the car everywhere they go.

How to build a crayon holder:

three boards of equal length

Step 1: Follow Ana’s plans and cut your lumber.

glue two boards together

Step 2: Glue and clamp 2 boards together.  Be sure to wipe away any excess glue.

Next print out the crayon holder template which is a guide to make the holes.  Click here for free printable template.

crayon holder template free printable
paper template with holes marked
(I used a handmade template before putting together the printable version above.)

Step 1:  Take the paper template and fold it in half then punch out the holes:

use hole punch for equal spacing

Step 2: Line up template on the wood piece and mark holes with a pencil:

paper template made with hole punch

Clamp the board to your workbench and be sure there is a scrap board underneath:

clamp boards to workbench

Use a 3/8″ drill bit – this fits crayons, pencils and skinny markers:

3/8" drill bit same diameter as crayon
clamp board to table and drill holes

I added a piece of tape on the drill bit to mark the depth.  Just deep enough to go through two board but not the scrap piece underneath.

drill holes in board

Now glue on the last board (the one with no holes).

apply glue in-between boards

And clamp:

clamp three boards together to dry

Sand smooth.

Print out the lettering, I used Verdana font at 130 point.

printout lettering template

Line up the lettering over wood and using a ballpoint pen trace letters.

trace template with ballpoint pen

The pressure of the pen will leave an indent in the wood:

wood indented from ballpoint pen

 Paint on and inside the indent.

handpainted letters on wood

Fill with crayons and you’re ready to wrap up and give.
Thanks Ana for working with me on this Handmade Holiday series.  I now have a full arsenal of hand built gifts to give thanks to your free plans.

You may also like...

  • DIY Baseball Beanbag Toss GameDIY Baseball Beanbag Toss Game
  • DIY 18″ Doll Camp HideawayDIY 18″ Doll Camp Hideaway
  • DIY Flatware Storage BoxDIY Flatware Storage Box
  • DIY Stacking Big Mac ToyDIY Stacking Big Mac Toy
Share this post:

Filed Under: 2013, DIY, GIFTS, HANDBUILT HOLIDAY, KIDS, ORGANIZATION, SCRAP WOOD14 Comments

Reader Interactions

Comments

  1. By Neymes says

    December 21, 2013 at 12:45 AM

    MUITO BOA ESSA IDÉIA JAME,EU ADORAR.UM FELIZ NATAL PARA VOCÊ E SUA FAMILIA.BEIJO.VALÉRIA.(BRASIL).

    Reply
  2. Tasha A. says

    December 30, 2013 at 1:33 AM

    Well this is just fabulous! So glad I stopped by from the DIY Show Off party to check it out. Pinning now!

    – Tasha @ Designer Trapped in a Lawyer's Body {www.designertrapped.com}

    Reply
  3. Julia Nyanyo says

    December 30, 2013 at 12:04 PM

    Wow, this is genius! I love to see colouring pens or pencils all lined up just asking to be used, they look so tempting! and the lap tray bit is just brilliant.

    Reply
  4. CJ Smythe says

    January 8, 2014 at 9:15 AM

    Did I miss something? The instructions say it will hold 32 crayons, but I only counted 29 crayon holes. Where do the other three crayons go?

    Reply
  5. Unknown says

    February 20, 2014 at 6:58 PM

    I love this,, I wish I had seen this earlier. Im saving to make for birthday gifts and happies for Christmas this year. Thanks for sharing.

    Reply
  6. Steve says

    December 18, 2017 at 3:43 AM

    Has anyone made a printable template?

    Reply
    • Jaime says

      December 18, 2017 at 6:54 AM

      Great idea Steve, I will update the post with a template soon.

      Reply
      • Kerri says

        January 14, 2020 at 9:31 AM

        Did a printable template ever get added to the post? Thanks!

        Reply
        • Jaime says

          January 14, 2020 at 10:18 AM

          Hi Kerri, It is your lucky day. I had a few minutes to put together the template and I have added it to the tutorial above. The free printable crayon holder template is here: https://drive.google.com/file/d/1PvLlZvhT7w5BumMsGF65CxeoiuXws4D9/view?usp=sharing

          Reply
          • Kerri says

            January 14, 2020 at 3:49 PM

            Wow! What service! Thanks so much!! Excited to make this for my 2 nieces!

Leave a Reply Cancel reply

Your email address will not be published. Required fields are marked *

Primary Sidebar

Hi! I’m Jaime

Jaime Costiglio

Hello!

Thank you for stopping by.
Join me for lots of DIY.

Read more

Get new posts via email

Handbuilt Holiday: Gift Project Plans

handbuilt holiday gift project plans

Collection of DIY gift project plans to build.

The Home Depot Tool Prospective

THD Prospective

Tools to consider for the DIYer.

Archives

The Home Depot Logo
Copyright © 2023 Jaime Costiglio · Custom site by Moonsteam Design

Privacy Policy