• Home
  • Blog
  • About
  • Contact
    • Disclosure
    • Privacy Policy
  • SHOP
  • Widget area for main menu

    • Email
    • Facebook
    • Instagram
    • Pinterest
    • Twitter
    • YouTube
  • Skip to primary navigation
  • Skip to main content
  • Skip to primary sidebar

Jaime Costiglio

build - paint - sew

  • BUILD
    • BEDS
    • BENCHES
    • DESKS
    • DRESSERS
    • GAMES & TOYS
    • SCRAP WOOD
    • SHELVES
    • STORAGE
    • TABLES
  • TOOLS
  • PAINT
    • CRAFTS
    • FURNITURE
    • HOME DECOR
  • SEW
    • GIFTS
    • HOME DECOR
    • POUCHES
  • HANDBUILT HOLIDAY
    • 2021
    • 2019
    • 2018
    • 2017
    • 2016
    • 2015
    • 2014
    • 2013
  • GIFTS
    • BABIES
    • KIDS
    • FOR HER
    • FOR HIM
    • TEACHERS
    • WEDDINGS
  • SEASONAL
    • 4TH OF JULY
    • FALL
    • HALLOWEEN
    • CHRISTMAS
    • SUMMER
    • SPRING
    • ST. PATRICK’S DAY
    • THANKSGIVING
    • VALENTINE’S DAY
    • WINTER
  • SALTBOX PROJECT
    • BATHROOMS
    • DINING ROOM
    • EXTERIOR
    • FAMILY ROOM
    • FOYER / MUDROOM
    • KIDS BEDROOMS
    • KITCHEN
    • LIVING ROOM
    • MASTER BEDROOM
    • PLAYROOM
  • SCROLL SAW

“A” is for Alphabet Blocks

August 5, 2013

diy alphabet blocks
Make alphabet blocks using old books, a square wood dowel and mod podge.
diy alphabet blocks using Beatrix Potter images
A gift for a friend who is having her first baby.  
She outfitted her nursery using a subtle Beatrix Potter theme and these baby blocks should fit right in.
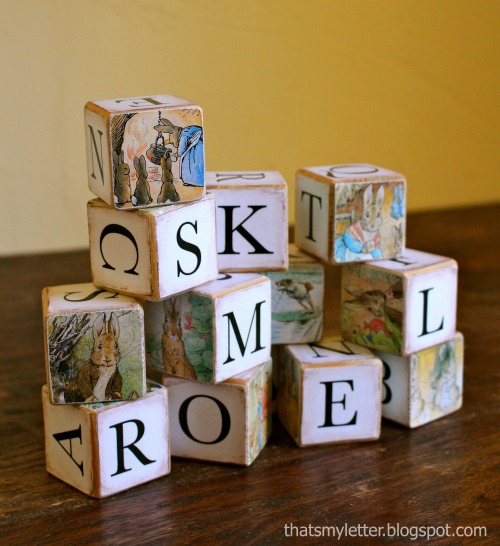
The edges are sanded smooth:

diy alphabet blocks using Beatrix Potter images
I tried to incorporate images of all the Beatrix Potter characters:
Beatrix Potter characters on wood blocks
how to make alphabet wood blocks
Lots of good rabbit images too:
Peter Rabbit and friends wood blocks
Here’s how to make alphabet blocks:

1. Supplies: 
– kids picture books
– mod podge – matte
– paint brush
– 2″ x 2″ wood dowel cut into 2″ lengths
– printed alphabet onto cardstock
– paper cutter
– sandpaper
– dark brown acrylic paint
how to make Peter Rabbit wood blocks
2. Trim desired image down to slightly larger than block, apply mod podge to block:

using mod podge to make wood blocks
3. Press image onto block and repeat for opposite side:

using mod podge to make wood blocks
4. Let dry then sand excess paper edges off:

sanding off excess paper to smooth edge
5. Do all images first, I choose 2 images for each block leaving 4 sides open for letters:

how to make wood alphabet blocks
6. Same process for letters.  Cut printed letter down to size and apply with mod podge to block:

how to make wood alphabet blocks
7. Repeat for opposite side:

how to make wood alphabet blocks
8. Then repeat letter process again for other 2 sides.
9. Using a dry brush and dark brown acrylic paint apply dry paint to edges of letters to create aged look:

aging wood blocks with acrylic paint
10. Apply final coat of mod podge to all 6 sides to seal papers.
Beatrix Potter alphabet blocks

You may also like...

  • “C” is for Cupcake Placecards“C” is for Cupcake Placecards
  • “W” is for WANTED party invitations“W” is for WANTED party invitations
  • Cross Stitch Monogram Ornament PlacecardCross Stitch Monogram Ornament Placecard
  • Thanksgiving Mantel with Paper PoinsettiasThanksgiving Mantel with Paper Poinsettias
Share this post:

Filed Under: BABIES, BUILD, CRAFTS, CRAFTS, DIY, GAMES & TOYS, GIFTS, HOME DECOR, PAINT, SCRAP WOOD16 Comments

Reader Interactions

Comments

  1. Our Pinteresting Family says

    August 5, 2013 at 12:16 PM

    They turned out so pretty. What a thoughtful gift!

    Reply
  2. Sandi @ The Primitive Skate says

    August 5, 2013 at 2:32 PM

    Love thos!
    Thanks for sharing.

    Reply
  3. Julie @ Living on the Ledge says

    August 5, 2013 at 3:19 PM

    These are darling! A gift I would love to give or receive! Beautiful.

    Reply
  4. [email protected] says

    August 6, 2013 at 1:52 AM

    These are adorable!

    Reply
  5. Velud'arte says

    August 6, 2013 at 10:44 AM

    wow.
    I love the illustrations of Beatrix Potter, as you can see in my daughter's room.
    I have many wooden cubes at home, left over from the present I made for the guests of the baptized.
    This idea is wonderful. Thanks for sharing!

    Reply
  6. Maria Lourdes Rios says

    September 2, 2013 at 2:11 AM

    I love these blocks.. The pictures are so cute. Thanks for sharing…

    Reply
  7. I Heart Peter Rabbit says

    October 3, 2013 at 2:45 PM

    Very very cool idea……. Where did you get all of the pictures from?
    Thanks!

    Reply
  8. Tam Nguyem says

    October 7, 2013 at 12:31 PM

    I love it, it looks great. I love the clean, simple look of the wooden alphabet above it!

    Greek Wooden Paddles

    Reply
  9. Karen says

    April 28, 2018 at 8:16 AM

    Thank you for this post! I made these for a friend having her first baby. I thought about going to Goodwill and looking for a old baby book but purchased craft papers from my local Hobby Lobby instead. They were on sale 50% off, and I already had the 2×2 and Modpodge. So this project cost me about $2.00. Super cute. Thanks so much!

    Reply
    • Jaime says

      April 28, 2018 at 9:04 AM

      Love hearing this Karen, thank you for sharing. And all the more special and appreciated by your friend because you took the time to make it.

      Reply
  10. BeckyLeBlanc says

    February 9, 2020 at 2:03 PM

    Question, what were the dowels for?
    Thanks

    Reply
    • Jaime says

      February 9, 2020 at 2:20 PM

      Hi Becky, The 2×2 dowels are cut into 1 1/2″ lengths to make the blocks. Or you can purchase precut wood blocks.

      Reply
  11. Daniella says

    August 9, 2020 at 6:11 AM

    Love this idea! How many blocks did you make?

    Reply
    • Jaime says

      August 9, 2020 at 12:52 PM

      Thanks Daniella, to be honest I don’t remember how many blocks I made.

      Reply
  12. Cindy Klein says

    September 2, 2020 at 5:30 PM

    These are so cute and I am making some for our grandsons first birthday which is a Beatrix Potter theme. My blocks are 2 inches and I was wondering what size letters you used and if you have a recommended template for that.
    Thank you

    Reply
    • Jaime says

      September 2, 2020 at 10:18 PM

      Hi Cindy, I don’t recall what size letters I used (this project was done a few years back). And I don’t have a template, I simply made a word document and printed them onto cardstock. Good luck!

      Reply

Leave a Reply Cancel reply

Your email address will not be published. Required fields are marked *

Primary Sidebar

Hi! I’m Jaime

Jaime Costiglio

Hello!

Thank you for stopping by.
Join me for lots of DIY.

Read more

Get new posts via email

Handbuilt Holiday: Gift Project Plans

handbuilt holiday gift project plans

Collection of DIY gift project plans to build.

The Home Depot Tool Prospective

THD Prospective

Tools to consider for the DIYer.

Archives

The Home Depot Logo
Copyright © 2023 Jaime Costiglio · Custom site by Moonsteam Design

Privacy Policy