• Home
  • Blog
  • About
  • Contact
    • Privacy Policy
  • SHOP
  • Widget area for main menu

    • Email
    • Facebook
    • Google+
    • Instagram
    • Pinterest
    • Twitter
    • YouTube
  • Skip to primary navigation
  • Skip to content
  • Skip to primary sidebar
  • Skip to footer

Jaime Costiglio

build - paint - sew

  • BUILD
    • BEDS
    • BENCHES
    • DESKS
    • DRESSERS
    • GAMES & TOYS
    • SCRAP WOOD
    • SHELVES
    • STORAGE
    • TABLES
  • TOOLS
  • PAINT
    • CRAFTS
    • FURNITURE
    • HOME DECOR
  • SEW
    • GIFTS
    • HOME DECOR
    • POUCHES
  • HANDBUILT HOLIDAY
    • 2018
    • 2017
    • 2016
    • 2015
    • 2014
    • 2013
  • GIFTS
    • BABIES
    • KIDS
    • FOR HER
    • FOR HIM
    • TEACHERS
    • WEDDINGS
  • SEASONAL
    • 4TH OF JULY
    • FALL
    • HALLOWEEN
    • CHRISTMAS
    • SUMMER
    • SPRING
    • ST. PATRICK’S DAY
    • THANKSGIVING
    • VALENTINE’S DAY
    • WINTER
  • SALTBOX PROJECT
    • BATHROOMS
    • DINING ROOM
    • EXTERIOR
    • FAMILY ROOM
    • FOYER / MUDROOM
    • KIDS BEDROOMS
    • KITCHEN
    • LIVING ROOM
    • MASTER BEDROOM
    • PLAYROOM

DIY Handsome Nightstand

April 2, 2017

*This post contains affiliate links.

diy pottery barn inspired owen nightstand

Build this handsome nightstand with free plans from Ana White here.
diy pottery barn inspired owen nightstand
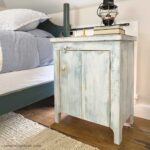
After building the pipe and wood slat bed you know Ana and I wouldn’t forget the nightstand!
diy pottery barn inspired owen nightstand

This nightstand has very masculine lines and a campy feel, it fits perfectly in my son’s bedroom.
The lamp is from Ikea – Ranarp work lamp.
diy pottery barn inspired owen nightstand
diy masculine nightstand with two drawers
Tons of storage with two big drawers and I used basic pulls from Home Depot.

everbilt handle pulls on nightstand
Inspired by Pottery Barn Kids Owen nightstand:
pottery barn owen nightstand
image source

This diy version will cost just about $100 in supplies, I used nearly all scraps I found in my stash so my costs were very minimal.

diy owen nightstand
How to build a handsome nightstand:

1. Follow Ana’s plans here and cut lumber.
2. Begin by making pocket holes with your Kreg jig in side panels:
building a nightstand

MY LATEST VIDEOS
building a nightstand
3. Construct side panels using 1×2 trim on front, screw down from exterior (the screw heads will be hidden under the lath trim):
diy nightstand side panels
4. Attach legs to side panels.
5. Make pocket holes with your Kreg jig into horizontal 2×2 supports:
kreg jig into 2x2 legs
6. Attach all 6 supports to one side panel:
nightstand side supports
7. Then add other side panel:
nightstand carcass
8. Attach lath trim using a finish nailer:
lath trim on nightstand
9. Attach the back:
plywood top on nightstand
10. And finally the top:
diy nightstand built
11. Ana suggests adding a support piece under the 1/4″ plywood top.  After getting the top on I decided it would be best to add the support:

diy nightstand built
12. Finish with stain, I used Minwax 1 part weathered oak and 1 part provincial:
stained finish on nightstand
13. Seal with 3 coats Minwax clear satin polyurethane.
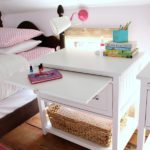
14. Build drawers and install drawer glides:
drawer glides on nightstand
15. Mark the drawer front for holes for the handle pull:
installing drawer pulls on nightstand
16. Position the drawer front using a 1/8″ spacer (and glue), insert finish nails in between the marks for the screws:

installing drawer faces on nightstand
17. Remove the drawer and secure drawer front from interior by countersinking 1 1/4″ screws:
installing drawer faces on nightstand
18. Attach handle pulls and ready to use.
SHOP THIS POST:

You may also like...

  • DIY Nightstand with Pull-Out Ledge (free plans)DIY Nightstand with Pull-Out Ledge (free plans)
  • DIY Mod NightstandDIY Mod Nightstand
  • How to Finish DIY Furniture with PaintHow to Finish DIY Furniture with Paint
  • DIY Media ShelfDIY Media Shelf
Share this post:

Filed Under: BUILD, DRESSERS, FURNITURE, STORAGE14 Comments

Reader Interactions

Comments

  1. Korrie@RedHenHome says

    February 28, 2014 at 2:55 AM

    That's a really fun design. I was overflowing with scraps, and since the weather was nice this afternoon, I had a burn party–I knew I would regret burning those short pieces of 2x2s!

    Reply
  2. Cassie @ Primitive & Proper says

    February 28, 2014 at 3:01 AM

    love it! i love the hardware!

    Reply
  3. Danielle Bartran says

    March 1, 2014 at 12:43 AM

    I'm in love! This is beautiful! I love the style….I wonder if I could somehow adapt this into a dresser?!

    Reply
  4. Kim @ NewlyWoodwards says

    March 2, 2014 at 4:24 AM

    The lines on this are awesome. Very modern. You are such an inspiration to me. I love seeing everything you build.

    Reply
  5. Katie from Sew Woodsy says

    March 4, 2014 at 5:17 PM

    great job on the nightstand! Love the knockoff projects!

    Reply
  6. Joanne Coathupe says

    March 6, 2014 at 1:38 AM

    I love this design and will be definitely making it for my son's bedroom. When you attached the plywood top did you put the wood lathe pieces in front of the plywood edge to hide the ugly part of the plywood? From the plans it looks like the plywood is above the wooden pieces but I cant see the plywood edge on the photos. Hope that made sense 🙂

    Reply
  7. Rayana Botelho says

    March 6, 2014 at 9:50 PM

    Love what you have done! I had been looking for nightstands for the master bedroom for so long! I guess I just found them 🙂 Will be building mine soon. Thank you for sharing.

    Rayana @ FiRefinishBlog.com

    Reply
  8. Katie @ Addicted 2 DIY says

    March 10, 2014 at 2:57 AM

    I love this nightstand and actually had it pinned to build for my boys. I was so excited to see Ana White make plans for it! You did an amazing job and that bed is awesome too!

    Reply
  9. Leshia @ Southern Chic Love says

    March 16, 2014 at 7:06 PM

    I absolutely love this and is my new build for my sons room as we have just finished making his bed from another plan of Ana's. I'm wondering if you or Ana would be able to modify this plan into a dresser. Maybe one similar to size of the Rolling Rustic Wood Dresser… Any help would be appreciated.

    Thanks!

    Reply
  10. Donald says

    June 22, 2014 at 12:53 AM

    Building now. I would also like to see this modified for a 5-6 drawer dresser. Please?

    Reply
  11. Colt says

    December 9, 2017 at 4:40 PM

    What kind of wood did you use?

    Reply
    • Jaime says

      December 10, 2017 at 6:59 AM

      Pine boards and birch plywood.

      Reply
  12. Medina says

    June 2, 2018 at 9:26 AM

    The detailed pictures that you provided are awesome! I have a question-
    What type of screws did you use to nail the 1×2 trimmings to the side panels?
    Thank you!

    Reply
    • Jaime says

      June 3, 2018 at 8:34 PM

      Thanks Medina. The 1×2 are attached to the side panels using #8 – 1 1/4″ wood screws. They should be countersunk and sit flush and then they will be covered with the finish flat mould trim bits. Hope that helps.

      Reply

Leave a Reply Cancel reply

Your email address will not be published. Required fields are marked *

Primary Sidebar

Hi! I’m Jaime

Jaime Costiglio

Hello!

Thank you for stopping by.
Join me for lots of DIY.

Read more

My Latest Videos!

Get new posts via email

The Home Depot Tool Prospective

THD Prospective

Tools to consider for the DIYer.

Christmas in July

mini tool ornaments

Collection of miniature tool ornament tutorial posts.

Archives

The Home Depot Logo
Copyright © 2019 Jaime Costiglio · Custom site by Moonsteam Design