Summer is just around the corner and what’s more fun for little ones than sand and water? So I teamed up with Ana White again to bring you free plans for this simple and functional sand and water play table.

A DIY tutorial to build a sand and water play table. Make the perfect play space for kids and they’ll be entertained for hours.
Give your kids a place to play and make a mess with all the sand and water. This play table lets them stir, pour, sift, mash and build in a designated space. Because I think it’s important to provide kids the opportunity for explorative and imagery play and this play table fits the bill.

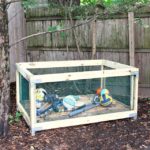
And we designed this play table to fit standard 28 quart tupperware bins. So you can put the lids on the bins when you’re not using it. This protects the sand from critters and the elements.

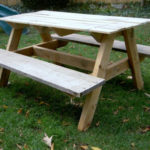
A solid play table with sturdy legs and a slatted shelf for storage down below. One note – if I were to build this again I would consider using cedar or other material better suited for extended time outdoors.

Clearly my sand toys are lacking a little bit! But kitchen gadgets work just a good. This would be a great birthday gift idea or even better to have on hand for a kids backyard party. I hung up the colorful wood bunting and it looks so cheery with the play table.

Be sure to stop at Ana’s place to get the free plans to make your own sand and water play table.

This is super cute! And yes, the kitchen utensils work just fine!
Can you put the dimensions?
Hi Apryl, the dimensions are in the plans but I will leave them here as well: 44 3/4″l x 18″w x 24″h.
Did you put any holes for drainage in the sand portion? I'm worried about the kids dumping water into the sand & not having an easy way to drain it…
I a looking at you project and trying replicate and some twist for an eagle Project. Would it be possible to get a step by step and Material list from you.
HI Nicholas, the link to the plans including materials, cut list and step by step instructions is up above in the post.
How did you attach the legs to frames? I assume it was using screws that are countersunk with wood filler but I wanted to confirm.
Hi Delbert, the legs are attached to the apron on the interior using countersunk screws. I didn’t fill with wood putty because they aren’t visible to much through the plastic bins. Good luck!
Hi!
I can’t find the link to the actual plans anywhere. Can you please repost the link?
-MH
Hi Michael, the plans are linked in the post above but I will leave it here as well: https://www.ana-white.com/woodworking-projects/sand-and-water-play-table
What are the size of the tubs? They are not available on home depot.
Hi Brittany, I used the 28 quart bins. These are very similar: https://bit.ly/3vHTcKx
The mentioned bins on the H.D. site are 23″ x 16.25 x 6″. Appears the 23″ length (times 2) is too long for the plan length of 44.75″.
What would the corrected length dimension be for 2 top sides and 2 shelf sides? Thanks.
Hi Steve, the bin measurement is taken from the longest top portion of the bin with the lip edge. The bins are tapered at the bottom which makes them shorter (about 22 3/8″). I suggest purchasing your bins first and double checking the cut length accordingly. Good luck!