Wood just might be the most versatile product out there. We make furniture with it, we make it into paper and write on it, we cook with it and it provides heat, the list goes on and on. So why not make wall art with it too!

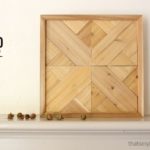
A DIY tutorial to make a giant wood planked quilt wall hanging. Add warmth and beauty to your walls with this large wood quilt style wall art.
You can make this wall decor using pine boards, glue and various stains, it makes a great statement and combines two of my favorites: wood and sewing!


I can’t take all the credit for this beautiful design. This wood planked quilt was inspired by Pottery Barn’s planked quilt square:

Their version will set you back $319 plus shipping. I made this diy version for $60.

Even better I was able to tailor the stain colors to my liking. The walls are a neutral off white painted Benjamin Moore sea pearl and I love the contrast of the warm wood stains against the white walls.
The finished size of my version is 43.5″ square.


We’ve come a long way in the family room since we moved in, check out this before and after photo below:

Below are the step by step instructions to make this wood planked wall quilt. Be sure to read through entirely before beginning.
Supplies:
- 6 – 1 x 4 x 8 pine boards
- 2 – 1 x 2 x 8 pine boards
- 1/2″ plywood panel 4′ x 4′
- wood glue
- miter saw

Step 1: Make your cuts using the measurements above. This is one quarter of the wall quilt, you will need 4 quarters to complete this wall art.
Cuts:
- 4 – 3 1/2″ square
- 8 – 7″ long, one end 45 degree miter
- 8 – 10 1/2″ long, one end 45 degree miter
- 8 – 4″ long, one end 45 degree miter
- 8 – 7 1/2″ long, one end 45 degree miter
- 8 – 11″ long, one end 45 degree miter
- 16 – 14 3/4″ long, both ends 45 degree miter parallel
Step 2: Layout all pieces on plywood backing and trim to size. My plywood measures 41 1/2″ x 41 1/2″.

Step 3: Stack up each quarter section of pieces as a group and mark the back to keep the direction correct.

Step 4: Stain all the pieces as desired. I randomly stained different sizes all different colors to mix it up. Let dry.

Step 5: Begin placing the pieces back on the plywood taking care to make sure the stain colors are varied.

Step 6: Mark the exact center of the plywood to keep the design straight and square.

Step 7: Once you are satisfied with the layout start gluing the pieces to the board.

Step 8: Weigh down the pieces using heavy paint cans while the glue dries.

Step 9: Before adding the trim check to be sure no boards are hanging long off the edge. The edge pieces must all be flush in order to attach the frame.

Step 10: Mark off any long pieces with painters tape to protect the stained surface.

Step 11: Cut off the excess edge with a jig saw. Alternatively you could run the entire piece through a table saw.
Step 12: Cut 1 x 2 boards to frame out edge. Glue and nail in place.

Step 13: Secure cleat to center upper backside of the plywood.

Step 14: Attach wall portion of cleat to wall. Hang and enjoy!

AWESOME! What a great impact this piece makes, and I love that you can customize it to your own tastes and style. It would be amazing with color too – for a bedroom even. Well done!
That is ridiculously amazing! I cannot believe you made it. Awesome job!
Angela @ Number Fifty-Three
this is totally amazing!
Great job!!!Amazing!
Love it! Beautiful work.
You are SO talented. I've follow your blog and am always amazed to see what you do next!
Gorgeous! (I like your version much better than the inspiration piece.)
This is absolutely amazing- and it looks so great on your white paneled walls. The whole thing looks so pottery barn and pretty. Great knockoff!!
~Krista from the happy housie
That is BEAUTIFUL! And your tutorial is great. You have come such a long way, and it all looks fantastic.
Wow, that looks great! I need to make me one.
Marie @ Fort Ledbetter
LOVE this! Just perfect from the design to the color to the decor : )
Your color choices are several hundred times better than Pottery Barn's dark, muddy concoction. Love it!
This. Looks. Awesome. I'm seriously pinning the snot out of this one. One of my next projects is a barn quilt square for our barn, and now I want to recreate this square. I've been scouring quilt books and I just want to make them all.
I love this! More so I WANT this!!! Thanks for posting the plans!
Ooh, I love this idea. I am a quilter, so I can appreciate this even more. It looks beautiful against your white wall.
Thanks for the inspiration,
Suzanne
Pieced Pastimes
PS-Would love to have you link this up to Saturday Sparks. Links are open till Friday.
This is so beautiful; I am definitely pinning this, so I don't forget about it.
Love this! Have pinned it and hope to try it myself at some point!
So awesome! I saw this in the new Pottery Barn catalog last month and actually clipped it out for my next summer project. You beat me to it, but now I can steal the dimensions. Thanks for making the job so much easier! 🙂
Thanks so much for sharing! I literally emailed the PB pic to my dad last week telling him I wanted him to make it for me. Now he has the directions! Thanks! 🙂
I love it, and so easy too. Thank you for sharing your technique. I'd like to try something like it one day.
Stunning piece of work! I love the natural and rustic edge it gives to your space.
Your quilt is truly outstanding! Thanks for sharing a tutorial too. Awesome!
I'm seriously in love with this wood quilt. Wow, it's stunning. I've been quilting for over 15 years now, and in the last couple of years, I've developed a thing for working with wood. This to me is a stunning example of 2 things that I love.
Thank you so much for sharing.
Just wanted to stop by and let you know that I am so completely 100% in love with your Wood Quilt that I am featuring it on The Sunday Faviourates. Please feel free to stop by and grad a button at http://thequestionablehomesteader.com/sunday-faviourates-8/
Hi Jaime! Saw this at That DIY Party and it is absolutely AMAZING! What a beautiful piece of art and for the impact it makes, the price is great too! Thanks for sharing 🙂
Wow, you worked so carefully, it fits together perfect! I don´t think I could do that – but I will bow down to your superior skill!
Holy cow. That is amazing!
This is absolutely wonderful! I love it!
LOVE this!!!!! Can you tell me what stain colors you used?
very interesting and creative wood wall art work. I love it!
I really appreciate this. I've been searching the internet for an easy and intesting large wall art that wouldn't cost a lot but have dimension1 and add another element. GREAT, I like your work and site. very easy to navigate and research the projects.
Great tutorial. i was using it to make this for my wall but after staining all the pieces i wind up using it for a head and end tables I made. Thanks for giving me this great idea and easy to follow instructions.
Oh my gosh! We did the same thing last summer using the Pottery Barn version as our model. We simplified the pattern somewhat, and used colored stains. It turned out much richer looking than PB. LOVE your stain choices! Just beautiful!
I loved this so much I made one for myself over the weekend. It wasn't difficult at all. The instructions you gave made it so simple and easy to make. It turned out beautiful. I haven't hung it yet. It is a bit heavy so I have a pair of helping hands coming to help me hang it.. Thank you so much for sharing this project and for sharing the plans on how to make it.
Hello, beautiful project! We visited Iowa last fall and got hooked on the barn quilts and eager to try ours. Confirming the width of each board? Are they 3.5 inches or 4 inches wide ? We have a lot of scrap wood I am hoping to be able to use for the project, if they are wide enough. Thanks for sharing.
Thanks Vicky. The boards are 1×4 (nominal size) but the actual measurement is 3 1/2" wide. Good luck with your barn quilt!
I don’t know what else to try…I have measured, remeasured, bought a planer to make sure everything was nice and equal and still this does not fit together. For some reason I do not get square sections. I thought I had seen in here a while ago you mentioned your square was 20 3/4″ ( I don’t see that now for some reason) I know it can very a bit depending on actual wood size but…. Anyway, I keep coming up with one side being about 20 7/8″ and the other corner being about 21 1/16″ or so which when you put 4 of these together it doesn’t fit correctly when you put the 4th square in. Any suggestions as to what I am doing wrong?
Thanks
My best advice is measure the width of your 1×4 boards (mine are 3 1/2″) then start at one corner making a square from the 1×4 (mine are 3 1/2″ x 3 1/2″). From there you can start making 45 degree cuts. Also double check you have at 45 degree angle. Hope that helps.
Love this! Any suggestions on a finish?
Thanks Julie. I used various stains medium and dark for variation.
Can you tell me exactly what stains you used?
What about treated and non treated boards? Any difference?
Hi Brad, I don’t recommend using pressure treated boards for any interior projects (unless its necessary like a foundation plate etc).