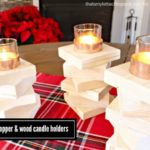
diy wood block chandelier

A crazy, fun and colorful centerpiece for any occasion! I made this wood block centerpiece from scrap 2×2 wood pieces and clear monofilament. Although this little gem happens to be from my kids Christmas table I figured it’s a versatile piece that could definitely be used for other events too.

I painted the blocks different bold colors I had on hand. Of course you could change up the colors, use different stains or even go natural.

This is an easy, inexpensive way to add color, height and a visual centerpiece to any table setting. And bonus it doesn’t block anyone’s view of people across the table!


When the light hits it just right the monofilament shines and looks like water.
How to make a wood block chandelier:

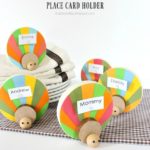
Step 1: Cut 2×2 wood scraps into 1 1/2″ lengths. (A 2×2 is the nominal size, actual size is 1 1/2″ x 1 1/2″ in order to get a square cut into 1 1/2″ lengths.) Paint and sand edges smooth. Lay out blocks to ensure good color placement, there’s no rules just make it look random and try not to have the same colors next to each other. Be sure to take a picture of your layout for quick reference.

Step 2: Cut a circle out of 1/4″ plywood. Make the diameter large enough to cover the widest measurement of your block layout. (* A circle definitely isn’t necessary and if I were to do this project again I would cut a square to match up with the block layout size.*) Place blocks on top of plywood and predrill hole in center with small drillbit. Drill down far enough to mark the plywood. Do this process for all of the blocks, the corner pieces will have to get smooshed onto the edges.

Step 3: Once all the blocks have been predrilled the plywood should have all these holes. Be sure these holes go all the way through for your monofilament and here you can also see where the corner pieces are smooshed onto the edges.

Step 4: Predrill 2 larger holes for attaching to ceiling. Spray paint white.

Step 5: Cut lengths of clear monofilament and thread through holes. I used longer pieces in the middle and shorter around the edges.

Step 5 continued: Make 3 knots in each filament piece on the top side to hold in place.

Step 6: Attach plywood to ceiling using anchors and screws. Now attach wood blocks to monofilament and this is where your layout photo will come in handy. Start at the center making that the longest piece and work out towards edge in circles sliding the block onto the filament then make 2 knots on the underside of the block.

Adjust the length as desired making the knot where you want to block to hang.


I’m linking up to:


Creative Collection @ Lolly Jane
That DIY Party @ The DIY Showoff
Tutorials & Tips Tuesday @ Home Stories A to Z
Share Awesomeness Thur @ The 36th Avenue
Pretty Things Thursday @ Scissors & Spatulas
Flaunt it Friday @ Chic on a Shoestring
Frugal Friday @ The Shabby Nest
Furniture Feature Friday @ Miss Mustard Seed
SAS @ Just a Girl
Remodelaholics Anonymous @ Remodelaholic
inspiration board @ Carolyns Homework
Sunday Showcase Party @ Under the Table & Dreaming


OMG…that is the coolest project…would love to make one for outside use…using jute so it wouldn't tangle…love your blog!
This is not only creative but really fun too. I love the colors. You always come up with great ideas.
Such a fun idea!
so fun and would make a great baby mobile, too!
I love the bright colors – and I'm with Cassie about it being a baby mobile. It'd be perfect for that.
whoa. neat!
b