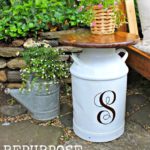
DIY repurposed milk jug into side table.

How to take a vintage milk jig and make it into a side table with just a little paint and a piece of wood.

A friend of mine found these milk jugs on a work site and brought them to me to be repurposed. Although I love the etched letters in the crusty old jug (it says Dairymen League New York) my friend wanted a fresh clean look so we opted to paint them.


And add a little personalization with a swirly single letter monogram.

Ready to tackle this project? Below are the supplies and steps I took to make these side tables from vintage milk jugs:
Supplies:

- vintage milk jug
- 17 3/4″ circular wood round
- hammer
- sandpaper
- spray primer
- spray paint gloss
- spray clear gloss poly
- stain
- clear semi gloss poly
- foam brush
- acrylic paint (for personalization)
- small brush
- printer/paper
- scotch tape
- ballpoint pen
- 3 L brackets
- pliers
- 1″ wood screw
- drill/bits
- 1 1/4″ wood screw
- E6000 adhesive
- measuring tape
Instructions:

Step 1: Use a hammer to pop off the top, empty any residual liquid (yikes!), rinse and let interior dry completely. Sand any loose paint and rust off the exterior.

Step 2: Using a spray primer with rust protection, apply the first coat. Let dry then spray with paint color. Use several thin coats allowing them to dry between coats. Resist the urge to cover the entire jug in one or two passes. Too much spray paint will result in drips and a less durable paint job.

Step 3: Print out desired letter using a word document. (The font here is Monogram KK at 650 point.) Tape the print out to side of milk jug in desired location. Using a ballpoint pen and heavy pressure trace the outline of the letter. The pressure from the pen should leave an impression in the paint.

Step 4: Using a small paintbrush, apply acrylic paint on and inside the impression, it may take 2-3 coats for even coverage. Once dry, apply clear spray gloss over the letter to seal.

Step 5: Stain the circular wood round (I used Minwax Early American) on all sides. Let dry then seal with Minwax clear semi-gloss polyurethane. Use at least three coats of the sealer and sand between coats.

Step 6: Place wood round on protected surface. Apply a line of E6000 adhesive to top rim of milk jug then flip over onto wood round, centering the milk jug (use a measuring tape to ensure it’s centered).

Step 7: Prepare the L brackets by bending them to an angle suitable for the lip of the milk jug.

Step 8: Determine good placement for 3 brackets, predrill into wood top then secure bracket with 1″ wood screw.

Step 9: Predrill hole into milk jug just above lip and down into wood top.

Step 10: Secure milk jug to wood top using 1 1/4″ wood screw. Finally, apply bead of E6000 adhesive around seam between wood top and milk jug. Let dry before flipping upright.

Beautiful! I love that you used two. I have this same setup in the nursery, it's the perfect size for the sound machine and humidifier, as well as the errant paci here and there. Repurposed projects are the best!