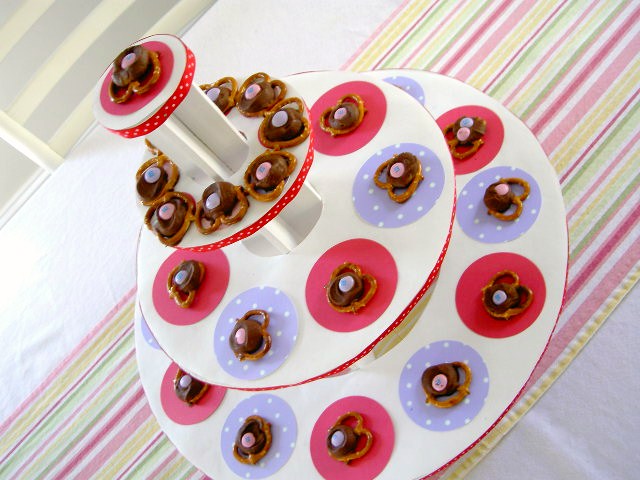
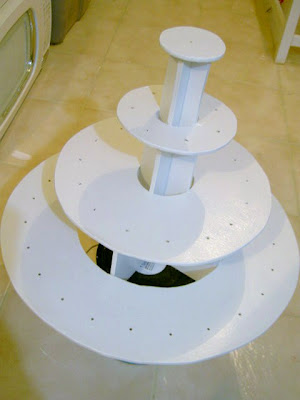
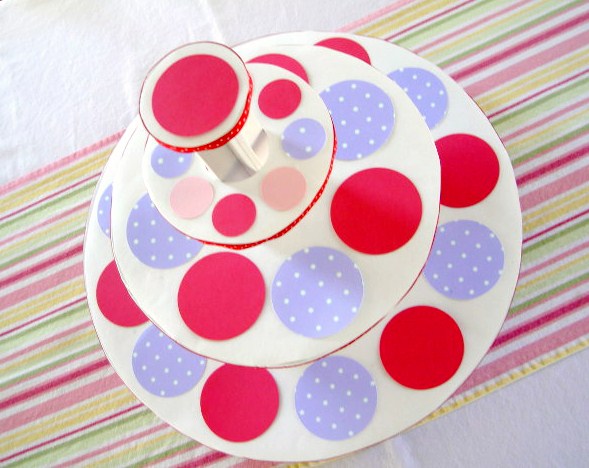
I built a treat tower.


Cupcakes, cake pops, candies whatever you fancy!
Girl #2 wanted to bring cake pops to school for her birthday treat. I got to thinking about the best way to transport, display and serve cake pops.
Then I caught Martha the other day and she one of her handymen made this cupcake tower:

image from Martha Stewart
Great, but Martha it’s one sided!
So I altered the plans, making it a full circle, adding depth to the shelf to overhang the support and adding height to the bottom level to create a fourth shelf just up off the table.
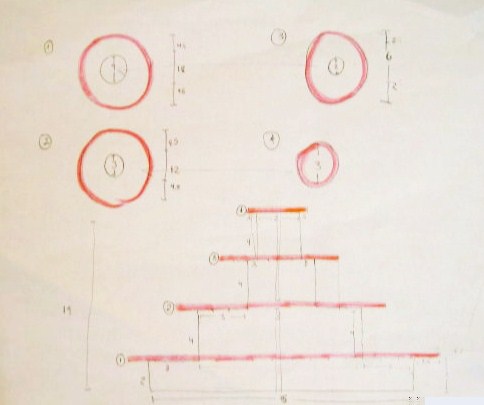
Here’s my drawings:

Basically I recreated my own version, possibly better? Definitely.
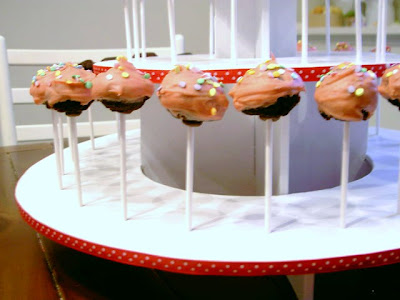
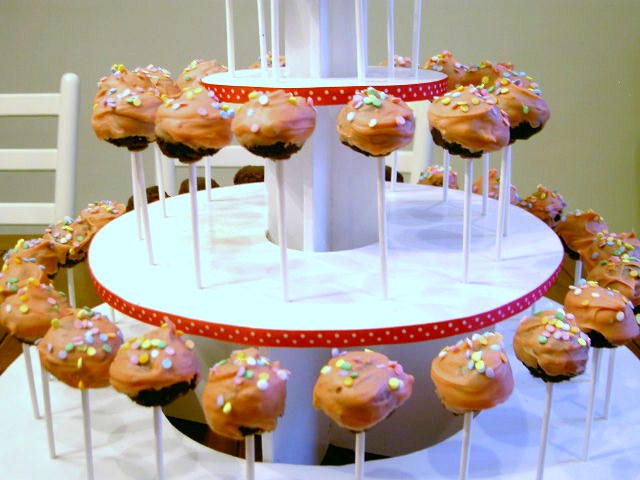
And not only is it good for cupcakes, I drilled holes for cake pops or lollipops (basically anything with a stick).

Here’s how I made the treat tower:
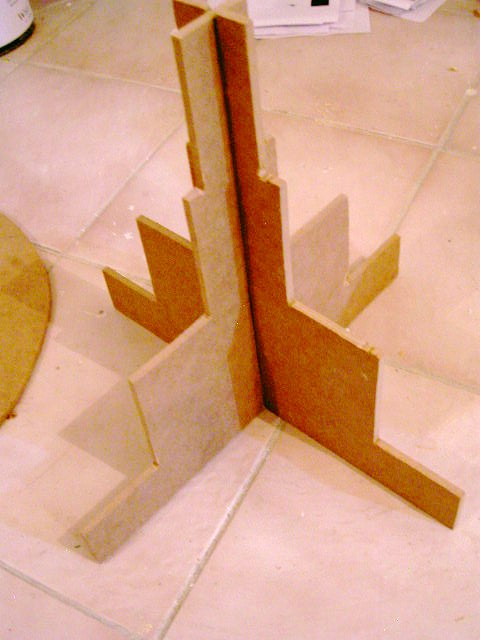
1. Draw shape onto 1/4″ plywood or mdf. Cut out with jigsaw:
(Notice the 2 yellow lines in the cross supports – those are 1/4″ slits to fit the two pieces into each other.)

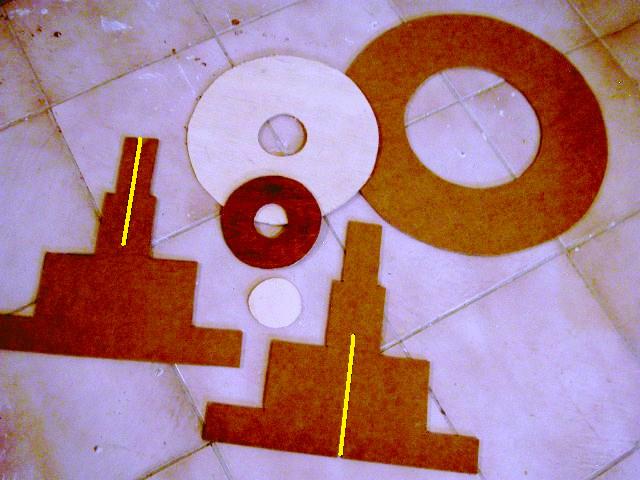
2. Check for fit, especially the two cross supports, you want it snug.
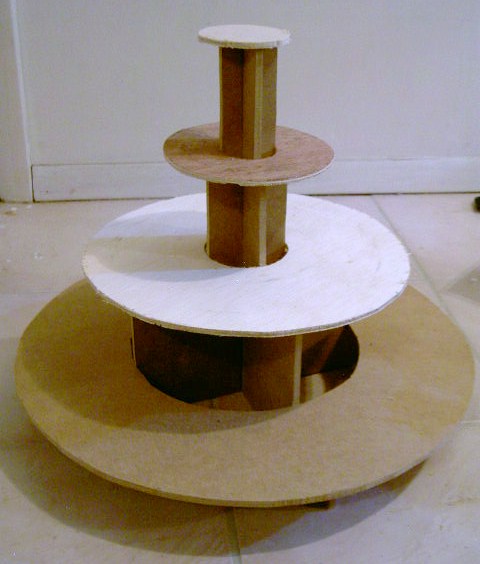
3. Sand, prime and paint.
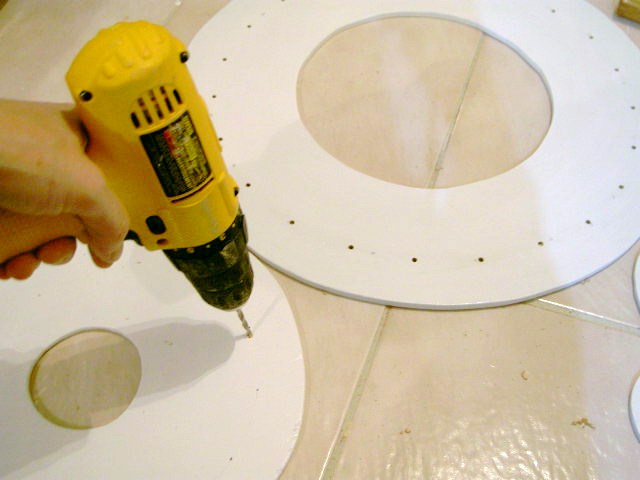
4. Drill holes for lollipop sticks now (if you want holes). I used a 5/32″ bit and spaced my holes every 2″.
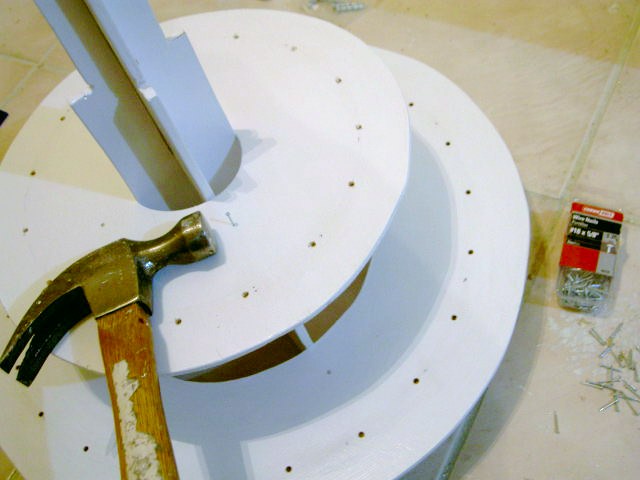
4. Assemble and tack with 5/8″ brads, it’s very sturdy without the nails but for safety let’s secure it.
5. Touch up with paint.

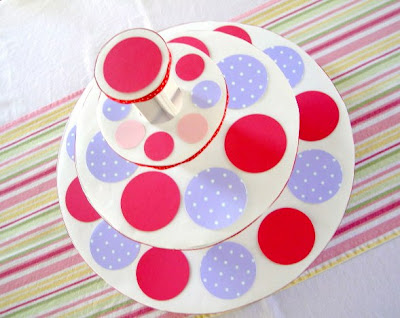
6. Add ribbon, paper edging, anything goes.
Here I cut white craft paper to ‘hide’ the holes and circle placemats for the candies.

6. Insert cake pops.
I know what all you school moms are saying – she’s totally crazy.
Yes but now I have a cupcake tower for any event!


Too easy not to make and dress up for any occassion.
I’m linking up to:


Oh geez you are my idol Jaime! They sell towers just like this at Michaels but they are made of crappy cheap cardboard. My daughter wanted cake pops for vday for school. I had never made them before. Can you say Cake Pop FAIL??? Oh yes, it was a disaster. Your's look great though!
wow you are so creative!! they look awesome!
What a great idea! I love cake pops, and I was wondering how to display them in a cute way…this is perfect!
what a great idea! I may have to draw something up for the hubs to cut out for me! It came out so fantastic and you could even change the ribbon out to match any theme! love it!
Thanks for the great tutorial. I think I need to make one.
LOVE IT!!! My hubby is gonna build me this tower…he loves building and I am getting into cake pops now! Thanks for this great idea!!!
yay! been wanting to make one of these forever and now i can! thanks for the cute tute!!
we'd love for you to link this @ our weekend party 🙂
lollyjaneboutique.blogspot.com
It's genius!! Love it!
What a great way to display cake pops! lovely tutorial.
I am having a $35 store credit + free shipping giveaway on my blog. A chance to select a custom trendy backpack for your kid from Paige Holliday Designs. All you have to do is leave a comment.
check it out!
http://houseonashwelllane.blogspot.com/2011/03/35-store-credit-free-shipping-to-get.html
hey NY blogger – there doesn't seem to be a lot of us out there. What a great idea this is…I like how you have designed it to be so versatile! I imagine this could also be used for snacks like peanuts, pretzels, goldfish etc, served in small bowls. Thanks for sharing this clever idea…patti
So funny you posted this. I was looking for something to hold my cake pops this weekend. Might have to put my hubby to work on this one!! Excellent tutorial. Thanks
This is such a super duper cute idea…thanks for sharing it at NTT!
Blessings,
Linda
You are very clever and handy too. Fabulous piece. I could never do this but it's fun to dream. 🙂
Wow! What a fabulous, useful project!
I'm your newest follower! ~Amy
http://amy-showalter.blogspot.com
omgoodness.
this is fantastic. especially for the cake pops. they are so hard to have for parties. last year, i placed mine is a florist wreath so they would stand up. THIS is so much better & prettier.
thanks for linking this up to the SPRING FLING!
kellie
This is amazing! How adorable.
just came back to say, i'm sharing this on the blog's FB page.
thanks again!
kellie
Love this! What a great idea!
Warm Wishes,
Jodie
It looks great. Doing one better than Martha are you? Now Martha is going to be a Jaime-wannabe.
looks delicious. I love cake pops.
megan
craftycpa.blogspot.com
The tower and the treats look great! Great job!!
~your new follower 🙂
wow, thats impressive! I bet it would look awesome with cupcakes and cakepops on there together!
I LOVE THIS!!!!!! I make cake pops all the time (ok, not all the time but often enough) to warrant this!! I am going to make (my husband) this!!
I am your newest follower!!
Patty
http://www.nuestrasaventurasentexas.com
Wow! This is awesome…what a great project and fabulous tutorial!
Hi love the stand could you tell me measuremnts for each piece please the plan is very blurry and i would love to make well my dad to make one. Many thanks x
Hi love the stand could you tell me measuremnts for each piece please the plan is very blurry and i would love to make well my dad to make one. Many thanks x
Hi love the stand could you tell me measuremnts for each piece please the plan is very blurry and i would love to make well my dad to make one. Many thanks x
Hi love the stand could you tell me measuremnts for each piece please the plan is very blurry and i would love to make well my dad to make one. Many thanks x
Thank you so much for the detailed information you gave us!! I'm planning my son's bday party and looking tp build something myself because it's do much cheaper and I get to choose the materials 😀
This tower came out amazing. LOVE IT!!