• Home
  • Blog
  • About
  • Contact
    • Disclosure
    • Privacy Policy
  • SHOP
  • Widget area for main menu

    • Email
    • Facebook
    • Instagram
    • Pinterest
    • Twitter
    • YouTube
  • Skip to primary navigation
  • Skip to main content
  • Skip to primary sidebar

Jaime Costiglio

build - paint - sew

  • BUILD
    • BEDS
    • BENCHES
    • DESKS
    • DRESSERS
    • GAMES & TOYS
    • SCRAP WOOD
    • SHELVES
    • STORAGE
    • TABLES
  • TOOLS
  • PAINT
    • CRAFTS
    • FURNITURE
    • HOME DECOR
  • SEW
    • GIFTS
    • HOME DECOR
    • POUCHES
  • HANDBUILT HOLIDAY
    • 2021
    • 2019
    • 2018
    • 2017
    • 2016
    • 2015
    • 2014
    • 2013
  • GIFTS
    • BABIES
    • KIDS
    • FOR HER
    • FOR HIM
    • TEACHERS
    • WEDDINGS
  • SEASONAL
    • 4TH OF JULY
    • FALL
    • HALLOWEEN
    • CHRISTMAS
    • SUMMER
    • SPRING
    • ST. PATRICK’S DAY
    • THANKSGIVING
    • VALENTINE’S DAY
    • WINTER
  • SALTBOX PROJECT
    • BATHROOMS
    • DINING ROOM
    • EXTERIOR
    • FAMILY ROOM
    • FOYER / MUDROOM
    • KIDS BEDROOMS
    • KITCHEN
    • LIVING ROOM
    • MASTER BEDROOM
    • PLAYROOM
  • SCROLL SAW

“O” is for Ornaments

August 8, 2011

Pinwheel ornaments.
Christmas is a few months away but these ornaments are going to the craft market at the beach next weekend.
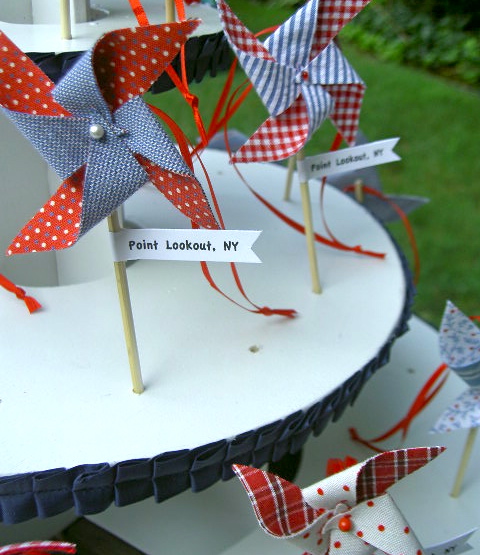
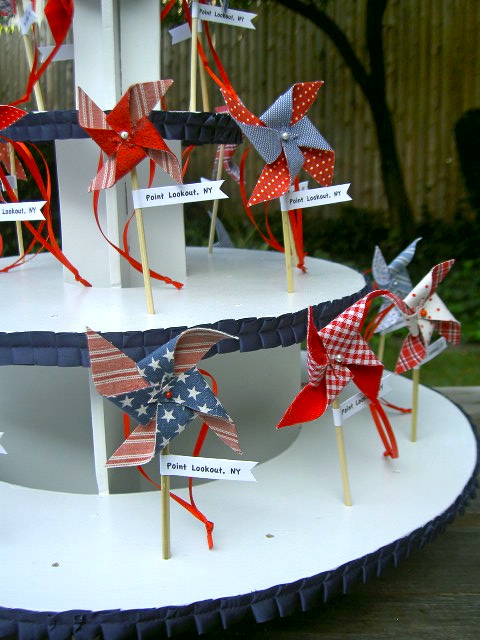
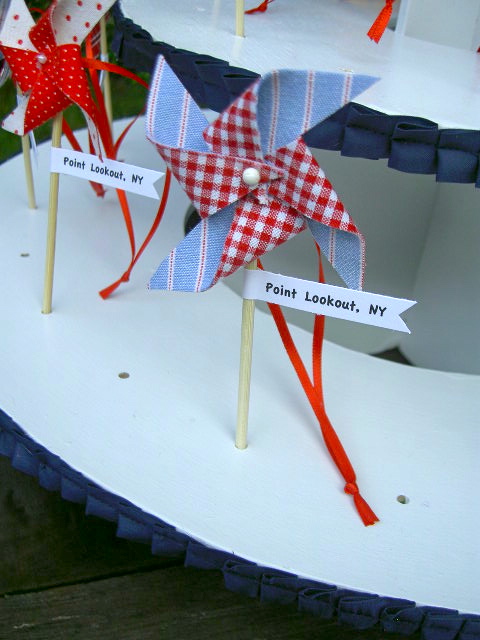
I used the cake pop tower I had made here, changed out the ribbon and stuck in the ornaments.
Makes for a perfect display stand.
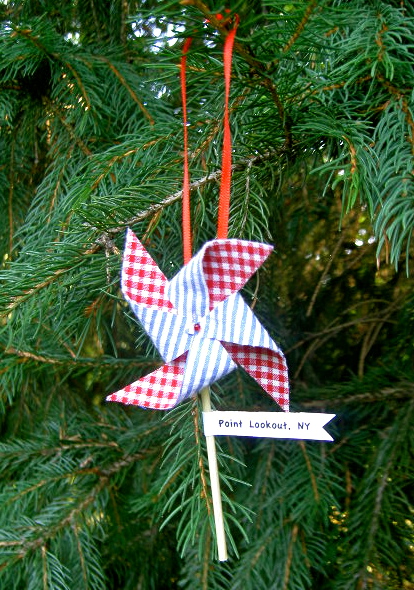
I had made the pinwheels for a 4th of July tree decoration:
You can see the how-to on the pinwheels here.
I plucked the pinwheels off the tree, added a ribbon, stick and banner and now they are ornaments:

Here’s how I made the ornaments:

1. Follow the pinwheel construction in the post here.
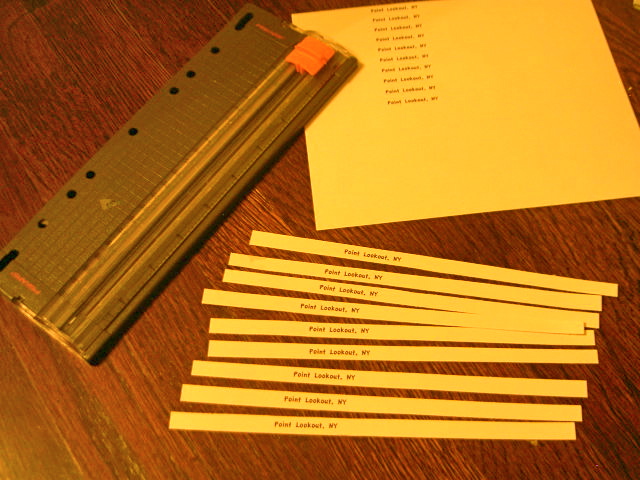
2. Using bamboo skewers cut 4″ pieces for the sticks:
3. Print out the banner tag and cut into strips:
4. Lay the pinwheel face down, apply hot glue, lay ribbon across pinwheel and then stick in center:

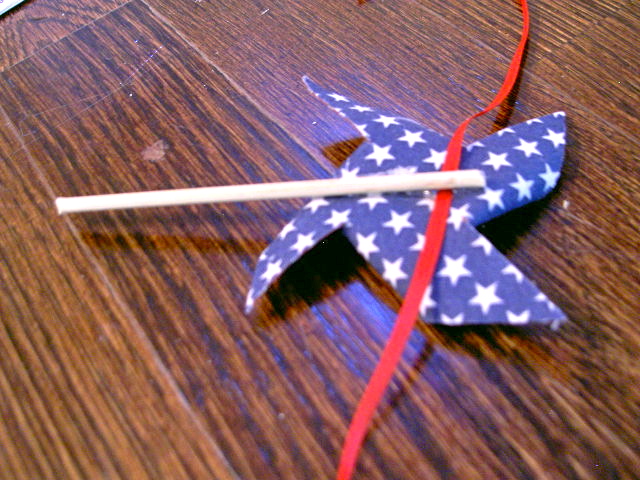
5. Wrap banner tag around stick, glue and trim ends:
Here’s how I made the ribbon trim on the tower:

1. Cut 1 1/2″ wide strips from blue fabric:
2. Sew strips together at short ends, press long raw edges in about 3/8″:
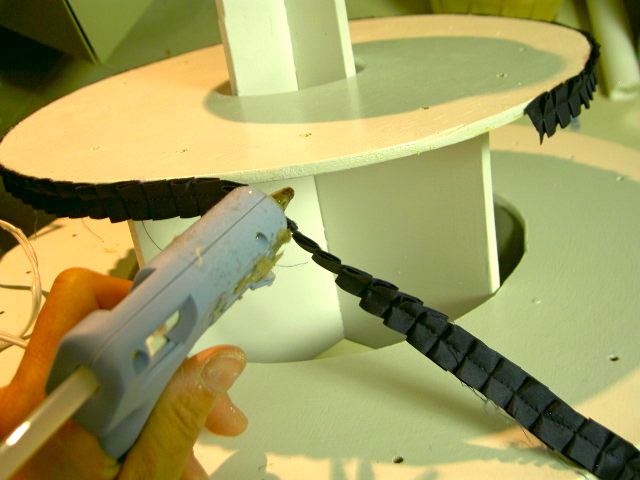
3. Straight stitch down the middle making pleats as you go:
4. Hot glue the pleated trim onto edge of the tower:
5. Completed trim with ornaments:
So fun I want a whole pinwheel tree this Christmas.
I’m linking up to:
Nifty Thrifty @ Coastal Charm
Tuesday Treasures @ My Uncommon Slice of Suburbia
Tutorials & Tips Tuesday @ Home Stories A to Z
Good Life @ A Beach Cottage
Delightfully Inspiring @ Delightful Order
Transformation Thursday @ The Shabby Creek Cottage
Strut Your Stuff @ Somewhat Simple
Share Awesomeness Thur @ The 36th Avenue
Flaunt it Friday @ Chic on a Shoestring
Tickled Pink @ 504 Main
Frugal Friday @ The Shabby Nest
SAS @ Just a Girl
Feathered Nest @ French Country Cottage
Remodelaholics Anonymous @ Remodelaholic
Textiles @ Freckled Laundry
Whatcha Got Weekend @ Lolly Jane
SAS @ Funky Junk
Lovely Crafty Weekend @ Lovely Crafty Home
Weekend Wrap Up @ Tatertots & Jello
Sundae Scoop @ I Heart Naptime
Sister Sunday @ Sisters of the Wild West
Sunday Showcase Party @ Under the Table & Dreaming
Just Something I Whipped Up @ The Girl Creative
DIY Project Parade @ The DIY Showoff
Made by You Mondays @ Skip to My Lou
Making the World Cuter @ Making the World Cuter

You may also like...

  • Cross Stitch Monogram Ornament PlacecardCross Stitch Monogram Ornament Placecard
  • “W” is for Wood Favor Tags“W” is for Wood Favor Tags
  • “C” is for Cake Party“C” is for Cake Party
  • “O” is for Oyster“O” is for Oyster
Share this post:

Filed Under: CHRISTMAS, CRAFTS, DIY, FOR HER, FOR HIM, GIFTS, SEASONAL, TEACHERS5 Comments

Reader Interactions

Comments

  1. m e g a n says

    August 8, 2011 at 2:02 PM

    too cute! I need to come up with my annual homemade ornament.

    Meg

    Reply
  2. Inspire Me Heather says

    August 8, 2011 at 2:20 PM

    How sweet Jaime – you've done a wonderful job, again!

    Reply
  3. Kirsty says

    August 10, 2011 at 4:19 AM

    I love it on the Christmas tree! Very sweet.

    Reply
  4. Natasha in Oz says

    August 12, 2011 at 2:23 AM

    They are gorgeous and I would love to make them for Christmas! Great tutorial too-thanks so much!

    Best wishes,
    Natasha.

    Reply
  5. freckled laundry says

    August 19, 2011 at 3:04 AM

    I love these, Jaime!

    {xo}

    Reply

Leave a Reply Cancel reply

Your email address will not be published. Required fields are marked *

Primary Sidebar

Hi! I’m Jaime

Jaime Costiglio

Hello!

Thank you for stopping by.
Join me for lots of DIY.

Read more

Get new posts via email

Handbuilt Holiday: Gift Project Plans

handbuilt holiday gift project plans

Collection of DIY gift project plans to build.

The Home Depot Tool Prospective

THD Prospective

Tools to consider for the DIYer.

Archives

The Home Depot Logo
Copyright © 2023 Jaime Costiglio · Custom site by Moonsteam Design

Privacy Policy