• Home
  • Blog
  • About
  • Contact
    • Disclosure
    • Privacy Policy
  • SHOP
  • Widget area for main menu

    • Email
    • Facebook
    • Instagram
    • Pinterest
    • Twitter
    • YouTube
  • Skip to primary navigation
  • Skip to main content
  • Skip to primary sidebar

Jaime Costiglio

build - paint - sew

  • BUILD
    • BEDS
    • BENCHES
    • DESKS
    • DRESSERS
    • GAMES & TOYS
    • SCRAP WOOD
    • SHELVES
    • STORAGE
    • TABLES
  • TOOLS
  • PAINT
    • CRAFTS
    • FURNITURE
    • HOME DECOR
  • SEW
    • GIFTS
    • HOME DECOR
    • POUCHES
  • HANDBUILT HOLIDAY
    • 2021
    • 2019
    • 2018
    • 2017
    • 2016
    • 2015
    • 2014
    • 2013
  • GIFTS
    • BABIES
    • KIDS
    • FOR HER
    • FOR HIM
    • TEACHERS
    • WEDDINGS
  • SEASONAL
    • 4TH OF JULY
    • FALL
    • HALLOWEEN
    • CHRISTMAS
    • SUMMER
    • SPRING
    • ST. PATRICK’S DAY
    • THANKSGIVING
    • VALENTINE’S DAY
    • WINTER
  • SALTBOX PROJECT
    • BATHROOMS
    • DINING ROOM
    • EXTERIOR
    • FAMILY ROOM
    • FOYER / MUDROOM
    • KIDS BEDROOMS
    • KITCHEN
    • LIVING ROOM
    • MASTER BEDROOM
    • PLAYROOM
  • SCROLL SAW

How to Finish DIY Furniture with Paint

June 27, 2012

How to finish a modern nightstand with paint.
diy mod nightstand with painted finish
The complete how-to finish the mod nightstand with paint.
diy mod nightstand with painted finish
I used one coat of Zinsser cover stain primer.
Two coats Benjamin Moore summer shower.
Two coats Minwax clear satin polycrylic.
zinsser cover stain primer and benjamin moore paintbenjamin moore summer shower 

minwax clear satin polycryclic

diy mod nightstand with paint

Start by constructing the nightstand with plans from Ana White:

build a mod nightstand using plywood
Step 1: Sand all surfaces, vacuum and wipe with damp cloth:

vacuum unfinished wood furniture
Step 2: Protect any portion you DO NOT want painted with painters tape:

painters tape to block areas

painters tape to block areas
Step 3: Begin with primer, Zinsser cover stain is oil based = hard to clean up but so worth it for the coverage and smooth soft surface it provides.
After primer dries, sand.

primer applied to wood nightstand
Step 4: Vacuum again.

vaccum primed furniture
Step 5: Using a 2″ angled Purdy brush apply Benjamin Moore summer shower paint to all corners and crevices where roller cannot reach:

cutting in with paint in crevices
Step 6: Then use roller on larger surface areas:
Sand and vacuum again then apply second coat.

painting large areas with roller
Step 7: Apply protective polycrylic in clear satin finish.
Use a small foam brush in corners and crevices then a roller on larger surface areas.
Apply two coats.

seal paint with polycrylic
Step 8: Mark drawer fronts at center for hardware pull.
Predrill hole with proper sized bit:

predrill holes for hardware pulls
I used Martha Stewart medallion knobs in polished nickel available at Home Depot:

martha stewart medallion knobs
Attach knobs and insert drawers into nightstand:
martha stewart medallion knobs on painted nightstand
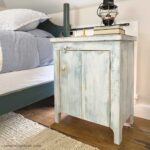
Here you can see the nice soft, protective satin sheen from the poly:
painted mod nightstand
This completes the bedroom makeover for my girl #1:
girls bedroom before picture

girls bedroom after picture

You may also like...

  • DIY Primitive Nightstand with PlansDIY Primitive Nightstand with Plans
  • DIY Plywood ProjectsDIY Plywood Projects
  • Master Bedroom MakeoverMaster Bedroom Makeover
  • How to Add a Butcher Block Top to a Locker NightstandHow to Add a Butcher Block Top to a Locker Nightstand
Share this post:

Filed Under: BUILD, DIY, DRESSERS, FURNITURE, FURNITURE, PAINT, SHELVES, STORAGE5 Comments

Reader Interactions

Comments

  1. Sue says

    June 27, 2012 at 7:19 PM

    This looks great! I was wondering how you finished the plywood edge – did you just sand and paint, fill, sand, paint, use edgebanding?

    Thanks!

    Reply
  2. Suzanne@Meridian Road says

    June 28, 2012 at 10:23 PM

    It's fantastic! Just the right size and shade for that adorable room!

    Reply
  3. The Bold Abode says

    June 29, 2012 at 12:34 AM

    Wow! Ana White is awesome and you totally ROCKED this out!

    It's absolutely amazing!

    Thanks so much for partying with us at The Bloggy Olympics Paint Event! I'm so glad I got to see this nightstand!

    Reply
  4. Hilary says

    June 29, 2012 at 2:57 AM

    I have been searching everywhere for nightstands! I wish I has the tools to be able to make one this awesome!! Super great job 🙂

    Reply
  5. JNW1016 says

    July 25, 2012 at 11:03 PM

    I just saw this on remodelaholic. It looks great! I just refinished a dresser and two nightstands for my daughters room and now I wish I would've sanded in between coats! What grit did you use for after the primer and first coat?

    Reply

Leave a Reply Cancel reply

Your email address will not be published. Required fields are marked *

Primary Sidebar

Hi! I’m Jaime

Jaime Costiglio

Hello!

Thank you for stopping by.
Join me for lots of DIY.

Read more

Get new posts via email

Handbuilt Holiday: Gift Project Plans

handbuilt holiday gift project plans

Collection of DIY gift project plans to build.

The Home Depot Tool Prospective

THD Prospective

Tools to consider for the DIYer.

Archives

The Home Depot Logo
Copyright © 2023 Jaime Costiglio · Custom site by Moonsteam Design

Privacy Policy