• Home
  • Blog
  • About
  • Contact
    • Disclosure
    • Privacy Policy
  • SHOP
  • Widget area for main menu

    • Email
    • Facebook
    • Instagram
    • Pinterest
    • Twitter
    • YouTube
  • Skip to primary navigation
  • Skip to main content
  • Skip to primary sidebar

Jaime Costiglio

build - paint - sew

  • BUILD
    • BEDS
    • BENCHES
    • DESKS
    • DRESSERS
    • GAMES & TOYS
    • SCRAP WOOD
    • SHELVES
    • STORAGE
    • TABLES
  • TOOLS
  • PAINT
    • CRAFTS
    • FURNITURE
    • HOME DECOR
  • SEW
    • GIFTS
    • HOME DECOR
    • POUCHES
  • HANDBUILT HOLIDAY
    • 2021
    • 2019
    • 2018
    • 2017
    • 2016
    • 2015
    • 2014
    • 2013
  • GIFTS
    • BABIES
    • KIDS
    • FOR HER
    • FOR HIM
    • TEACHERS
    • WEDDINGS
  • SEASONAL
    • 4TH OF JULY
    • FALL
    • HALLOWEEN
    • CHRISTMAS
    • SUMMER
    • SPRING
    • ST. PATRICK’S DAY
    • THANKSGIVING
    • VALENTINE’S DAY
    • WINTER
  • SALTBOX PROJECT
    • BATHROOMS
    • DINING ROOM
    • EXTERIOR
    • FAMILY ROOM
    • FOYER / MUDROOM
    • KIDS BEDROOMS
    • KITCHEN
    • LIVING ROOM
    • MASTER BEDROOM
    • PLAYROOM
  • SCROLL SAW

How to Add a Butcher Block Top to a Locker Nightstand

December 12, 2012

butcher block wood top on metal nightstand

How to add a butcher block wood top to a metal locker nightstand.

before and after nightstand makeover
A friend of mine recently updated her oldest son’s bedroom:

 We refinished the dressers from nursery white to a much more mature black:
painted dresser makeover enamel

before and after dresser makeover
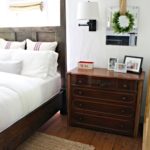
And then she found a locker style nightstand at Homegoods for a good price, very similar to the Pottery Barn Safe Bedside Table:
pottery barn safe bedside table
image from pbteen.com
The locker was a perfect fit and just the right amount of ‘teen boy’ for his room update but I thought it might look more finished and add a touch of warmth with the wood top:
locker style nightstand makeover
(Excuse the blurry pictures, not so much natural light in the corner there.)

locker style nightstand with butcher block top
Here’s how to add a butcher block top:

1. Cut butcher block to size:
(Measure locker top then add 3/4″ on both sides and front.)
(I used a piece of IKEA numerer in oak.)
ikea butcher block numerer oak top
2. Sand and stain two coats Minwax Provincial:

minwax stain on butcher block
3. Apply 3 coats of Minwax clear satin poly, sand between coats:

minwax polycrylic clear satin on butcher block
4. Place butcher block down (on towel to protect floor and finish) then line up locker on top.
Predrill screw holes in 4 corners and center:

attaching butcher block top to metal nightstand
5. Lift up locker and apply construction adhesive to wood:

construction adhesive on butcher block
6. Place locker down and line up again, use 1 1/2″ metal screws and secure top to base:

attaching butcher block top to metal nightstand
how to add a butcher block wood top to a metal nightstand

You may also like...

  • DIY Simple Personalized PillowsDIY Simple Personalized Pillows
  • Master Bedroom MakeoverMaster Bedroom Makeover
  • DIY Monogrammed Lumbar PillowDIY Monogrammed Lumbar Pillow
  • Nightstand MakeoverNightstand Makeover
Share this post:

Filed Under: DIY, DRESSERS, FURNITURE, HOME DECOR4 Comments

Reader Interactions

Comments

  1. Sherry Calamia says

    December 12, 2012 at 2:39 PM

    Such a great idea to add the butcher block to the top of the table… Beautiful job!

    Reply
  2. Kim @ Too Much Time says

    December 15, 2012 at 3:12 PM

    This is just awesome- It is industrial and cool! If you find a sec this weekend, I would love to have you share at Get Schooled Saturday at Too Much Time On My Hands.
    xxx
    Kim
    http://too-much-time.com/2012/12/get-schooled-saturday-5-2.html

    Reply
  3. Laura says

    December 16, 2012 at 5:08 AM

    Very cool Idea! Ill have to borrow that one!
    Laura at LifeWeLive4.blogspot.com

    Reply
  4. pinktoesandpowertools.com says

    December 16, 2012 at 2:53 PM

    Good call on that–the butcher block adds a touch of warmth without taking away from the industrial feel. Yours is the second project I've seen lately using Ikea butcher block –I really like the look!

    Reply

Leave a Reply Cancel reply

Your email address will not be published. Required fields are marked *

Primary Sidebar

Hi! I’m Jaime

Jaime Costiglio

Hello!

Thank you for stopping by.
Join me for lots of DIY.

Read more

Get new posts via email

Handbuilt Holiday: Gift Project Plans

handbuilt holiday gift project plans

Collection of DIY gift project plans to build.

The Home Depot Tool Prospective

THD Prospective

Tools to consider for the DIYer.

Archives

The Home Depot Logo
Copyright © 2023 Jaime Costiglio · Custom site by Moonsteam Design

Privacy Policy