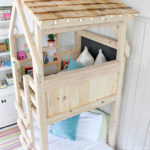
While I couldn’t resist sharing the clubhouse bed yesterday today I’m back with the building details. All the things you’ll want to know before you build this kids clubhouse loft bed. Let’s go!

A DIY tutorial to build a kids clubhouse loft bed. Make an amazing loft space for kids that fits a twin size mattress.
It goes without saying but I’m pretty sure almost every kid wants a loft bed. Because what’s cooler than sleeping up off the group in a semi-enclosed cabin style loft? Nothing. First we owe a huge thank you to Ana White for drawing up the plans for this awesome loft bed. Thanks to her we can build the bed for our kids.

Clubhouse Loft Bed Specs:
- fits a twin size mattress
- ceilings in this room are 8′

We took inspiration for this clubhouse bed from the Pottery Barn Eli Fort bed.
Honestly I cannot believe I actually built this loft bed for my kids. They love it, I love it and it was a fairly simple process.

What loft bed is complete without a fun hideout space below? For more details on installing the curtains click here.


And once you pull the curtains closed it’s a secret hiding place for clubhouse gatherings.

Ana had the brilliant idea to add the red window grids and I just love the pop of color.

And I attached them on hinges to make them operational.


Build Details:
Step 1: Using Ana’s plans here cut the lumber, side walls first, then back, front and ladder.

Step 2. Assemble the side walls. For equal spacing use a spare 1×3 in between the slats.

You’ll need lots of pocket hole plugs but only at the top portion of the side rails. The bottom portion will not be visible once the mattress is in place.


Step 3: Add the legs, stretchers and finally the front trim piece. I waited until the trim was in position and then made the pocket holes in the legs to attach that trim from behind.


Step 4: Assemble the back wall. Start with the legs and first slat using pocket holes to attach at the sides. Then find the middle of the back and secure the center slat to the inside trim piece. After these vertical slats are in position you can space out the remaining slats.

Lay out the remaining slats on one side, keeping an even 1/8″ space between boards.

Step 5: Once all slats are attached to the trim flip the wall over and secure the top trim to the slats. Screw from the trim side to keep the screw heads hidden.
Step 6: Build the front wall in the same fashion except screw the top trim from the interior this time. Add a small horizontal 1×2 piece at the top seam to keep the trim piece steady, this also provides a good hook for hanging signs across the front. Alternatively you could pocket hole the two front trim pieces at this seam if you remember to drill the pocket holes before assembly ;). (

Windows:

On the interior of the clubhouse loft bed I added a piece of 1×3 lower trim. This creates a thicker sill and secures the slats.

Step 7: To attach the four sides I used 3/8″ hex screws @ 3 1/2″l with washers and nuts in 3 places on each leg to secure the 2×4 legs together.

Use clamps to hold the 2×4 legs together. Then predrill screw holes with a 3/8″ bit, one at top, middle and near the bottom.


Step 8: Add the mattress slats (1×3 furring strips) working from the edges towards the middle.

Step 9: Finally secure the ladder with 3/8″ carriage bolts @ 2 3/4″l with washers and nuts on the interior.
Window Grids:
Dimensions:
- Opening for window: 11 1/2″w x 11 3/4″h
- Finished window grid: 11 1/4″w x 11 1/2″h
- ** Double check your window opening and deduct 1/8″ from each side for a hinged grid.
Shopping list:
- 4 – 3/4″ square dowels at 36″l
Cut list:
- 2 @ 11 1/4″ (top and bottom)
- 2 @ 10″ (sides)
- 1 @ 9 3/4″ (middle cross piece)
- 2 @ 4 5/8″ (short cross pieces)


Step 1: Attach the sides to the top and bottom using 1 1/2″ countersunk wood screws.

Step 2: Attach one short cross piece to the middle cross piece at center, then add that portion of the grid to the outer frame.
Finally attach the last short cross grid piece, screw at outer edge and toe nail at center. Paint and attach to clubhouse loft bed with basic hinges.

The window grids make a huge difference!


Be sure to get the plans over at Ana’s site here. Thanks for joining me as I built this kids clubhouse loft bed. Please follow me on social media for sneak peeks and more project inspiration:


I love everything about this! What is the ceiling height in the bedroom? Thank you so much for sharing.
Great job! I took my daughter to pbk last month and she was so upset when I wouldn't let her climb up into the fort bed. One question though, how hard is it to change the sheets?
Great job! How much did a project like this cost? I'm sorry, I might have missed that. What a fun idea for kids! 🙂
Serena
Thrift Diving
Great job! I was also wondering about the cost of the project. We've been eyeing this bed at PBK and my husband already said, "I could build that"! 🙂 Also, is it a pain to change the sheets/make the bed???
From someone that has built a massive bed before, I can appreciate the work you did! Great job, looks great and I will not show my son this, or he will want me to build him this one!! Keep up the great work.
JM
Wow Jaime – too cool!!!!
You and Anna are an amazing team! Super fun project!
love it , great job.
This is amazing! I love it! I found your blog through the 36th Avenue Linky party. Thanks so much for sharing!
-brittany
http://www.ahandcraftedhome.com
Oh my goodness! That is incredible, i'm pretty sure my son would die for bed like that. One question- how hard is it to change the sheets? 🙂
Jessica
stayathomeista.com
This is so cool!!! I love making things that are inspired from PB kids! Following you @
http://www.craftycagirl.blogspot.com
Oh my goodness is this cute! My son would go crazy over this!I would love for you to link this up to my Feature Friday Linky Party.
Danielle @ Blissful and Domestic
http://www.blissfulanddomestic.com/2012/05/feature-friday-linky-party-southern_24.html
WOW!!!! How awesome is this!!!!!!!!!! Makes me wish I was a kid so I could have one of these!!!!! Absolutely love it!
That's super great. Any kid would love that!!!
Fabulous!!! I always thought you would have to have an amazingly huge, loft style room to make one of those beds work but looks like you did it in a regular sized room!! Great job.
Changing the sheet – for everyone who has asked
"how hard is it to change the fort bed sheet?" no harder than the top bunk on bunk beds. But changing the sheet is really minor compared to the hours of fun and memories my kids are making of their fort bed! It's so worth the little bit of extra effort.
Cost – lumber $200, total including hardware, fabric, etc. $300
Ceiling height – in this room is 90", the bed is 88".
Looks awesome! I loved this bed at PBK. I especially loved its height, as it left room underneath to play but it wasn't tall like a bunk bed (which scares me a bit).
This turned out awesome, Jaime! What was the cost of the project/lumber? I checked Ana's site but I must be looking too hard because I don't see it. Thanks!
I have a question, how do you change the sheets on the bed?
Again – Changing the sheet – for everyone who has asked "how hard is it to change the fort bed sheet?" no harder than the top bunk on bunk beds. But changing the sheet is really minor compared to the hours of fun and memories my kids are making of their fort bed! It's so worth the little bit of extra effort.
We love it! and are in the process of finishing construction. We are confused on how to attach the slats that hold up the mattress. You mentioned a 2×2, but further on say a 1×2 @ 71". There is no clear detail on attaching.
dollray200
Dolly – the 1x2x71 is attached as a cleat to the inside base of the side walls, I ran a long pocket screw through the 2" part into the wall slats and outside trim (making the 2" part parallel to earth). You can barely see it in the picture before Step 8 and the picture after Step 8. Leave me your email address if you have further questions.
We are so excited to start this project for our 3 year old son. We will make it a "Dino Den" however as he is obsessed with them. Picked up all the materials already and getting started tonight. Thank you for sharing this amazing bed/plans!!
This might seem like a silly question but how you get the mattress inside once the bed is built?? I'd love to build one of these for my daughter but it's just me with no one to help so I haven't tackled a bed yet… She's almost 6 though so I don't want to wait too much longer!
Jaime, I saw your surfer bed before and yet it never fails to amaze me. Beautiful job and you had great vision on this one! Thanks for sharing.
Brittany
P.s. I'm not sure why I didn't comment before ;-(
This bed is amazing! One question though… roughly how much time did it take to build? I'm trying to figure out if this could be a weekend project or not.
Did you use the Kreg Jig for the pocket holes? It looks like there are quite a few of them!
Yes
We've finished building the clubhouse and are in the process of sanding it down. I love the color and look of the wood and I would prefer to leave it as is. Did you use anything to seal or protect the wood? I'm afraid that a lacquer product will change the color and that's not what I want. Please advise. Thanks!
I used clear satin poly to seal. It will darken the wood ever so slightly but keeps the finger prints and dirt at bay.
are you able to get the front and back piece through a standard bedroom door or did you have to assemble the long standing legs once inside room?
TIA
Yes the front and back can fit through a standard door. You have to bring it in upside down, one leg then wiggle up and then the other leg. Like a C shape and wrap around the doors.
Hi I want to build this next week for my son. What is the approx. weight limit???
My husband and 3 kids were all in there with no problem. So I would say 300 pounds is safe.
Hi. At what height did you start the steps for the ladder and what is the spacing for the two remaining steps?
Hi Scott, I believe the steps start at 8″ from the ground and 8″ between each rung. Hope that helps.
Thanks!
I built this bed this weekend, and it is certainly a great build. I see lots of people re-blogging this saying $200 worth of material. Well, I can tell you now that’s not even close. I have over $500 invested in lumber and material (that is including the roughly $160 for the kreg jig and screws) not including paint and the plywood for the top of the slats. The plans are spot on from Ana White’s website though, but if you are planning on using 1×6’s make sure you pick up a set of bar clamps to clamp each end down or you may end up wider on the front and back panel due to gaps and warps in the boards. By myself, it took roughly 9hrs. to complete in my shop. Something to think about for you guys building, attach the legs to the front and back pieces to check fitment then remove them.. It is nearly impossible to get the front and back panels up stairs and around corners with the legs on them since they make the overall height about 88″ tall.
Thank you Paul, so kind of you to share your tips and notes with others considering this build. I truly value this kind of feedback from actual building experiences and really appreciate you sharing, thank you. Hope the little one enjoys and makes lots of fun memories!
How do you get 14 1×3 at 25.5″ out of 4 1x3x8?
Good catch Taylor, correct you can only get 12 pieces so you would need 5 sticks. I’ll ask Ana to edit the plans.
I am building this as a playfort vs a bed and I was wondering if you think I could use 1/4” lag bolts vs 3/8” lag bolts to pull the walls together? I just happen to have some on hand. They appear to be grade 2 bolts.
Thanks for the plans!
Hi Julie, Yes you can definitely use the 1/4″. So happy to hear from readers actually building the fort! Good luck.
Hi,
I wonder if you built the playfort, and how you did the floor. I would like to build this for my son, and have him sleep on the lower part, so he can climb up and have a clubsouse.
Would you mind sharing with me how you modified it?
Thank you
I admire your work SO much and have a newfound respect for furniture and the artists behind each and every piece…that being said, I am just an exhausted mom of twin boys and I have searched for weeks in an attempt to find a plan for this bed in a queen. Do you happen to know if it’s possible/how? I get overwhelmed and decide to go with another style but keep ditching them and finding myself back here daydreaming about revealing this awesome bed to my sweet boys!. SoS❤️
Hi! Do you know if this bed fits a normal twin mattress that is 75×39 inches? I am asking since the slat rail is 71 inches.
Yes this fits a regular twin size mattress. The total length of the sides is 78″ and then once you sister up the 2×4 legs you loose 3″ so you still have 75″. I used a regular twin mattress in my build above and it fits just fine.
Is the shopping list up to date? We are going to build next weekend and I wasn’t sure if the shopping list had been modified to accomodate errors that had been found
Hi Jaime,
Can you please explain how I join the legs to the side walls ?
Thank you.
Kind Regards,
Jo Warn
Hi Jo, To attach the legs to the short side walls look at Ana’s plans step 2. The easiest method would be to screw in from the leg into the top and bottom rail using 3″ countersunk screws. You won’t see the screw head because these legs get sistered up with the long sides legs and will hide any screw heads. Good luck!
Question do you happen to have plans for this bed that fits a full sized mattress?
Hi Kara, thanks for asking. We don’t have plans for a full size but you could easily modify if you have the mattress dimensions.
Hi,
I was thinking on building this bed for my son, but having him sleep on the lower part, so the top can be a truly club house.
I read some people wanted to build a playfort. I wonder how they did the floor. Should I put the slats, and over them some plywood? should I reduce the number of slats? what thickness plywood?
Thank you
Hi Lucrecia, If you wanted to add a sleeping platform to the lower portion I would do it the similar to the mattress support area. I would consider adding 1×4 or 1×6 add your sides (between the legs) and then attach the 2×2 flush to the 1×6. Then add the slats on top of that. That way you have a secure boxed in area for the mattress to live and it won’t slide around. To make it a play fort up top keep the construction as is with the slats and add 3/4″ plywood (where the mattress goes), you’ll need one full sheet cut down to size for that area. Hope that helps.
I see that 2×4’s are used for the for the legs. Are 2×4’s used for the corner leg braces? When using 1 1/2 Kreg hole jig holes…for some reason doesn’t look correct…
I have a question about attaching the slats on the walls, in the plans it says to cut them and put them in place, but doesn’t explain how they are attached? I understand cutting the angles out, but are the attached to the trim piece with regular screws? Or nails? Or how exactly are they attached?