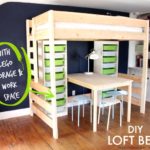
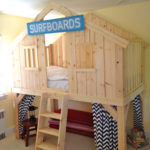
The official first project of the Handbuilt Holiday series for 2018 is an indoor playhouse also known as an over the bed kids loft. Kids of all ages love a loft space and yes you can build it for them using free plans from Ana White.

A DIY tutorial to build an indoor playhouse kids loft over a twin bed. Make your kids dreams come true with free plans from Ana White for this awesome loft.
Ana and I are back for a sixth season of Handbuilt Holiday where we share gift project ideas in time for the holiday season. In case you missed the previous years projects you can find the entire catalog here. There are a variety of gift ideas ranging from big builds to easy small projects, things for young babies and toddlers all the way up to adults and everything in between. If you’re looking to build and make a holiday gift you are bound to find something perfect for that special person. We post a new gift plan every Friday leading up to Christmas and we are so excited to share this indoor playhouse kids loft as our first gift idea this year.


If you have 8 foot ceilings this playhouse will fit. Ana designed the structure at 94 1/2″ tall which fits just right under 96″ ceilings. The design also accommodates a standard twin mattress (39″w) to fit between the leg openings. You can add this loft to your kids room without sacrificing too much space because the bed still fits underneath!

Honestly I think Ana outdid herself with this kids playhouse design, it’s all around perfection. The built-in ladder keeps floor space clear and doesn’t poke out into the room or create a tripping hazard. My favorite part is the loft space above. It makes a great hiding place for kids and adults!

This playhouse is most likely suitable for ages 4 – 12. I did find my 14 year old daughter up there enjoying the view but I think it’s probably best for young kids. The loft area has plenty of space for 2-3 kids. Below is my 11 year old 5’4″ son in the loft for size comparison:

I painted the back wall with chalkboard because it’s a favorite and for the side wall (without the eave) I opted to create shelves between the legs using the studs. It’s super simple and adds a ton of storage and nooks for kids to keep all their things. Short bungee cords attached to the studs help keep books in place.

The built-in ladder is simply genius. At first I was nervous that the weight of a person on the ladder would pull the loft forward but not to worry it’s completely sound. As an adult (over 130 pounds) I gave the ladder multiple test runs and the loft is plenty heavy on it’s own. I opted to attach the vertical ladder pieces and rungs from the interior so you would not see the screw heads.


There really is no need for handles on the ladder but how cute would vertical pipe handles look painted in a bright fun color?!

The ladder also creates a nice barrier for the bed space which keeps the sleeping area a bit cozy. Below is the view from the interior side of the ladder, you can see there is still plenty of foot space so kids aren’t getting their dirty feet all over the mattress every time they go up to the loft:

I would have given anything to have this cool loft in my bedroom as a kid. Alas I’m extremely grateful to be able to build it for my kids and even more excited to share the free plans with you so you can build it for your kids!
What loft space is complete without twinkle lights? I used these because they have plastic globe covers – safety first. Also they are battery operated, remote controlled and run on a timer!
Supplies:
- miter saw
- pocket hole jig
- drill & drill bits
- 3/8″ hardware (hex screws, nuts and washers)
- 2 1/2″ wood screws
- clamps
- jig saw
- construction adhesive
- tacker and staples
- cedar shakes
Below are a few building notes and progress photos of the installation in action. Please read through Ana’s plans entirely before beginning and be sure to leave comments if you have questions.

Once you have the four wall panels complete it’s time to assemble in the room. Start with the back wall and use clamps to hold the side walls in position while you predrill holes for the bolts.

To attach the sistered stud legs I used (3) 3 1/2″ long – 3/8″ bolts on each leg. One at the base, one just under the loft floor, and one at top. Be sure to use a washer on both sides of the studs and secure with a nut.

Predrill a 3/8″ hole and then ratchet the bolt into position.

For the loft floor I opted to use (4) 2×3 studs as joists so the floor would sit almost flush with the 2×4 frame:

I used 3/4″ MDF for the floor piece because I had it on hand. I recommend plywood only because it’s probably more kid proof with spills etc. Notch out the corners as needed and lay the floor piece in position:

For the roof I added cedar shakes because it’s just that much cuter! The shakes extend 1 1/2″ over the front and sides. Use construction adhesive and staples to hold the shakes in position. Be aware of your staple size when attaching to 1/4″ plywood below. Once you reach the edge use a jigsaw to cut off the excess.

To attach the roof portion to the playhouse use clamps to hold the roof piece in position and then secure with 2 1/2″ spax wood screws from the interior:

At the lower roof portion where it sits on the eave I used straight mending plates to secure to the leg:


I hope you enjoyed this fun indoor playhouse over the bed kids loft. Be sure to share your projects and tag us on social media, we love seeing reader creations.
Also check back every Friday for a new gift project plan as we continue with the Handbuilt Holiday series. And don’t forget to follow along on social media with sneak peeks!
SHOP THIS PROJECT:


did you cut off the rounded edges of your 2x4s?
Hi Caitlin, those 2×4 are exactly the way I purchased them from Home Depot. My HD carries 3 options for studs and I used the Burrill Premium fir stud at $3.90 each because they have a more square edge than the other options.
Looks awesome!
What size bolts did you use to join the walls together? Thanks!
Thanks Tony. 3/8″ bolts at 3 1/2″ long
Awesome playhouse!! You built the playhouse with boards what looks like 1x boards between the 2×4 on the front of the playhouse. Would you please share what boards you used? Thank you.
Thanks Mark. Yes the side wall with the eave has 1×6 tongue and groove pine boards (in place of the 1/4″ plywood). I simply screwed the boards to the 2×4 from the interior and then placed one more 2×4 on the top edge to create a ‘ledge’ and cover all the cut ends. This is the product: https://www.homedepot.com/p/1-in-x-6-in-x-8-ft-Premium-Tongue-and-Groove-Pattern-Whitewood-Board-604437/100028238
Thanks for responding. The pictures you had posted were really helpful along with the plans on Ana’s web site. Please consider reposting them if you are able. Thank you.
I am curious about the 3/8″ bolts. They are not in Ana’s plan. Are they necessary? Add strength? I am starting this build tomorrow for my daughters room! Please help!
Hi Laura, Ana’s plan calls for 2 1/2″ countersunk screws, I used 3/8″ bolts, washers and nuts instead. It’s totally up to you and more about if you plan to move (and need to easily disassemble). You daughter will love it!
Thank you! That is super helpful! I do have one more question…if you don’t mind… How did you hang the lights up? Thanks again!
The lights are stapled into the frame to keep them in position. The battery pack is mounted under the ladder.
Awesome! Thank you again! Did you use just one string of lights or 2? Sorry for all the questions, I am trying to get all the details before starting! Thank you again, I do appreciate your time in helping!
I used one long string of lights but 2 shorter might be a better option if you want more control over which lights are on / off.
Thank you! I started this today and can’t wait to have it finished!
Hi, so-
1- This is amazing and thank you for sharing .
2- I am on my way to Lowe’s to buy supplies (immediately after I found this I threw on clothes and headed out! I have been looking for something sleek and doable so this is perfect but I am building for my twin boys and being 4 I am concerned about someone having a random meltdown and deciding they want the fort to ‘Population: 1’…so do you think it makes more since to make two separate ones from the start or would it be possible to modify this into a larger fort? It’s going in their playroom so I don’t have to worry about a bed fitting but I am having that last second panic and can’t decide the best course of action, HELP!, please?
Thanks Miranda, I can’t whether it’s best to build one larger version or two regular size but yes you could modify this plan to make it deeper (or wider) depending on your space. There are plans out there for larger raised forts that may be a good fit as well so you don’t have to make the modifications. Sarah @thecreatedhome has one: https://thecreatedhome.com/cabin-playroom/ Amy @hertoolbelt has one: https://www.hertoolbelt.com/diy-clubhouse-play-set/ and she’s building another version here: https://www.hertoolbelt.com/basement-playhouse-build-framing/
Man I would have loved that when I was a kid! Can I ask though, can you post a video of how you make up that bed? I feel like if the kids are small enough to fit in that little room, they’re too small to make up a nice bed.. and my back could not take bending that low and crawling over to that back corner. Any tricks to make it an easier task that what it looks like?
Any easier solution would be Beddy’s beds – they make zipable bedding specifically for bunk beds and these hard to reach spaces.
Yes, about how much was this total to build! Love the idea
Thanks Tiffany, I don’t have exact numbers on the cost since lumber varies greatly depending on where you are located. If I had to guess about $200 maybe
is this attached to the wall or no?
Hi NE, This loft bed is NOT attached to the wall. To see it in action check my Instagram (@jaimecostiglio) highlights ‘LOFT BED’. Thanks, Jaime
Thank you for this! My husband and I just built this for our kids but tweaked the dimensions a bit! Works perfectly in their playroom!!
Love hearing this, thank you Sami for sharing. So glad you could make it work for their playroom. Happy New Year!
I am having a hard time finding the online plans
Hi Sarah, the plans are linked above in the post but I will leave them here as well: https://www.ana-white.com/woodworking-projects/over-bed-indoor-playhouse
I’m interested in having someone build this for me. I would need to know how much the entire build costed. It’s perfect for my playroom. Thank you.
-Sabrina
Hi Sabrina, Costs vary greatly depending on lumber selection and region. I would take the supply list and price it out where you buy your lumber.
My husband and I are trying to assemble this build and we are having a hard time figuring out the pocket holes for where the roof peaks come together at the top and where the roof supports meet the vertical wall supports on the gable ends. What kind of kreg jig did you use? None of the pictures or directions talk about or show where to put them or how to do it The specific jig tools is also not talked about. We are beginner builders, so this pocket hole thing is new to us. Thanks in advance for any help!
Hi Felicia, Wow you are adventurous to take on this big project as a beginner. The pocket holes for the roof peaks are pictured here: https://jaimecostiglio.com/wp-content/uploads/2018/10/over-bed-kids-loft-interior-front-wall-and-roof-attached.jpg. For the roof portion where it ‘rests’ on the vertical wall can be seen from the interior here: https://jaimecostiglio.com/wp-content/uploads/2018/10/over-bed-kids-loft-roof-attached-at-lower-angle.jpg
I use a Kreg K4 for 3/4″ lumber and a foreman for the 1 1/2″ lumber simply because I have them both so I typically leave them set for those standard thicknesses. Hope that helps!
Hi, trying to build this now and just wondering how you attached the 2×3 floor studs to the 2x4s?
Hi Katrina, the 2×3 floor supports are attached using pocket holes. Good luck with your project!
Hi, thank you! Sorry I realized that you did pocket holes after I posted the question!
I’m so excited about this build and almost done, however… the “shelves” you have for books and trinkets, did you put those in before putting it together in his room or after? I’m trying to see if any of the shelves will be in the way of the flooring before I bring it in…