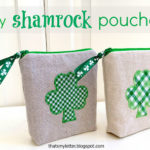
Handmade gifts that fit the occasion are truly something special. I wanted to give my kids classmates something functional and useable beyond the initial holiday candy exchange so I made zipper goody bags for Valentine’s Day from drop cloth canvas and added red gingham heart.

A DIY tutorial for mini zippered canvas goody bags with an applique heart perfect for Valentine’s Day. Today I’m sharing a step by step tutorial to sew a mini zippered pouch.
The finished size on this bitty pouch is 5″w x 4.5″h x 1″thick at bottom. I would call it a coin pouch as it’s just big enough for money, coins, lip gloss and small bits.

I made these canvas pouches for my daughter’s school Valentine’s Day party.

They are the perfect size for some bubbles and chap stick, great candy free options that won’t break the bank.

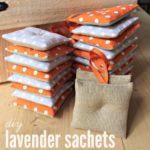
Then I wrapped them up in cellophane, added a cute tag and we are ready to go:

Because they are made from drop cloth canvas and cotton gingham they are completely washable too!


Below is the step by step tutorial to sew mini zipper canvas pouches or goody bags. Please read through entirely before beginning.
Supplies:
- 1 – canvas drop cloth (10″ x 6″) exterior
- 1 – medium fusible interfacing (10″ x 6″)
- 2 – lining fabric (5″ x 6″) cotton
- 1 – 5″ red zipper
- heart applique cut out
- grosgrain ribbon for zipper pull

I order my zippers in bulk from Jennifer at her Etsy shop: zipit.

For the applique hearts apply fusible interfacing to back of fabric, trace a heart shape and cut out all the hearts:


Step 1: Begin by fusing interfacing to wrong side of canvas and then pin heart applique in place.

Step 2: Sew the heart in place with a zig zag stitch.

Step 3: Place the zipper face down on right side of canvas then one lining piece on top. Pin as needed. Then sew across the top seam.

Step 4: Press lining open to cover seam and then top stitch down to avoid getting the lining caught in the zipper.

Step 5: Repeat process for other side.

Step 6: Place lining pieces together and right side of canvas together then straight stitch side seams beginning at pouch bottom.

Step 7: Miter the corners of canvas for a flat bottom pouch which creates depth for items to fit better inside.

Step 8: Snip mitered corners to get rid of bulk.

Step 9: Turn right side out, press lining bottom raw edge in 1/2″ then top stitch closed.

Step 10: Push lining down into pouch and press.

Step 11: Be sure to press bottom flat edge by folding as per photo above.

Step 12: Add ribbon detail to zipper and seal cut ends with fray check.
Then make 24 more and they’re ready for use.

Fill with treats and wrap for giving:

For the tags I simply printed Happy Valentine’s Day on cardstock:

Then cut out the words and used double stick tape to adhere to polka dot paper and then red card stock:

Punch holes in the ends:

And tied on with twine:

Happy Valentine’s Day!

For more candy free valentines ideas click here:


Wow, these are fantastic! Thanks for the tuto!
Esther.
I wanna be in her class! Those are so cute!!
Absolutely adorable! I would love to make something like this, but between the 3 classrooms, that would be over 70 of them! Even for birthday parties would be fun! Thanks for sharing!
These are beautiful! Thanks for the great tutorial, I've pinned it on pinterest to try sometime.
adorable, love the gingham heart. i would absolutely be interested in ordering some of these for valentine's day. if that's a possibility, please email me at [email protected].
xo
molly
omgoodness! As a teacher, I would love to get a bigger version of one of those! you are making want to take a trip to the cloth store to start making some pouches! lol
)
The Teachers’ Cauldron
You are one awesome Momma to make these for your daughter's class!! So pretty and perfect! You did an amazing job! Happy New Year! Angie xo
Amazing idea!
~Mrs. Delightful
ourdelightfulhome.blogspot.com
These are amazing!!
I invite you to add this post (or any other Valentine's Day posts) the Find Some Love Fest on February 1st! 5 blogs, 1 party!
http://www.feedingmytemple.com/2012/01/exciting-announcement.html
Fantastic idea. Great gift for Valentines Day.
These are so cute!! Such a thoughtful gift! I love them!
These make such a lovely gift, thanks for sharing.
WOW! WOW!! love them!! this is a perfect link on my party blog- feel free to link here: http://www.atozebracelebrations.blogspot.com/2012/01/totally-cute-crafts-tuesday.html
I love these, and I would love to make one! I've never put a zipper in! Maybe I will try!
Debbie
Make me one! I am so impressed. I usually just do paper bags…maybe I'll up my game this year. Fabulous tutorial. Visiting from 36th Avenue.
🙂 Samantha
holy cow that's alot of work, you're an AWESOME mom!
you should join me for handmade 52! http://raisingoranges.blogspot.com/2012/01/handmade-52-2.html
Very ambitious to make 25! Great tutorial, and they turned out very cute! Good idea to use a drop cloth.
great job
would love it if you could share this on my link party
http://serenityyou.blogspot.com/search/label/Serenity%20Saturday
Natasha xx
I'll be featuring you tomorrow…
These little bags are super cute!
Adorable. Love these. Wish I sewed so I could make them.
So cute! Love this idea… if only I had a little girl!
So cute, Jaime! I miss having little girls…but these are perfect for grown up girls too! Sharing in tomorrow's highlights. 😉
Really this is too much! You are amazing to do all of these. I am pinning this on my TO DO board. What a lucky girl you have!
Lou
What cute bags! I love the fabrics you chose. Great gifts for Valentine's Day.
The bag is so adorable! Thank you for sharing your tute!
OH MY GOODNESS!!! How fabulous are these?!?! I absolutely love that you used drop cloth. Talented!
would LOVE to have you join our HANDMADE VALENTINE party! 🙂 blessings 🙂
My party just started and I'd LOVE to have you stop by and share this ~ TOTALLY impressive!!!
Overflowing with Creativity
XO, Aimee
Um. You're like the best mom ever. Can't believe you made 25 of these adorable pouches! I guess I better get to work over here! Great tutorial. Your sewing skills are, as always, flawless! I would totally trust you on my sewing crew of two…(you and me)! Thanks for sharing with {air your laundry} friday!
Stinkin cute. Best mom of the year award! Love these mucho!!
I love seeing a whole slew of your bags all lined up and the presentation is fantastic!
So cute! Where did you find the ribbon?