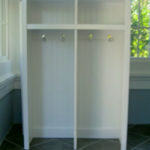
Entryway cubbies built and complete. Today I’m sharing details on the bench portion.

One cubby unit on either side of the front door.


My version of this system from Pottery Barn:

This family of five was using this:

And now each child has their own space:

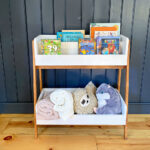
Complete with labeled baskets to hold shoes, etc:

To see how I made the chalkboard name labels click here.
I modified plans from Ana White here for the base bench portion.
(This bench measures 34″wide x 20″high x 18″deep.)


For the full post on the upper locker section click here.
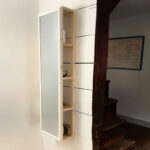
I added the additional hooks in the lockers:

The hooks are polished chrome to match the front door hardware:

All filled up:

Here’s a few progress pics of the bench portion:
1. Base complete:
(those skinny scrap wood pieces across the middle are holding the sides square until I add another 1×2 at the upper back)

2. Painted one coat primer, two coats semi gloss white:

3. Top piece was stained one coat Minwax dark walnut, 3 coats satin poly.
Added top piece by screwing down through top, screws are hidden by side and middle divider pieces of locker portion.
Locker portion is only 12″ deep therefore screws cannot go past 12″ and absolutely must be flush.


4. Carefully place top portion on base so as not to scratch finish.

Secure top to base using 1″ L brackets in front corners:

and mending plates on back:

5. Add baskets to complete.
Up top smaller baskets for hats, gloves, etc.

Down below larger baskets for shoes, boots, etc.

These base sections have no backing, it isn’t really necessary but more importantly there is open access to the electrical outlets:


All complete:


Looks like they were meant to be there all along.


Thanks beach friend for a great project.

These are fantastic! Just what I need before the cold weather hits.
it looks awesome!!!! fabulous job, jaime!
Total storage envy! Looks great, Jaime!
Can I just tell you how much I love these?! You did such a wonderful job! Their entryway looks like it is in a Pottery Barn catalog! 🙂
Okay, wow, that is amazing! Fantastic job. Found you via Sisters of the Wild West. Toodles, Kathryn http://thededicatedhouse.blogspot.com/2011/08/little-goodwill-finds.html
good job that took a lot of patience! So what do you do with your kids while you're working? I throw pizza at mine and let them play wii all night. :/
i'm in awe. They look amazing!! Well done!
Jenny
LOVE this. What a crisp, clean look for your entry! You're going to be SO happy come coat season!!!
Dana
craftedniche.wordpress.com
Jaime, these are SO cool! Your friend is so lucky!
Found you from the roomspiration party. Gorgeous storage pieces! They look perfect and professionally done. So impressed! 🙂
these look FANTASTIC!
love the look – and they hold so much.
lovely.
xox
Family friendly but beautiful too! The best of both worlds! So glad you linked up with Roomspiration today! 😀
Wow! Awesome job! They look just like the Pottery Barn ones. You do awesome work!
They turned out great–just like I knew they would coming from you! Your friend has got to be thrilled with her new entrance. The difference is dramatic!
It looks fabulous! I love the darker wood against the color of your walls. If you get a chance, I would love it if you could link this up to my party, The Creative Spark, tomorrow night. Have a great week!
Jenn 🙂
http://www.cleanandscentsible.blogspot.com
Lovely cubbies! I think yours look nicer than Pottery Barn's!
These look fantastic! How nice to have such a great looking storage system! I need to figure something out for our stuff – so much clutter!! Thanks for the inspiration!
Jo-Anna
Great job!
Ive always loved that look from Pottery Barn and you've made it yours!! 🙂
Deborah
You are very skilled..they look amazing, every detail down to the personalized baskets.
Wow! Those look great! Love them.
Very nice! Love it!
Have a great day!
~Wendy
Very cute and what a great way to organize coats and whatnots!
Thanks for sharing 🙂
Visiting from MMS linky party,
Suzanne in NW Illinois
I've had that same Pottery Barn pic saved for my hubbie to build for me. Yours turned out SO CUTE!! Hooray for cute organization!
Now that is on AMAZING before and after! Pretty AND functional…love it!
These are awesome, I can not believe you made them yourself!!! Inspiring!
Visiting from MMS
Come see me at Solongfarm.blogspot
I never tire of these wonderful cubbies! Now can you come over to my house and build some for me? 😉
I love these. They turned out better than the PB ones!
Wow, that turned out so good. Thanks for sharing. I would love for you to share it on my link party at cookienut.blogspot.com
LOVE!!! I want one! Will you come make me one or maybe convince my husband that I NEED this 😉 Yours turned out better than Pottery Barn, just sayin!
Pottery Barn is great for inspiration and yours is wonderful!
I like how you were able to add the names. My toddlers are learning to write and read and they are fascinated by seeing their names–this would be great for them.
I hope you are able to stop by It’s a Wrap Link Party at Artful Rising
Erika
Gorgeous my friend!
XO
This is great! I featured it today!
http://delightfulorder.blogspot.com/2011/09/delightfully-inspiring-thursday-party_21.html
DaNita
Eeeee!!!! I WANT, I WANT, I WANT!!! Those are amaze-balls, and totally look better than the ones in Pottery Barn. On my to-do list and Pinterest account it goes. Oh man… still drooling over these.
Thanks for sharing!
Shelley
http://www.westermanfam.blogspot.com
Wow this is awesome. In November I'll be working on my mudroom and I want to make something similar to this. I will definately be checking back!
WELL DONE! I think you did a great job, and the beadboard backs are a great touch.
This is incredible! You've helped me to finally realize what I'd like to do for my kids!
Awesome! So functional and looks so cool! I need some of these in my house.
Those look fabulous – nicely done! You must be so proud of yourself! (Here from sawdustandpaperscraps)
This looks so amazing! Great job!
That is amazing! Great job!
Great cubbies and so much more space! Looks awesome!
So nice! They look even better than the PB ones. gives me a good idea for my next project:)
Ok…this is my first…but, I see this says Part II…is there a part I? Where are the dimensions/measurements?
Thanks, lol!
Ok…this is my first…but, I see this says Part II…is there a part I? Where are the dimensions/measurements?
Thanks, lol!
I'm officially addicted to your blog and happily your newest follower! I just love all of your projects and am so impressed that you have actually built these things! I love to make things and am not afraid of a power tool, but sure wish I had someone teach me how to make the things that you do!!
Jamie,
this weekemd my wife and I are going to undertake this project for the Entryway Locker system with the Bench.
I know you modified the plans from Ana.
Where can we get the exact specs that you used, or the exact modifications that you made to the original plan?
Thanks!
Amazing. I am in love with this entry way. You are incredibly talented. 🙂
I love your dresser rehab, it's gorgeous. I just wanted to say though, that oil-based paint is high VOC and is even outlawed in some areas. I woudn't use this in an area you spend a lot of time in or a child's room. 🙂