Everything gets personalized these days and you don’t have to have fancy machines to do a lot of that personalizing yourself. Let me show you a simple DIY handpainted method.

How to personalize almost any wood item using a computer print out. No fancy vinyl cutting machine required, just a steady hand and paintbrush.
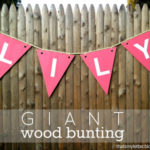
Most pieces made out of wood can be personalized as long as there is a flat portion to paint. And you can make the personalization with just a simple computer print out. Scrap wood trugs, wood step stools, toy boxes, and signs are just a few examples of items you can make your own with a few easy steps.

This wood step stool is a simple build but you can also purchase a premade wood stool and paint it a fun, bright kids color then add the personalization. I built this step stool for my niece and handpainted her name. It’s a great way for kids to see their name in writing every day in order to start learning letter shapes. This step stool makes a great gift idea too.


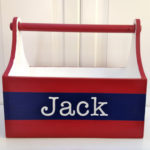
Same principle applies to wood toy boxes. You can build a fairly simple wood toy boxes then make it really special for the receipient by handpainting their name on the side. Pick a pretty color or something that coordinates with their room decor and that toy box will be the best gift ever (according to the parents ;)) to help contain all the other gifts that make a mess around kids rooms.
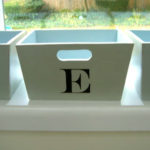
How about a wooden trug with a handle and rounded sides, more like a caddy?


This version has more hiding power. You could use it for art supplies, crafts, legos, barbies, anything with a lot of parts and pieces.
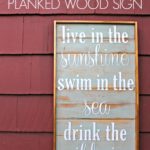
I’ve made a ton of wood signs using the same computer print out technique. Completely customizable, you choose whatever letters and font you need and make it fit to your wood board.

The technique is very simple and straight forward, no fancy vinyl cutting machine required.
* For an updated post on this how-to click here.*
Below I’m sharing how to personalize with paint on almost any wood object. Be sure to read through all the steps first before you begin in order to understand the project.
Supplies:
- wood object
- computer print out of lettering
- ballpoint pen
- acrylic craft paint
- paintbrushes

Step 1: Print out desired letters (font shown here is American Typewriter) and line up printout on wood object. Using a ballpoint pen trace outline of letters with heavy pressure. The pressure of the pen creates a slight indent in the wood.

Step 2: Using acrylic craft paint carefully paint inside the indent. The indent actually creates a tiny dam to hold the paint.

I use this technique on almost every wood piece I paint.

The look is clean and neat but still has that handpainted feel. If you love handpainting and the aesthetic then I highly suggest this technique. There’s something about a handpainted monogram that feels genuine and authentic.
This vertical Banksville sign below has that true handpainted look to it:


Wood and paint go hand in hand. Whatever your wood piece I hope you find a spot to add a handpainted personalization no matter how big or small. Please be sure to share your projects on social media and tag me! I love to see what others are making and painting.
Up next, personalizing with fabric and thread! Who wants to sew personalization onto zippered pouches? I’ve got a bazillion different DIY zippered pouch ideas for inspiration for your next sewing project:

Or if you’re wanting to paint on the personalization there’s a zippered pouch for that too:

These are very nice~
i like your signs. especially the address one!
I wondered how people hand paint and make it look so professional… we are very spoiled and use our cutter to cheat! Love your cute wood projects- you are SO talented!!!
Thanks for sharing 🙂
2017 and I finally have a cutter! Goodness that was a long time coming 😉
LOVE!!!!!!
W 🙂
Hey Jaime – you always do such a great job with your projects. I've got this one linked to my letters and numbers post today, for inspiration!
Thanks for sharing your technique. I would like to try sometime.
-Melike
acupofsparkle.blogspot.com
This is brilliant! I am so intimidated by hand-painted pieces. I love the look, but I know I don't have the steady hand. Great idea! Beautiful pieces, too!
I just found a link to your post on pinterest! This is so great! I was just painting a sign for my breadstand outside our home and was having a terrible time with the lettering! I'm going to wipe the slate clean and implement your method! I'm so excited – thank you for this post!
I was curious what kind of paint you use for the lettering? Acrylic? And what kind of paint brush? The picture looks like you use a super fine little brush?
Thanks!
Erin
[email protected]
Hi Erin, yes I use a fine small brush and mostly acrylic craft paint.
Brilliant! I love that the indentation from the pen makes a dam.
How wonderful! Thanks for sharing your secret. It definitely is a great medium so that it looks hand-painted but also neat and clean.
Hi! When you say "print out your letters", what exactly do you mean? Where are you getting these letters, and are you printing them on anything special?
Just pick any font you like and print out the letters using a Word document. You may need to adjust the font size depending on where you are planning to paint the letters. Word has a lot of font options or you can download free fonts (dafont.com for example) if you’re looking for something more. I print on regular white printer paper. Good luck.
Wow!! They all look perfect! Thanks for sharing. 🙂
I found you on Pinterest, thanks so much for the tutorial!! I'll be trying this 🙂
Fantastic! What a great idea! I'll definitely be using this.
Great idea! Very nice! 🙂
Visiting from pinterest- these are great. Why didn't I think of this?? LOL Thanks for sharing.
Can't believe it'd really be that simple. Why didn't I think of that?! Thanks for help:)
I love the simplicity and ease of just tracing the letters to make an indent in the wood. Smart!
I really like this idea. The indent in the wood makes sense. Now to keep the fingers from shaking while painting. 🙂
I do that too! Except I use an xacto!
Great Idea! Thanks for sharing!
http://sweet-southern-charm.blogspot.com/
What a great idea! I'm always trying to "imitate" fonts but it never works out. This is genius. 🙂
You make it look so easy – I'm going to have to try this!
Personalizing it so great and it perfect for gifts. I love your style. I shared this on Facebook!
excellent idea!!! i've never been able to paint on wood well…such a great idea thanks~~~
That's so smart! This is one of those ideas that, now that I know about it, I can't imagine doing it any other way!
ummm…. wow, this is so obviousy, but I never would've thought to do it! Thanks for the super helpful tip!!! 🙂
I never would've guessed! Thanks for sharing!
thank you so much for sharing your idea! very generous of you!! I love all your work!!
Thanks. I just found this on pintrest. Just when I needed it!
Found and reprinted from Pinterest. Thanks for sharing! I wonder if I can use or modify this technique on canvas?
Thank you, thank you, thank you! 😀
Also found this on pinterest, what a clever idea, will definitely be trying on my next wood project
I love your toy boxes! Where did you get them?
This is fantastic! Have been trying to figure out best way to do a family rules subway art piece, and I think you just made things much easier for me! Thank you!!
Brilliant — thanks for generously sharing!!
Your signs are so professional looking! This technique is so smart! Thanks for sharing!
Stephanie @ Ladywiththeredrocker.wordpress.com
What a great tip. Thank you very much!
V
Found you through Pinterest and love the tip. Thank you for sharing!
What an excellent idea!! Saw it on Pinterest. Thx for sharing!!!
What an excellent idea!! Saw it on Pinterest. Thx for sharing!!!
awesome!! I'm definitely going to try this.
I have used large font to make letters for display boards but I use "white" as the letter color and select black outline. Saves toner, and on school projects kids can color in and cut out the letters.
What a great idea! I'm definitely going to try this!
What a great technique! Found your post via Pinterest and am so glad I did. Thanks! 🙂
Great technique….do you make the caddies yourself or do you buy them?
Great technique….do you make the caddies yourself or do you buy them?
Found this on Pinterest. Love the ideas thanks for sharing!
I just found this on Pinterest and I love the idea. I don't have a Silhouette so I know I will be using the information. I am stopping in from TheStuffofSuccess and I am your newest follower. Feel free to stop by and say hi.
Thanks
Athena
Thanks for the tip!! I will be using this!!
Great idea and thanks for sharing your tip!
JoAnn
sweetpepperrose.blogspot.com
Very cool! Thanks!
I used this tutorial to make a vintage-style sign! Thanks – it really was easy!
http://alittlesplashofyellow.blogspot.ca/2012/05/diy-vintage-sign.html
This is such a great tip!! The boards/crafts look really well painted/made. Thanks for sharing!! I think I may try to make something today!! =)
Anyone know how you would adapt this technique to canvas lettering?
I also know a great way to trace letters (or anything!). Simply print off the design or words, turn the paper over (or just print mirror image if you have the capability), and trace a thick line of pencil around all the edges (you may have to hold paper up to a light source). Then turn the pencil side on to the surface you want to transfer to, and use the pencil to shade heavily over the entire image! So easy and leaves a darker design you can see on the wood/plastic/whatever
Wow, nice. I found this on Pinterest. I did a family name sign recently (http://irestorestuff.blogspot.com.au/2012/03/family-name-sign.html)
and used a similar method, but with shading the back with pencil. Will definitely try this next time as I like the idea of the dent making a tiny well for the paint to stop in. Thanks for sharing.
This is such a great idea! Thank you so much for sharing it!
I found your link over on pinterest 🙂
Lottie
@ thecuriousdeer.blogspot.co.uk
I love this idea and am using it to create signs for my garden. I really love the font at the top of your blog where it says "Build-Paint-Sew". Do you know what that font is called? I would love to use it for my garden signs 🙂
I am so excited that I found your blog and tutorial on how to paint letters! I've always wanted to try handpainting letters. What type of paintbrush do you recommend? I have several but none are the right kind.
Thanks!
Andrea
[email protected]
I love this! What font did you use for the "Banksville" sign? Also, where did you get that awesome piece of wood for it? Thanks!
Sarah
[email protected]
I have been looking for ways to paint my table top. This is an easy way, though my table is very hard surface, not sure if I can get that crease…will give it a try. Thanks!
New follower
Where did you buy the tool boxes?
Hi Sarah, I built the tool boxes. Lots of posts but one is here: https://jaimecostiglio.com/2011/07/t-is-for-trug.html
Just wanted to say thank you for this post. I found it on pinterest and you gave me the courage to re-paint a sign I had given to my husband for our first Christmas together and that now clashed with our newly painted bathroom. I'm not at all crafty and was able to make our sign over in grey to go with our sunny yellow bathroom. Thank you soooo very much!
I have been searching for a tutorial like thus for ever and it sounds doable. I am really gonna try this. Thank you so much for sharing.
I have been looking for an answer on how to do this for ages, every online company charges a fortune so I'm super excited to try this myself. My friend Twisted Ribbon on pinterest pointed me in your direction!
Seriously, I LOVE this tutorial! I have been wanting to make an "established in" sign and wondering how the heck I was going write the words. I am so excited to try your method. Thank you!!
do you let the base coat dry before tracing?
Yes let the base coat dry first.
Your blog looks fairly informative. I appreciated it.
Laser Patent
I have painted ALL of life and NEVER thought of this.
I shared you here:
http://kittnspurrfections.blogspot.com/2013/02/diy-tips-tricks-from-around-web.html?m=1
If that isn't okay, let me know and I will remove it immediately!
Clever! I always cut out and outlined in pencil, clearly doesn't hold a candle to this idea…
love love love your eye and artistic sensibility.
will you share the name of the font you used in the two Glenwood 20/27 signs (white on blue) ?
thank you
Helena
Thanks so much for sharing this technique – can't wait to try it!!
What if you want to not only paint the letters or words in a solid color, but also have the letters outlined? I was thinking of doing the lettering in baby blue, but to make it stand out, I want to outline it in a darker blue. Have you ever tried doing outlining with this technique? Is it difficult? Does it come out as neat and straight when you paint outlines (due to the indent in the wood)? Any help, tips, suggestions would be very much appreciated. Thanks in advance.
I love it….. so simple and the dam is perfect…..Keep up the good work… muuuuaaaaaaay….thank you…. Gene P. Gp
Another way for things that don't indent, I did a wheelbarrow a couple of years ago and I printed the design and letters on my printer, shaded over them on the back with a pencil, then put the paper on the hard surface and outlined the letters pressing hard. A little extra work, but worth it!
Great option Marcia!