The playroom, bonus room, kid’s space – whatever you want to
call it – like many folks we have one and it’s an ever changing space that
needs a comfortable seating solution.
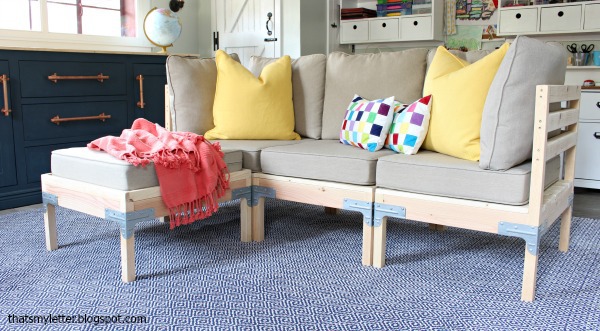
Enter the modular sofa, the answer to my prayers and then some!
call it – like many folks we have one and it’s an ever changing space that
needs a comfortable seating solution.
Enter the modular sofa, the answer to my prayers and then some!
I designed this sofa to be easily
reconfigured for many reasons but mainly because we use this space for many
purposes and having a modular sofa is the best solution. Down below I’m sharing the plans to make this sofa and ottoman.
For the most part this space is a kids lounge area (lots of
gaming and kid tv programs) but sometimes it’s a workout space and also when
the weather gets warmer we can easily move this sofa outdoors for pool parties.
gaming and kid tv programs) but sometimes it’s a workout space and also when
the weather gets warmer we can easily move this sofa outdoors for pool parties.
But let’s talk about the construction because you won’t
believe how easy and fast this sofa comes together. I built this modular sofa and ottoman using
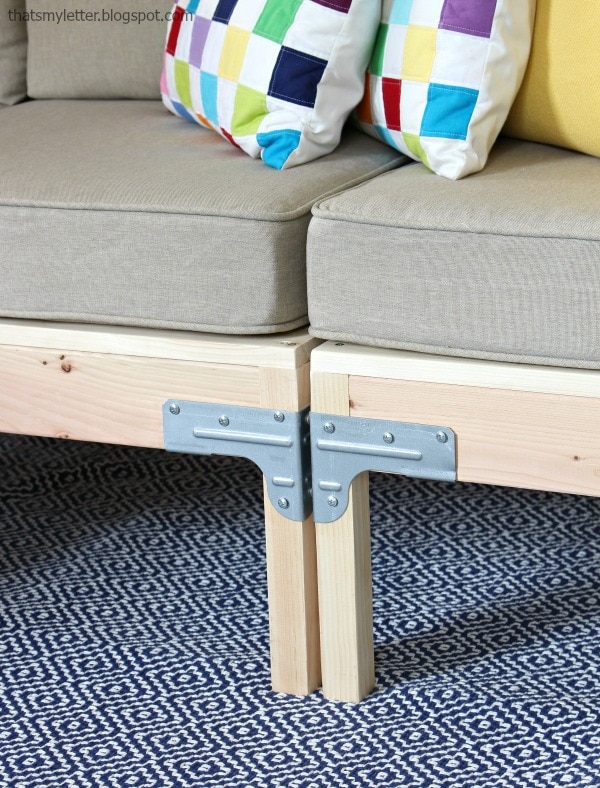
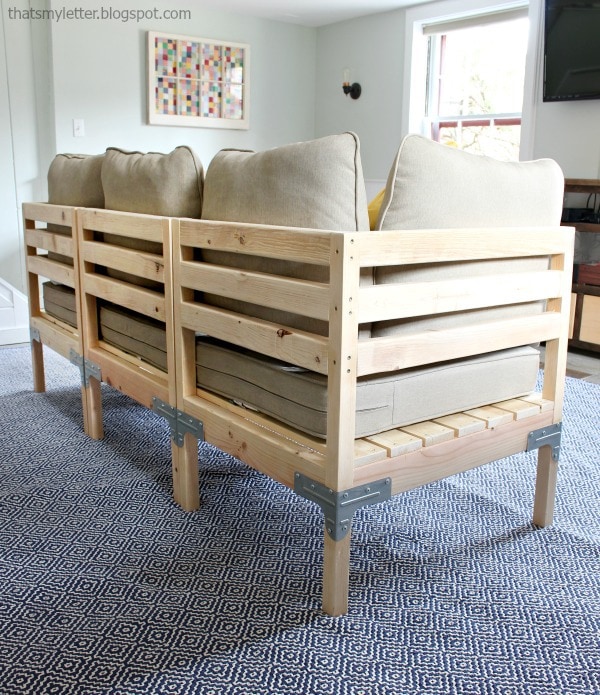
Simpson Strong-Tie RigidTie® RTC2Z connectors, they are my very favorite. You may have seen me use them before on my
workbench inspired desk and cleaning storage tower. Once you have your lumber cut and the connector
in place you simply attach all the screws and life is good. There’s no guessing about where the screws go
because the connectors are predrilled, it’s magic.
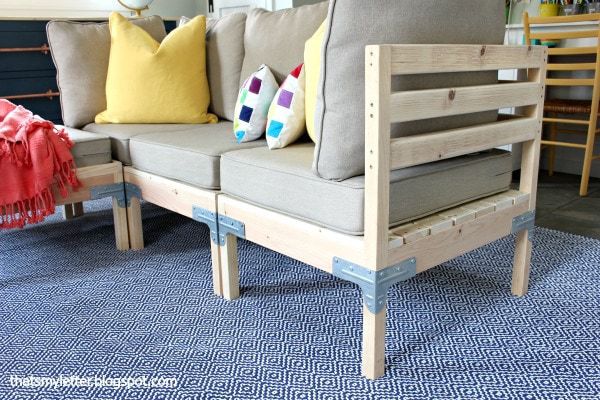
I rather like the industrial look of hardware and using the
Simpson Strong-Tie connectors not only makes building furniture fool proof but
moreover extremely strong and durable.
Simpson Strong-Tie connectors not only makes building furniture fool proof but
moreover extremely strong and durable.
Those legs aren’t going to wobble one bit.
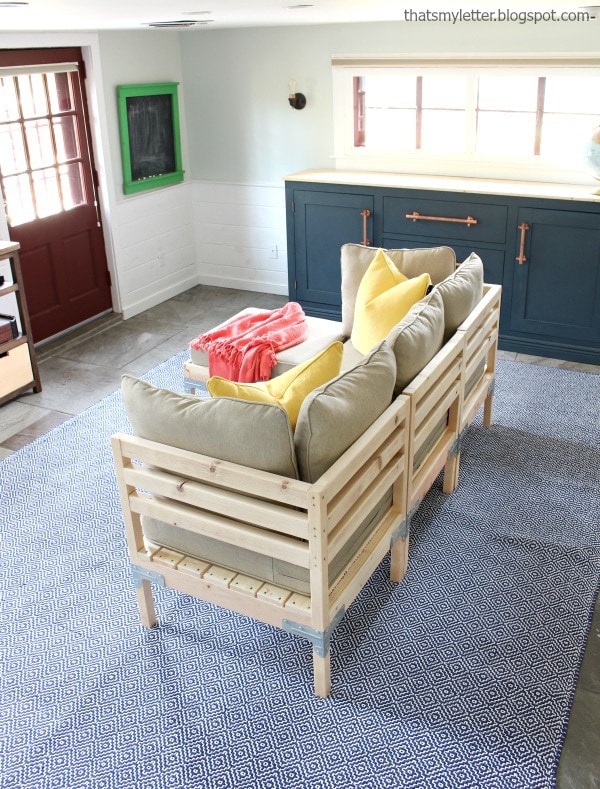
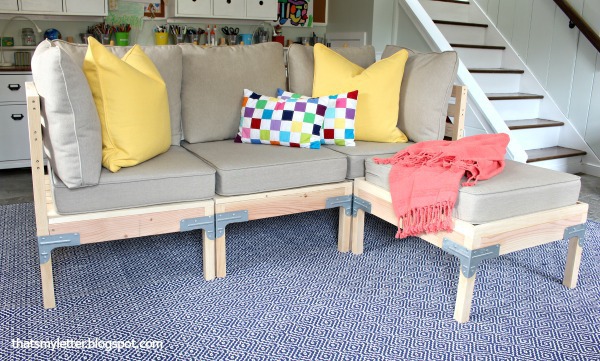
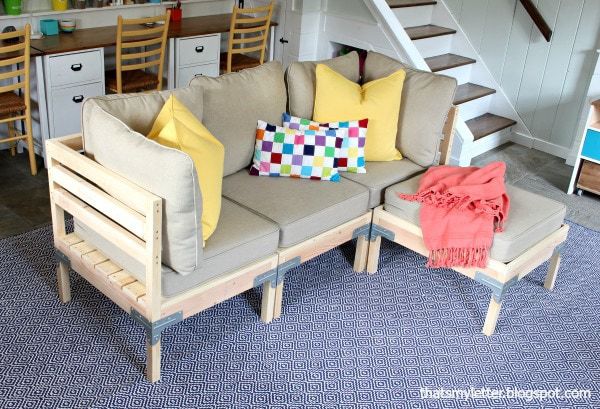
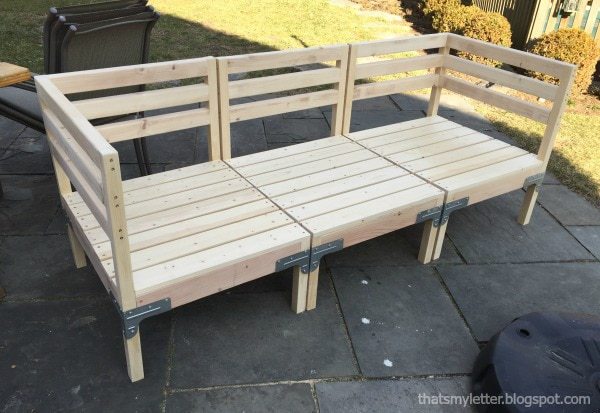
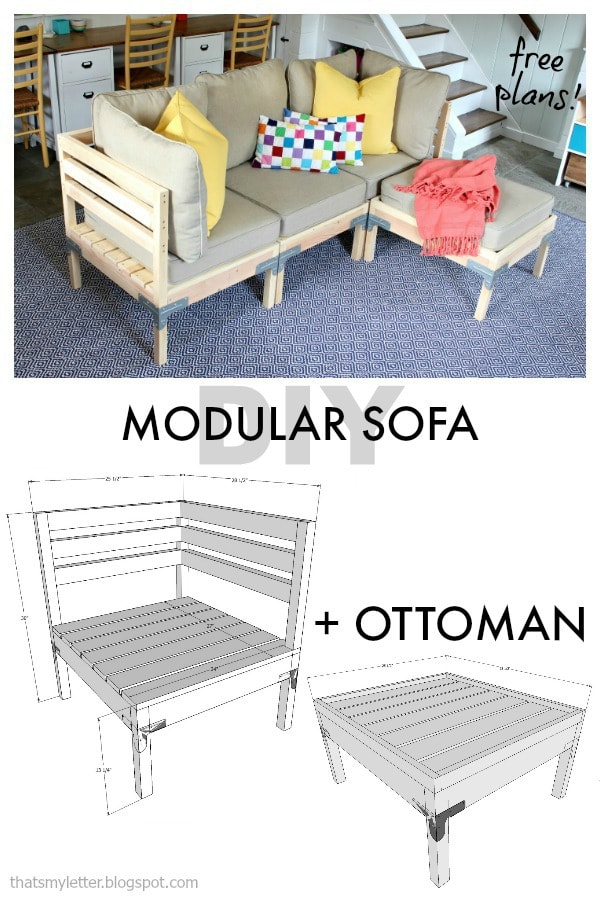
This sofa is two
corner units, one armless middle unit and one ottoman. You could make any combination work for your
space and even make one long sofa using the same connectors.
corner units, one armless middle unit and one ottoman. You could make any combination work for your
space and even make one long sofa using the same connectors.
I really like having the separate pieces because
I can keep the sofa in a square shape for the most part which allows my kids
lounge space and my husband his little workout space, everyone is happy.
One note about cushions: I used this set here which measures 23 1/2″w x 26 1/2″d. The plans below are made to fit this size cushion, be sure to measure your cushions prior to building to ensure proper fit.
Below are step by step instructions to build this modular sofa and ottoman. Please read through all steps and be sure to follow all safety precautions when operating power tools.
* This post contains affiliate links below, by clicking on an affiliate link and making a purchase I may receive a tiny commission. This small commission helps me keep this site full of free content so I thank you for your support. *
Supplies: (2 corners, 1 middle & 1
ottoman)
- 4 – 2x4x10 studs
- 4 – 2x2x8 boards
- 5 – 2x3x8 studs
- 8 – 1x4x8 boards
- 2 – 1x2x8 boards
- 16 – Simpson Strong-Tie Rigid Tie® RTC2Z connectors
- SD8 x 1.25” Wafer Head wood screws
- 3″ wood screws
- 1 1/4″ wood screws
- 2″ finish nails
- wood glue
Cut List:
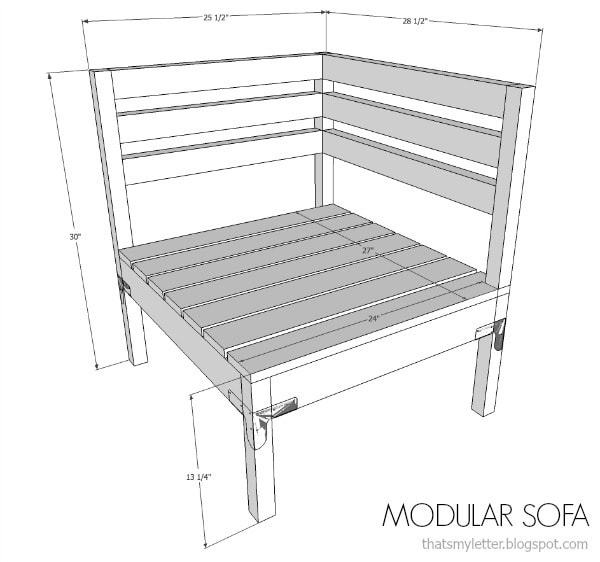
CORNER:
- 1 – 2×2 @ 12 1/2” (leg)
- 3 – 2×2 @ 30” (legs)
- 2 – 2×4 @ 22 1/2” (front &
back apron) - 2 – 2×4 @ 25 1/2” (side aprons)
- 3 – 2×3 @ 25 ½” (side slats)
- 3 – 2×3 @ 22 ½” (back slats)
- 7 – 1×4 @ 25 ½” (seat slats)
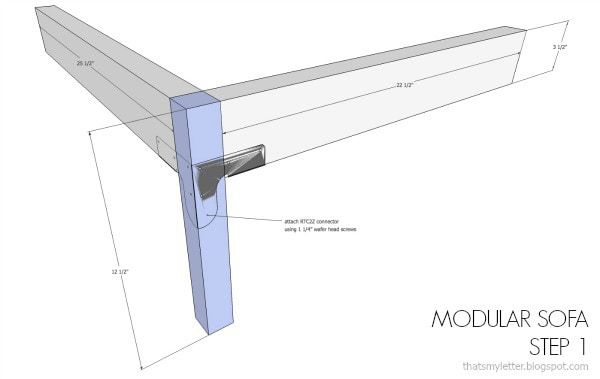
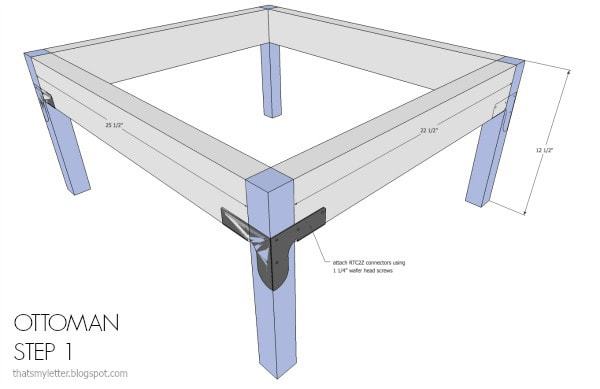
Step 1: Attach short
front corner leg to (1) apron front and (1) apron side using Rigid Tie® RTC2Zconnectors and 1 ¼” wafer head screws.
front corner leg to (1) apron front and (1) apron side using Rigid Tie® RTC2Zconnectors and 1 ¼” wafer head screws.
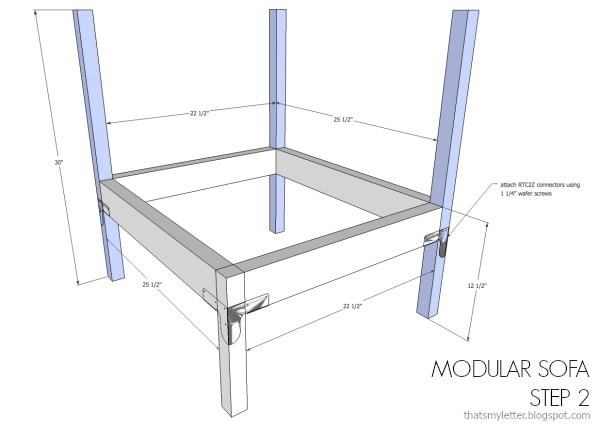
Step 2: Attach remaining
legs and (2) apron pieces using using Rigid Tie® RTC2Z connectors and 1
¼” wafer head screws.
legs and (2) apron pieces using using Rigid Tie® RTC2Z connectors and 1
¼” wafer head screws.
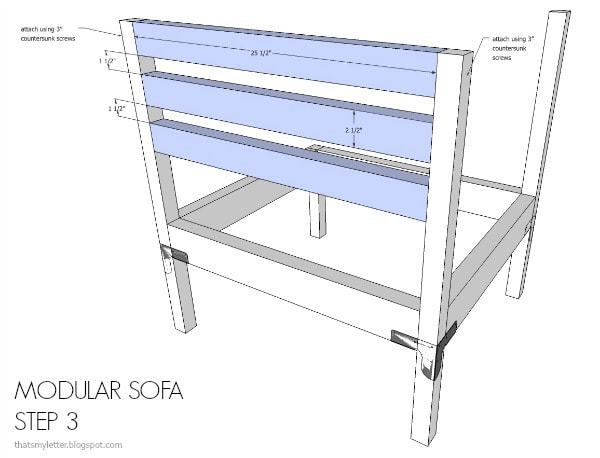
Step 3: Attach side slats using 3” countersunk screws. Keep 1 ½” spacing between slats.
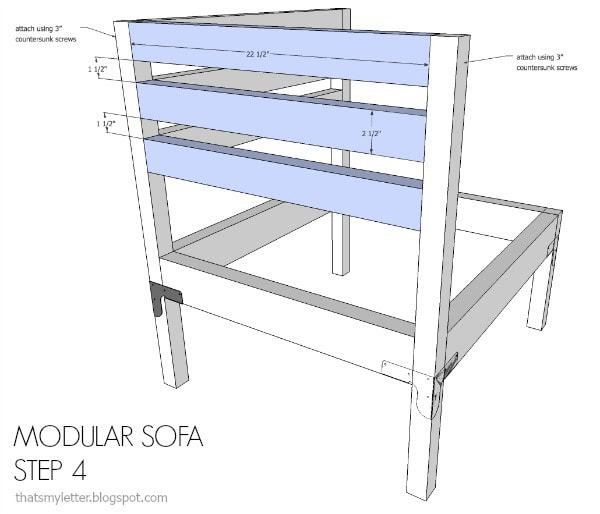
Step 4: Attach back slats using 3” countersunk screws.
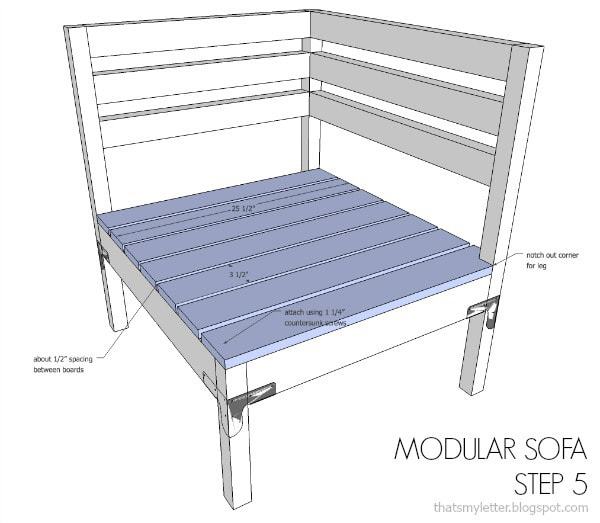
Step 5: Attach seat cushion slats using 1 ¼”
countersunk screws. Notch out corner of
first slat using a jigsaw.
countersunk screws. Notch out corner of
first slat using a jigsaw.
Cut List:
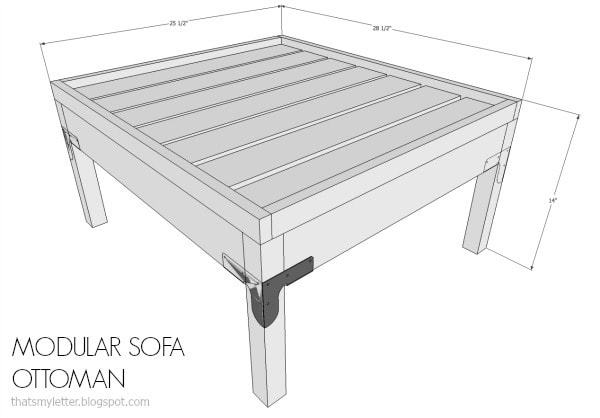
OTTOMAN:
- 4 – 2×2 @ 12 ½” (legs)
- 2 – 2×4 @ 22 1/2” (front & back apron)
- 2 – 2×4 @ 25 1/2” (side aprons)
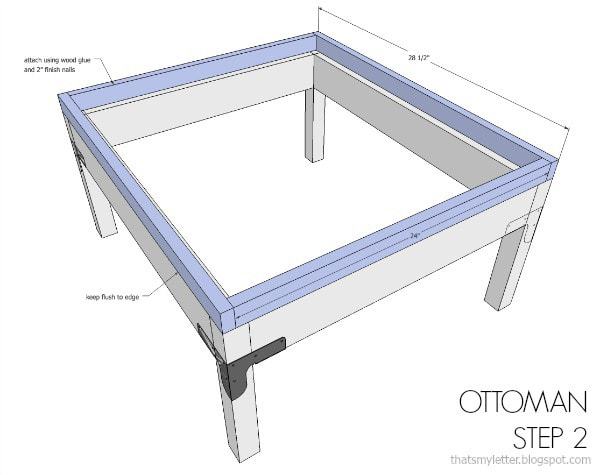
- 2 – 1×2 @ 28 1/2” (apron)
- 2 – 1×2 @ 24” (apron)
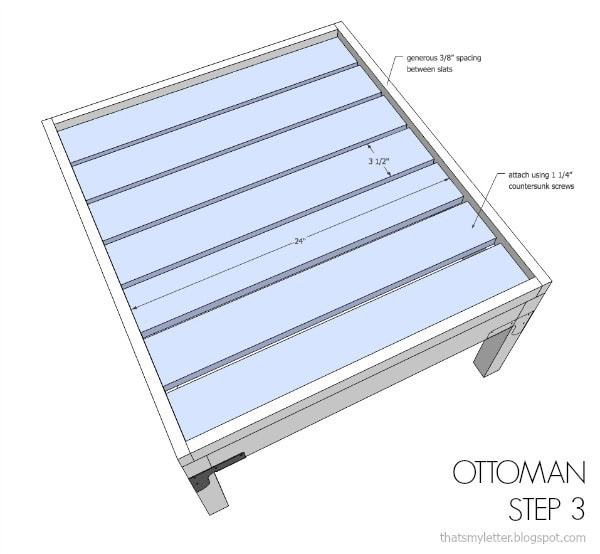
- 7 – 1×4 @ 24” (slats)
Step 2: Attach trim to base frame using wood glue and
2” finish nails.
2” finish nails.
Step 3: Attach cushion slats to frame using 1 ¼”
countersunk screws.
countersunk screws.
Disclaimer: I have partnered
with Simpson Strong-Tie® to bring you this post. I have received
compensation and/or product in exchange for this project post however all
thoughts and opinions are my own.
with Simpson Strong-Tie® to bring you this post. I have received
compensation and/or product in exchange for this project post however all
thoughts and opinions are my own.
SHOP THIS PROJECT:
I’m linking up to:

This is fabulous!!!!!! I can't wait to build it. So if I want rouse it outside I would just have to make sure it is sealed really well, correct? Can you recommend a good sealer? Thanks again. I really appreciate all your hard work to supply us with the plans. Sandy C.
What an awesome project! Like Sandy, I would love to place a set or two outdoors. Saving it for when I get those places ready!
This is an amazing project! I would love to make some of these out of treated wood for outdoors! Would you be willing to share this at our link party? You have some great projects on your blog! It's beautiful!
http://www.thestonybrookhouse.com/2016/04/dishing-it-digging-it-link-party-90.html