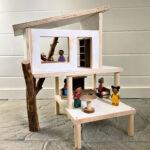
A folding doll trunk for all the doll lovers who need a place to store their doll and all her things. Today, as part of the Handbuilt Holiday series with Ana White, we are bringing you free plans for this folding doll trunk:

We are in Week 5 of this 12 week series and it just keeps getting better! Be sure to see all the previous weeks gift build projects here (and the last three years too!).

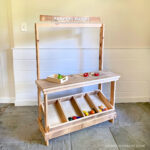
So far this year we have shared free plans for the pretend play market, toddler size scooter, moon doll bassinet and crib mattress sectional:

And now we are adding this diy folding doll trunk:

It’s a fairly simple build making three boxes and adding a few small details. Ana designed the plans using 1/4″ thick walls (and I highly suggest using poplar hobby boards) which keeps the trunk lightweight and portable. The completed folding doll trunk weighs about 12 pounds.

I added a 7″ circular mirror from the craft store because everyone needs a place to do their hair!


If I had to build this trunk again I might install the hanging rod just a tad higher. It sits 3″ from the top right now and could be 2″, see below for more details on how I made the hanging rack.

The bed is a scrap piece of 3/4″ plywood with dowel legs. Honestly I just used what I had on hand so any size chunky dowel would work. The bed is painted Deco Art Americana Decor wildflower pink.

And bonus the bed fits into the folding doll trunk along with the doll and all her things!

Obviously there’s plenty of space to add her bedding in the same slot with the bed however for visual purposes I wanted you to see just how the bed fits.

The hardware is key to making this folding doll trunk operational. I used the absolute smallest hinges I could find with the shortest screws. Your screw needs to be 1/4″ long or less, I had to clip off just the tip of my screws so they wouldn’t poke through.
For the top you’ll need two latches to keep the side pieces in place while carrying. I opted for these easy hook and staple latches. And then a handle in the middle.

For the complete plans including step by step instructions and cut lists please visit Ana’s site here.

To add the center divider panel you need to create a well in the top and bottom boards. I do not have a table saw so I rigged up a guide and set my tiny circular saw at 1/4″ depth then made multiple passes moving the board over ever so slightly with each pass.

For the hanging rod I used 2 – 1″ square dowel pieces cut at 3/4″ thick and a 1/4″ round dowel. Using a spade bit predrill a hole for the dowel and insert with wood glue. Attach one side to the center divider then secure with a 1 1/4″ finish nail through the outside. Repeat with the other side attaching to the plywood side and securing with a nail from the outside.

The bed is a 3/4″ piece of scrap plywood cut at 8″ x 19″. The legs are from a 1 5/8″ dowel cut at 4″ long. Predrill a 1/2″ deep hole for each leg at the corner then secure using wood glue and a countersunk 2″ screw from the top.
The entire folding doll trunk is spray painted in heirloom white.

I hope you enjoyed this gift build plan. Please stay tuned in every Friday through Christmas when Ana and I share a new Handbuilt Holiday gift plan.


this is wonderful! simple buy perfect, I wish my daughter still played with dolls so that I could make her one. May be I would add a simple bench for the vanity…the bed is a great addition. Love your work as usual!
If I were to make this for a taller doll (22 inch) which pieces would I need to add length to to make it taller without making it wider?
Hi Stefanina, all the vertical pieces.