This post about a DIY advent calendar is sponsored by Build Something. The thrill and excitement of the holidays is right around the corner. Let’s embrace the holiday spirit and make a Christmas countdown or advent calendar for the whole family to enjoy.

A DIY tutorial to make an advent calendar using pocket holes. Amp up the holiday anticipation with this vertical advent calendar using wood and a Kreg jig.
Did you know the Kreg pocket hole jig is good for not just pocket hole construction? The pocket hole jig makes the perfect angled hole for a 5/16″ dowel to rest down inside. I think this idea came to me in a dream. I thought why don’t I make multiple pocket holes in a row and then attach a star shape to a dowel and use that as my counter to mark the days? Well, I made that dream come to life with this advent calendar and I must say it’s even better than I imagined.

Pocket Hole Advent Calendar:
- vertical footprint (doesn’t take up any wall space)
- solid stable base
- perfect for kids of all ages (and adults too ;))
This advent calendar is fairly tall at just over 66″ high. I love the contrast of the height with the 2×2 post. And then you clearly see the star shape and know exactly how many days until Christmas! I’ve made a few advent calendars in my time but this is by far my favorite version.

For the daily counter I choose a star shape mostly because it’s got bulk to it. But you could use any holiday shape as long as there’s a spot to insert and secure the 5/16″ dowel.
Advent Calendar Counter Shape Ideas:
- Christmas tree
- big bulb (like those old fashioned tree lights)
- Santa hat
- elf hat
- candy cane


Look at those beautiful pocket holes all lined up! They were made possible by the Kreg 320 pocket hole jig. It’s the perfect jig for versatile situations whether you want one pocket hole or two. The Kreg 320 comes in it’s own storage container with all the parts you need to get started making pocket holes. The only additional item you may want is a Kreg face clamp to ensure the jig stays precisely where you want it. The clamp is a necessity on a project like this advent calendar where the pocket holes are visible and integral to the functionality.


I teamed up with my friends at Build Something to bring you plans for this advent calendar project. Build Something is a great source for free step-by-step project plans with tons of DIY building projects. Check out their large library of certified plans and plans submitted by woodworkers and hobbyists. Definitely worth a visit if you’re looking for free plans in a wide variety of categories. And as always please read through the plans completely before beginning and follow all safety guidelines.
Advent Calendar Construction Tips:
- follow plans at Build Something here
- mark center line of 2×2 post with pencil
- only use top portion of jig (remove bottom portion with thickness gauge stopper)
- must use Kreg face clamp to hold jig in position on board
- move collar on pocket hole drill bit as low as possible (just past 1 1/2″ mark) for a deep pocket hole

See in the above photo how I removed the right side portion of the jig for this advent calendar project. You do not need the piece on the right side, only the left side portion. Then be sure to use the face frame clamp with the clamp adaptor attached (which comes with the jig).

Making Pocket Holes:
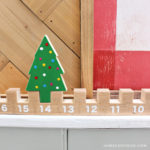
Start at the bottom of the 2×2 post and mark it at 2″ from the bottom. Then clamp the Kreg pocket hole jig onto the center of the board and drill the first pocket hole. Also be sure to set the collar on the drill bit as low as possible, which is a little bit past the 1 1/2″ marking. This will give you a deeper pocket hole and for this unconventional application we want a deep pocket hole to give more space for the dowel to rest.

For each successive pocket hole line up the jig precisely at the edge of the previous pocket hole. This will give you about 3/4″ spacing between pocket holes. And that’s also just enough space for you to paint the countdown numbers.

Advent Calendar Countdown Numbers:
I made stencils for the countdown numbers on my vinyl cutting machine but you could also use store bought vinyl numbers or hand paint them as well.


Be sure to stop over at Build Something for the complete step by step plans. I’ve included the star shape pattern over there as well as linked it here. Feel free to use my pattern or make your own holiday shape for the counter.


Thanks for joining me for this advent calendar project. Please leave any questions in the comments below and be sure to follow me on social media for sneak peeks, tools and project inspiration:
Instagram / Pinterest / Facebook / Youtube / Twitter
SHOP THIS PROJECT:


I love this! I think the only thing I would change is to have the number that corresponds with the hole under the hole rather than above, so you can still see it when you insert the star. I will definitely be making this soon!
Great idea Sarah, thanks for sharing.
Love it! I bet it would be cute if you made it shorter and put half of the numbers on the other side. I may have to try that! It’s such a great design!
Great idea Shannon! As long as the pocket holes are ‘in between’ each other so they don’t cross I think that would work great. Please share a pic if you do make it. Good luck!