• Home
  • Blog
  • About
  • Contact
    • Disclosure
    • Privacy Policy
  • SHOP
  • Widget area for main menu

    • Email
    • Facebook
    • Instagram
    • Pinterest
    • Twitter
    • YouTube
  • Skip to primary navigation
  • Skip to main content
  • Skip to primary sidebar

Jaime Costiglio

build - paint - sew

  • BUILD
    • BEDS
    • BENCHES
    • DESKS
    • DRESSERS
    • GAMES & TOYS
    • SCRAP WOOD
    • SHELVES
    • STORAGE
    • TABLES
  • TOOLS
  • PAINT
    • CRAFTS
    • FURNITURE
    • HOME DECOR
  • SEW
    • GIFTS
    • HOME DECOR
    • POUCHES
  • HANDBUILT HOLIDAY
    • 2021
    • 2019
    • 2018
    • 2017
    • 2016
    • 2015
    • 2014
    • 2013
  • GIFTS
    • BABIES
    • KIDS
    • FOR HER
    • FOR HIM
    • TEACHERS
    • WEDDINGS
  • SEASONAL
    • 4TH OF JULY
    • FALL
    • HALLOWEEN
    • CHRISTMAS
    • SUMMER
    • SPRING
    • ST. PATRICK’S DAY
    • THANKSGIVING
    • VALENTINE’S DAY
    • WINTER
  • SALTBOX PROJECT
    • BATHROOMS
    • DINING ROOM
    • EXTERIOR
    • FAMILY ROOM
    • FOYER / MUDROOM
    • KIDS BEDROOMS
    • KITCHEN
    • LIVING ROOM
    • MASTER BEDROOM
    • PLAYROOM
  • SCROLL SAW

DIY Bed Makeover

August 18, 2014

diy bed makeover
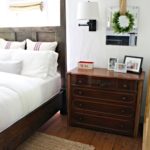
Completely transform the style of an existing headboard and footboard with a few pieces of wood, new feet and paint, it’s that easy.  This bed went from dated and faded to cute and farmhouse with very little effort.
headboard and footboard before
My friend had this dated, solid wood headboard and footboard (and siderails too).  The style and details left much to be desired and it sat VERY close to the ground.
footboard after

I simply wrapped the existing pieces with beadboard trimmed out with a few pine boards and added turned feet to create a farmhouse style bed.
bed makeover collage
The new feet give the bed almost 10″ of clearance which is perfect and much more desirable.
The costs here are minimal:
 – 4 tulip feet: $24
– 1/2 sheet of beadboard: $20
– 1 – 1x5x8: $6
– 4 – 1x3x8: $16
– paint & primer
Total cost $66
beadboard headboard makeover
 How to makeover an existing headboard and footboard:
original retro headboard and footboard
Step 1: Find a solid wood headboard and footboard.
sketch to transform headboard
Step 2: Sketch the plans.  Draw the existing headboard (in black marker) then make the additions in pencil to see the difference.

attach beadboard to headboard
Step 3: Using construction adhesive cut beadboard to fit and adhere with clamps to front of headboard.

remove existing feet
Step 4: For the footboard only, remove the existing feet.
rebuild of headboard and footboard
Step 5: Add 1×3 to edges and create front moulding (top, bottom & sides) then use a 1×5 for finished top.  Predrill holes for new tulip feet, glue and screw into place.  Putty and sand.
spray primer on natural wood
Step 6: Prime.  Sand.

spray paint bed pieces
Step 7: Paint (footboard on right has one coat).  I used Rustoleum Heirloom White in satin finish, two coats, sand in between coats.
rebuilt bed complete

You may also like...

  • DIY Vintage Quilt MakeoverDIY Vintage Quilt Makeover
  • DIY Plywood ProjectsDIY Plywood Projects
  • DIY Sliding Barn Door Hardware for $60DIY Sliding Barn Door Hardware for $60
  • Master Bedroom MakeoverMaster Bedroom Makeover
Share this post:

Filed Under: BEDS, BUILD, DIY, FURNITURE, FURNITURE, PAINT4 Comments

Reader Interactions

Comments

  1. Jen Woodhouse says

    August 18, 2014 at 3:08 PM

    This looks great, Jaime! How sturdy are the feet? I haven't had much luck in the past, whenever I attach feet to posts, they seem like they'll just break right off.

    Reply
  2. Steph @ Three Loud Kids! says

    August 18, 2014 at 5:09 PM

    It turned out gorgeous! I never would have guessed that was the same bed!

    Reply
  3. At Rivercrest Cottage says

    August 25, 2014 at 1:06 AM

    love the "new" bed. totally great makeover.

    Reply
  4. Beverley kerekes says

    May 6, 2019 at 7:00 AM

    How could you turn a bed like this into a 4 poster bed so you can hang sheer curtains from rails joining up the tops of the posts?

    Reply

Leave a Reply Cancel reply

Your email address will not be published. Required fields are marked *

Primary Sidebar

Hi! I’m Jaime

Jaime Costiglio

Hello!

Thank you for stopping by.
Join me for lots of DIY.

Read more

Get new posts via email

Handbuilt Holiday: Gift Project Plans

handbuilt holiday gift project plans

Collection of DIY gift project plans to build.

The Home Depot Tool Prospective

THD Prospective

Tools to consider for the DIYer.

Archives

The Home Depot Logo
Copyright © 2026 Jaime Costiglio · Custom site by Moonsteam Design

Privacy Policy