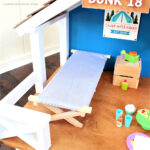
Build a diy doll pram.

Happy Halloween friends! Ana and I are back to share another handmade holiday gift build that any little person is sure to love – a doll pram.


Ana designed this little push pram perfectly. The plans feature a fairly simple build that is sure to see lots of playtime.

Fill it with their favorite baby doll (above is a Bitty Baby but the 18″ dolls fit too).
It’s spacious and roomy without being cumbersome, a 2 year could handle this pram no problem.


I’m in love with the simple lines and boxy look.
Bonus! I built this pram out of wood scraps and only purchased the $1 wheels at the craft store.


The mattress is a piece of 1 1/2″ foam wrapped in batting. I made an envelope style fabric covering that can be removed for washing.


How to build a doll pram:

Step 1: Cut main body pieces and make pocket holes using your Kreg jig.

Step 2: Assemble body using pocket holes.

Step 3: Sketch and cut out side pieces. Clamp 2 sides together and sand edges to be sure they are identical.

Step 4: Attach sides to main body using pocket holes.

Above view of underside.

Step 5: Add handle supports and handle. Putty and sand smooth then paint as desired.

Cut 1 1/2″ foam mattress to fit bottom.

Wrap mattress in batting and tack closed. Then make envelope style fabric covering to fit.

Sand and paint wheels.

Wheel hardware:
Each wheel requires the above hardware in the order pictured. Be sure to use the correct hex bolt that is smooth at the neck, this allows the wheel to spin freely.

Mark the center of each wheel and drill a hole to match the 3/8″ bolt.

Mark the corners of the pram body and drill 3/8″ holes.

Thank you to Ana as usual for designing these beautiful (and free!) plans. You can build gifts for all your friends and family, check out the handmade holiday page for more diy gift ideas from this year and last year too.

This is positively adorable!
I have 2 granddaughters who would love this. Where did you purchase the wheels?
That is adorable! I wish I lived closer to my nieces!
Wow! This is such a cute project! Any little one would love to have one of these. We would love for you to come and link up with us Your Designs This Time, Mondays 8:00 EST.
Hope to see you there!
Emily & Erin
Thanks for the great plans! The plan didn't have measurements for the wheel holes; I used an inch and a 16th from the bottom and sides based on scaling up where the holes were in the drawing (I don't see a functional reason a different spacing wouldn't work). The pocket hole technique was interesting but the angled screw has a tendency to pull the piece up and my base was pulled slightly off level. The wheels can be cut from the same wood as the base using a band saw. An example is here: http://www.familyhandyman.com/woodworking/woodworking-techniques-to-cut-circles-with-a-band-saw/view-all
Help! I'm making this project for Christmas and can't find anywhere to purchase the wheels!
I found these wheels at Michaels in the precut wood parts area.
Where did you find the wheels?
I found these wheels at Michaels in the precut wood parts area.
Step 4: Attach sides to main body using pocket holes.
I dont see where you made pocket holes to attache the main to the sides
can you please show and explain how you attached the sides to the main.
also what type of wood did you use for the sides?
Hi Jason, In Step 4 there are pocket holes in the main body pieces (back & front) on the exterior, sorry I don’t have a photo. Alternatively you can just glue and attach using finish nails. The wood for the sides is 1/2″ birch plywood. Good luck!
Im sorry I dont understand, I see how the back and front where attached to the main body by pocketholes but I don’t see how the sides were attached to the main body. Thanks!!
I’m building this now, my plan is to use a hole saw for wheels, I had bought a 6″ hole saw for making cornhole board game, so I’ll see how a 6″ wheel works
Great idea Jon, I actually think the bigger wheels will be more fun (and add stability). Thanks for sharing.