Wire baskets made from hardware cloth.

I must admit I got my inspiration from Charlie at Attempting Aloha.
Once I saw her baskets I knew I needed some too.
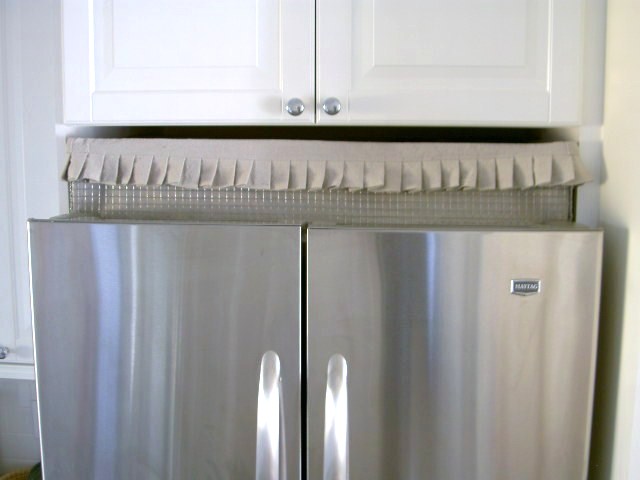
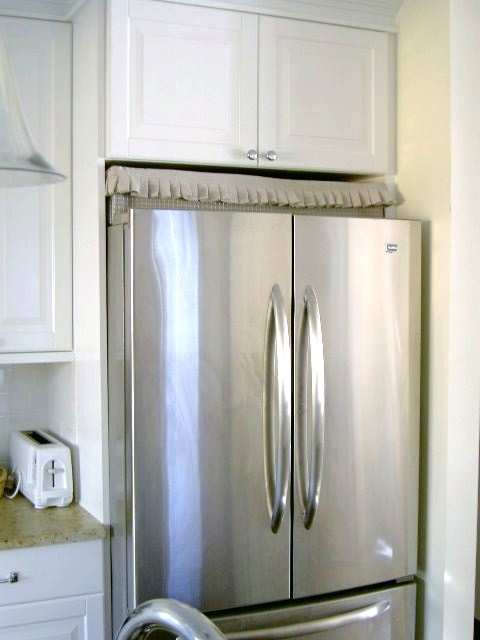
We saved thousands by installing Ikea kitchen cabinets but we did have this minor eyesore:
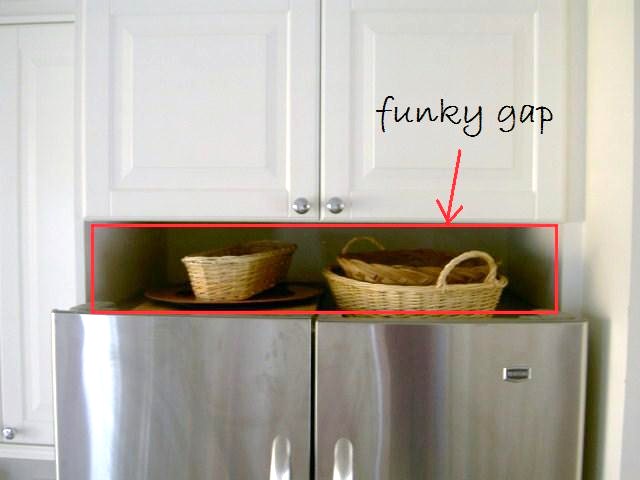
Which is actually a good place for bread baskets and larger platters but also a perfect spot for a wire basket with a cute pleated liner (to hide all the baskets and platters!):


Side by side:


The basket is deceivingly big (35″w x 18″d x 6″h) so it can hold a lot.


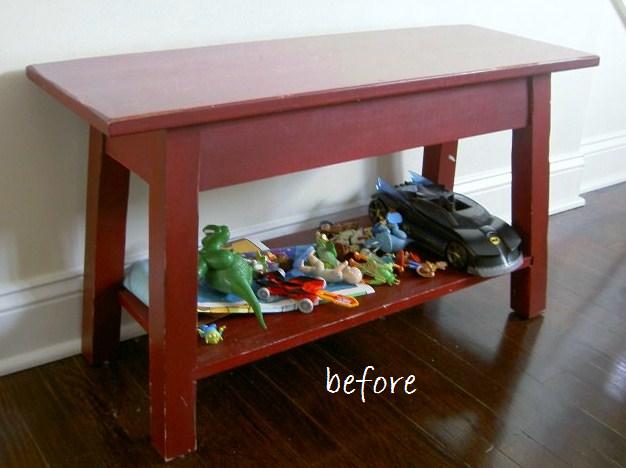
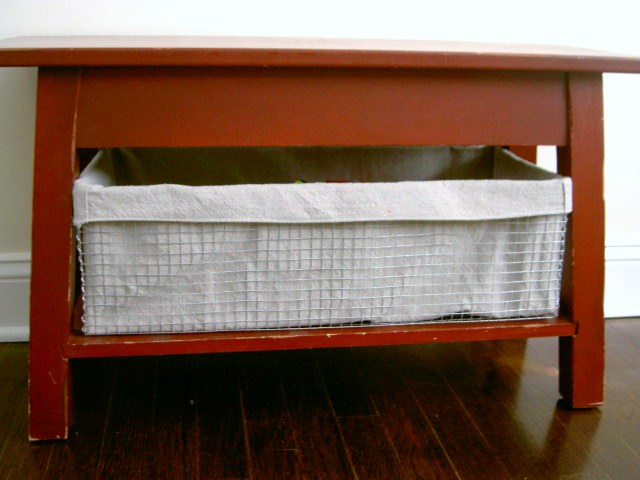
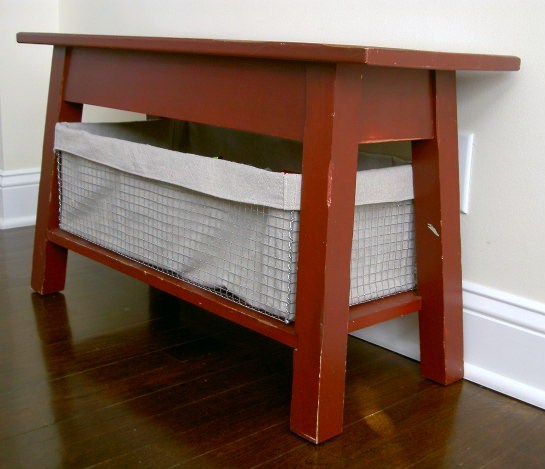
I also made a basket for under this bench.
I was tired of looking at boy toys piled on the shelf:
So I made a wire basket to fit the space:

No more visible toys and Buddy boy was so excited he decided to fill up the basket:
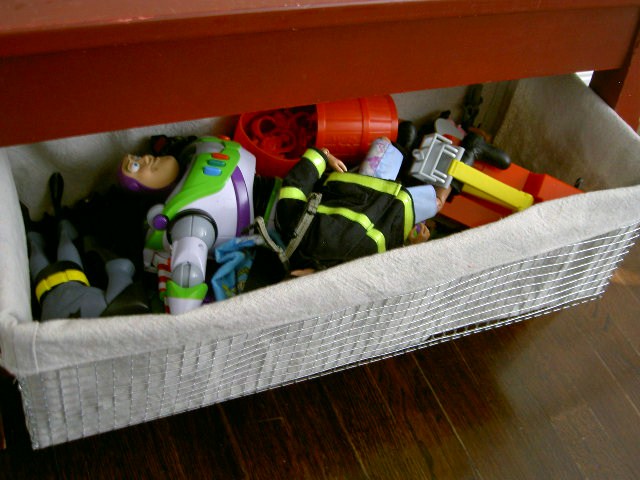
And now they’re hiding from plain view:
Here’s how I made the baskets:
Following Charlie’s tutorial above, cut out the hardware cloth as per your dimensions:
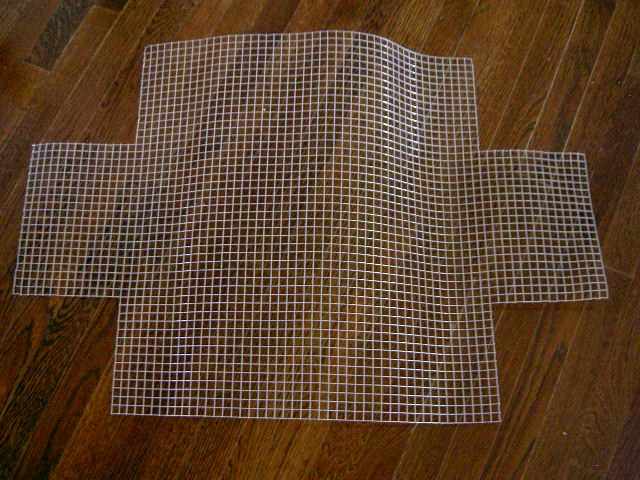
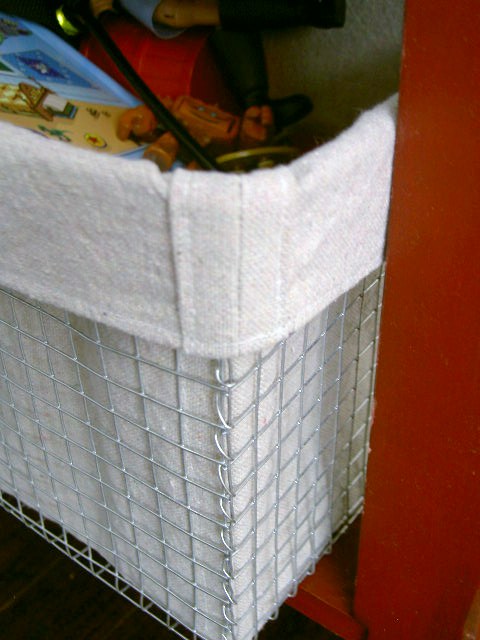
Fold up the sides and start ‘sewing’ the seams. My hardware cloth actually came wrapped in a long piece of wire that was the perfect gauge so I didn’t even bother looking for other wire.
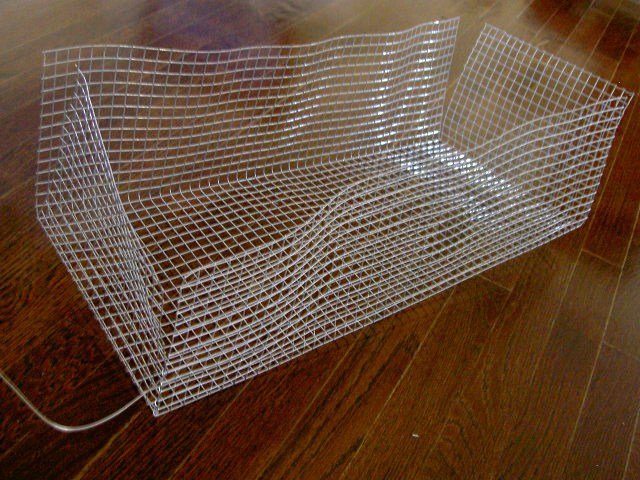
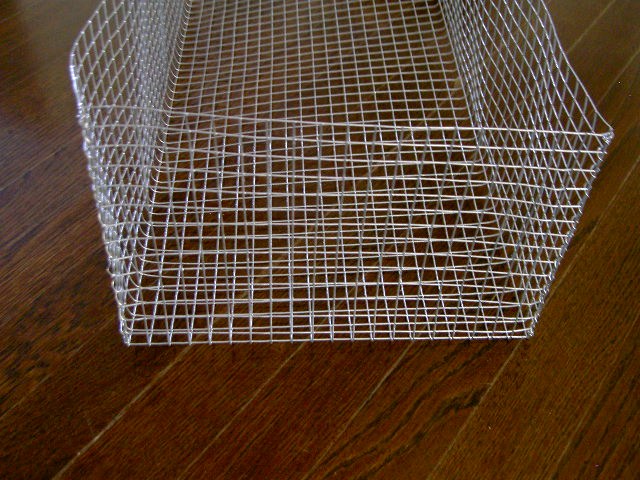
All four sides sewn:
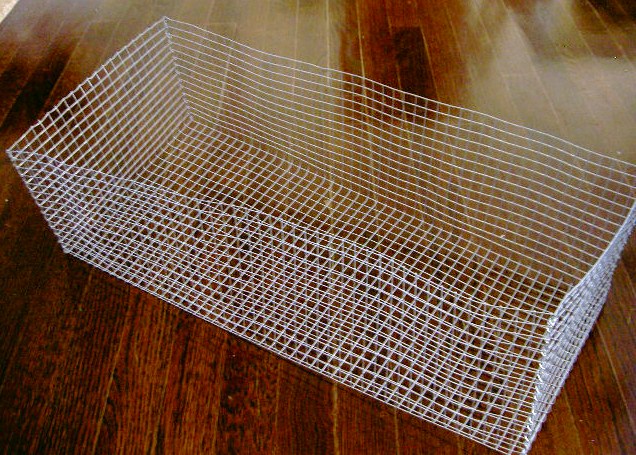
From the end, it looks distorted but it’s actually very square:
Here’s how I made the drop cloth liner:
Cut a piece of fabric similar to the flat hardware cloth used in the beginning, leaving excess to fold over the edge.
Mark your four corners and miter the edges.
Trim off the excess, leaving 3/4″ seam and press seams open.
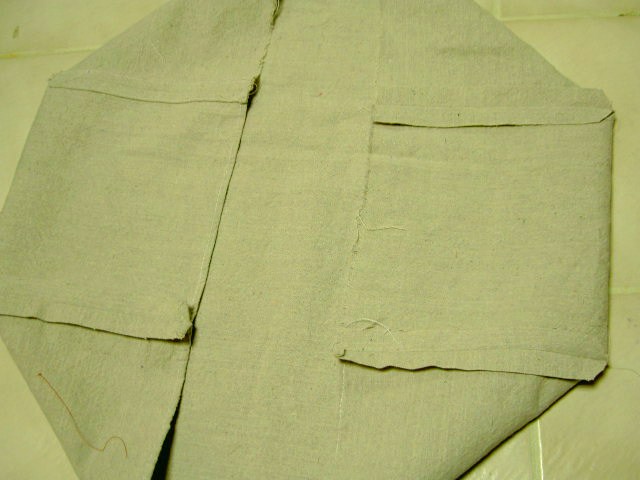
In order to get a finished looking seam on both sides (inside the basket and the folded over piece) fold under 1/4″ of the seam allowance on each side of seam and straight stitch:
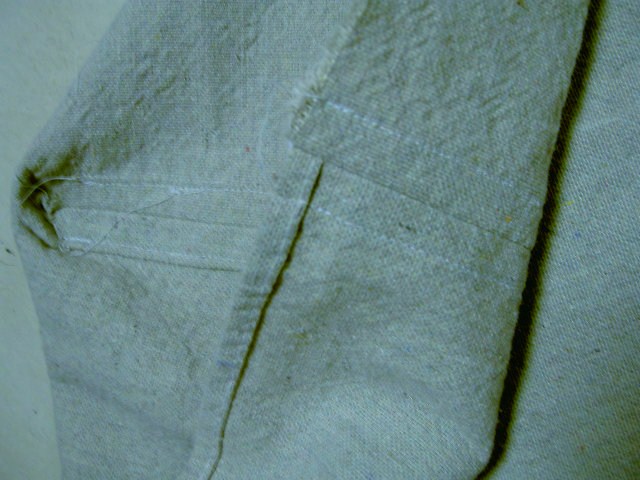
Fit liner and decide how much over hang on the exterior and hem.
(Add your pleats now if you desire.)
Once liner is inserted into the basket you will have a finished seam in the corners on outside and inside.
Works swell.
If you haven’t had enough there’s a wire basket loving decor post over at houzz.com here.


Easy, affordable and made to fit wire baskets – plus I have lots of leftover hardware cloth to make more!
I’m linking up to:


what a great idea! love <#! xoxo's nancy
Love this idea. Thanks for sharing!
I have a spot like that above my refrigerator too! Right now it is collecting mail – I think I might just need to make a basket!
Wow! These are so cool! I never would have thought of making my own wire baskets and the liners just put the cute-ness over the top!
I love these baskets, especially your over the fridge version. I have scheduled a feature of it for tomorrow morning at Extreme Personal Measures.
Denise
Extreme Personal Measures
Okay, that's cool! I'm impressed!
Very cool and I love the liners too. Gotta go see more of your stuff.
tammy
Great idea and a fabulous look. The liner really makes is amazing! Well done.
Thanks for the credit and for linking. 🙂
Love your over-the-fridge version!
Aloha,
Charlie
I am so trying this..I have that same funky gap!!
You are so clever – just whip up a cute basket when you need it. The perfect solution.
These are awesome! Thank you for sharing such a great idea – hum, I can think of a million places to put them…
Chelsea
I have a wire basket fetish! These are too cool! I like how you can design them to fit your space! Great idea!
🙂 ~M
Oh how fun! I can see how this could become addictive!
Very very clever idea! Love the way they look – and what they can hide! 🙂 Happy MM!
xoxo laurie
I love your project, your kitchen looks beautiful by the way! Thanks for sharing
Sherry
so smart! custom baskets…thanks for a great idea and tutorial!
Fabulous idea..love it when we can hide our stuff!!!
This is so cool. I've been looking for some flat, square baskets for my laundry room and it never occurred to me that I could make them. Thanks to you and Attempting Aloha!!
I LOVE YOUR BASKETS!!!! What a great metamorphosis! Well done.
I am having a hilarious Linky party with prizes this Wednesday. Details are on my blog today.
I hope you'll join in on the fun.
These are awe-some! I'm definitely going to make some!
What a great idea! Thank you so much for sharing. Goint to make some of these. Newest follower.
You are crazy talented girl!!!!
Love this!
XO
Kristin
Wow! Works very well! I could use some of these in my closet. Heh. I love how you can make them custom to fit any space! Great idea!
that is a gorgeous idea!!!!!!!!!!!!
lovely photos!
take care,
Rosa
Fantastic idea & l adore how simple you made this look to me….wonder if i will get adventureous enough to try? xoox
Tracie
Wow, how great are these!? As I started reading the post I thought I love these charming liners you made and I was immediately thinking I was going to write and ask where you purchased the actual basket. Then, oh my! You made the baskets too! Great tutorial and one I am actually going to have a go at. It would be great also for the top of our fridge to hide the cake and tart pans we seem to always stack up there. Love it!
I am officially in LOVE! I will be making these for ALL over my house! Thanks for the inspiration and tutorial!!!
This is oh, so clever! I think I need one too. I will definitely be bookmarking for the future.
What and EXCELLENT idea! And they turned out so beautiful! I have a few awkward spaces I could use something like this. I would be delighted if you could link this up to my VIP party tomorrow. http://www.designergarden.blogspot.com
Sommer
that is a brilliant idea! i love these baskets and liners…i think i just found my next project…i would love for you to link this to my fridays unfolded party tomorrow…now a follower too.
blessings,
alison
stuff and nonsense
Wow! How resourceful! Love it.
http://missmatchedandmarvelous.blogspot.com
Hi Jaima: these are great baskets. made one last year to put washed and reused water bottles in for the back of my kitchen cabinet. could have been a little taller, but was easy and to air dry the bottles is perfect. i also used the wire cloth to "fence" in my beads that are atop a work cabinet. now they are not accidentally pushed off the cabinet as we pass by. really like the lining you made for it. wonderful job…great minds think alike. sidney
i want some of these baskets!!!
Oh my – these are so darn cute…and useful. Just me style. Love it!
Holly
504 Main
those are beautiful! the liners are fabulous for hiding things that might be unsightly and i love the pleated ruffle you added!
Exactly the idea I've been looking for my baker's rack! I've been looking for (dirt) cheap baskets and have not been able to find quality ones in all the same size. Now I can make them whatever size I want! Brilliant!
-Paulette
great idea. And to line the baskets go to home depot/lowes and buy a fabric painters drop cloth. It would make great liners to go with the wire look! Have fun!
What a great idea – I am in love! I can think of so many places in my house for it. I really love how you used it in the shelf you built from Ana-White's plans too. Thanks for the inspiration.
New to your blog…. .love this wire basket with the liner. Are you going to make some to sell ?
Wow! the wire basket is such a cool idea… now I know how to make full use of all the gaps and small spaces in my house. Thanks a lot for sharing.. you change my life…haha! Your new follower from Penang, Malaysia. Love PC
Just love this project! I linked this post to my blog today.
Great idea! I definitely have to try this! Marcia
I love this idea!!! What a great way to get lovely wire baskets for less!! Thanks for sharing.
Catherine
{Stone and Rose}
So clever. I love metal baskets. Thanks for sharing!
Love them! I need about 50, they look great!
I found this post on Pinterest and loved it so I used in it my top 5. Hope you don't mind. You can see it here Top 5: wire baskets
Have a great day!