Life is crazy amazing and you just never know what’s coming next. Four years ago I did my very first collaboration project with The Home Depot, looking back I’m surprised they didn’t fire me for the awful photography! Since then I’ve been on the DIY Workshops team, the THD tool prospective group and done many one off projects – even one involving miniature tool ornaments for a holiday time lapse video. I’m still pinching myself and so honored and thankful to work with the wonderful team of employees at The Home Depot and their partners.
![]()
Make a dimensional logo using the scroll saw. How I made The Home Depot logo trophies for Haven Conference using a scroll saw.

This most recent project was truly a dream come true. It combined my love for working with wood and being creative all while making something purposeful. I am a maker at heart so when Raven, Daniella and Nicole asked if I was interested in creating trophies for the Orange Tank Pitch Competition at the Haven Conference I immediately responded YES. See these beautiful ladies in the photo above, they are part of the social team at The Home Depot, they make it all happen and I love them to pieces.
A little bit about the Orange Tank, if you are attending the Haven Conference (a conference for DIY bloggers) you can submit a project proposal to The Home Depot. The submissions are typical home renovations and nominees must prepare a presentation to persuade the judges to select their project.
![]()
The 12 finalists present their projects and the judges vote on three winners who will then go on to work with The Home Depot to make their project come to life. I could not agree more with the judges final choices. They selected Saneth from Little Creek Living, Kourtni from House on Longwood Lane and Amie from Meme Hill Studio. Definitely stop by their blogs and be sure to follow them on Instagram here, here and here as they share and make their projects come to life.

These lovely winners were presented with the trophies I had created so I thought I’d share how I made them. They are a DIY project using materials and supplies sourced from The Home Depot.
![]()
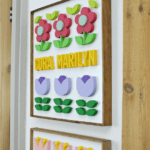
I opted to incorporate the logo by making it dimensional, the letters are cut on the scroll saw from 1/2″ MDF painted white and then glued to a pine background. The base is 1 1/2″ fir cut into an oval shape with steel rods and metal spacers to hold the logo upright.
![]()
One design aspect I made sure to include is portability. Most attendees at the Haven Conference travel and I wanted the trophy to come apart and lay flat for easy packing. The steel rods are 6″ long and protrude 1″ to slide down into the base. The metal spacers are glued to the bottom of the logo piece and provide a nice break between the base and logo.
![]()
All of the pieces fit inside a branded storage bag. I made the bags using the logo from The Home Depot canvas work apron and drop cloth canvas with a simple drawstring closure. I wanted to provide a complete package for the trophy to travel well and be safe but still use materials found at The Home Depot.
![]()
My favorite part by far is the teeny tiny trademark circle with capital R inside. I’ve never, ever cut something so small on the scroll saw and I was up for the challenge. It did take a few tries to get it right but I succeeded and it was well worth the effort. Plus now I know just how small I can cut!

Below are the steps to create a scroll saw logo. Every project is different and this is a glimpse as to how I made these trophies. Be sure to follow me on Instagram for sneak peeks and behind the scenes glimpses and check out this quick video:
Supplies:
- scroll saw
- printed logo
- spray adhesive
- MDF or wood in desired thicknesses
- drill & drill bits
- sandpaper
- acrylic paints & paintbrush
- rapidfuse super glue
![]()
Step 1: Print out the logo to size. I used 6 1/4″ x 6 1/4″ in order to fit onto a 1×8 background. Attach the print out to 1/2″ MDF using spray adhesive then drill holes in order to access the interior bits with the scroll blade.

Step 2: Sand the rough edges and paint two coats white gloss acrylic paint. Typically you would want to spray paint but these pieces are teeny and the force of the spray would blow them all over the place even with a taped base.

Step 3: Cut the oval base from 1 1/2″ thick lumber. I also cut ovals from 3/4″ thinking I wanted to stack the base but it ended up being too thick so I opted to just use the 1 1/2″ piece.

Step 4: Paint the background color onto the 1×8. I used Behr HD Orange for obvious reasons. Create a template for the base as to where you want the holes for the steel rods then predrill each base and the bottom of the logo background piece.

Step 5: To get the lettering onto the base make a vinyl stencil. I used Cricut Strong Grip Transfer Tape to make the stencil, it works best on unfinished wood to create a super tight seal which makes very sharp edges once painted. I wouldn’t recommend using the strong grip transfer tape on a painted wood surface or other more delicate surfaces. Paint inside the stencil using black acrylic then peel off the stencil.

Step 6: Use the picker tool to get all the small pieces off the wood base.
![]()
Step 7: Time to assemble the logo. I used DAP rapid fuse to attach the white logo pieces onto the painted background. Once all the pieces are in place be sure to put some weight on top with heavy books while drying.

Step 8: Cut the 1/8″ steel rods to 6″ long. Apply E6000 to the rod and insert into the base of the logo then put the spacer on the rod.
SHOP THIS PROJECT:

![]()
* This post contains affiliate links.


Mic drop!!!
Thank Amy, you’re too nice! Such a fun project collaboration.
Jaime these are Fantastic! Could I get one made for my wife for her 30th year at the Home Depot?
Thank you Jeremy, yes I would be happy to mark the occasion. I received your email and will reply shortly.
Looking forward to your email and award for my wife. Thank You.